
Loading...
Loading...
Loading...
Loading...
Loading...
Loading...
Loading...
Loading...
Loading...
Loading...
Loading...
Loading...
Loading...
Loading...
Loading...
Loading...
Loading...
Loading...
Loading...
Loading...
Loading...
Loading...
Loading...
Loading...
Loading...
Loading...
Loading...
Loading...
Loading...
Loading...
Loading...
Loading...
Loading...
Loading...
Loading...
Loading...
Loading...
Loading...
Loading...
Loading...
Loading...
Loading...
Loading...
Loading...
Loading...
Loading...
Loading...
Loading...
Loading...
Loading...
Loading...
Loading...
Loading...
Loading...
Loading...
Loading...
Loading...
Loading...
Loading...
Loading...
Loading...
Loading...
Loading...
Loading...
Loading...
Loading...
Loading...
Loading...
Loading...
Loading...
Loading...
Loading...
Loading...
Loading...
Loading...
Loading...
Loading...
Loading...
Loading...
Loading...
Loading...
Loading...
Loading...
Loading...
Loading...
Loading...
Loading...
Loading...
Loading...
Loading...
Loading...
Loading...
Loading...
Loading...
Loading...
Loading...
This section is designed specifically for BalkanID Administrators, providing a comprehensive guide to setting up and configuring your tenant for optimal security and access management. You will learn how to:
Add Users: Integrate user data into your tenant to ensure accurate user profiles and streamlined identity management.
Manage User Roles: Assign appropriate roles to each user, understanding the capabilities and access levels associated with each role.
Integrate Applications: Connect, integrate and configure your applications with BalkanID to extract critical access and entitlement data.
: Establish clear ownership for resources/connections within each integrated application, facilitating efficient governance and review processes.
By following these steps, you'll establish a robust foundation for managing identities and access across your organization with BalkanID.
Embarking on the BalkanID journey begins with a seamless onboarding experience. This section is designed to guide new users through the essential initial steps, ensuring a smooth and secure setup of their account. From establishing fundamental access to preparing for uninterrupted workflow, these foundational configurations are crucial for maximising the value of BalkanID.
This section will walk through the initial steps after signing in to BalkanID. You'll learn about the different authentication methods which can be used to access the platform, how to configure authentication settings, and the various roles the administrator can assign to a user which determine their access level and capabilities within BalkanID. The following subsections are included:
BalkanID Onboarding : This part of the documentation walks new users through the essential steps to get started with BalkanID. It covers the process of signing in for the first time and configuring one's user account to ensure a smooth and secure experience. Understanding the available authentication methods and the roles assigned by an administrator are key to navigating and utilizing BalkanID effectively.
: Streamlining the login process is vital for efficient operations. This section provides comprehensive instructions on how to configure Single Sign-On (SSO) for a user's account. Enabling SSO allows for convenient and secure access to BalkanID, leveraging existing organizational credentials and reducing login friction.
:
This section empowers users to tailor their BalkanID environment to suit individual needs and preferences. It covers settings that enhance daily interaction and ensure seamless workflow:
Theme Selection: Customize the visual theme of the application to match personal comfort or organizational branding.
Nominate Delegate: Delegate Responsibilities: Ensuring continuity of operations is paramount, especially when key personnel are unavailable. This feature allows a user to assign their responsibilities within the application to another designated user for a specific period, ensuring that all required actions and duties within BalkanID can be managed effectively, even in one's absence.
Welcome to the BalkanID documentation page. Here, you will find detailed information about BalkanID's capabilities, as well as release notes on the latest platform features.
BalkanID is an identity governance platform that provides the following capabilities:
Preemptive discovery, analysis and remediation of identity-related risks.
Correlation and visualization of IdP, SaaS, IaaS and on-prem application identities and related entitlements.
User access review (UAR) workflow and campaign management.
Application entitlement lifecycle management.
Notification Settings: Configure the types of notifications received at a user level, ensuring relevant alerts are delivered without overwhelming the user.
Signing into BalkanID:
There are two ways to sign into BalkanID depending on how your admin has configured the environment. They are :
Use your SSO provider to login (Okta, Microsoft, Ping etc.) for a seamless experience by using an existing Identity Provider (IdP).
Sign up using social providers (such as Google) or magic link on the BalkanID Application (if a social provider hasn't been set up on your tenant yet).
Role-based access
Once your account has been verified, your admin will assign a role to you in BalkanID. We have 3 primary roles used on our application which have been listed below. Depending on the role assigned to you, the following tabs will be visible:
Reviewers: A users with this role will be able to view the My tasks, Access Requests, Account and Help menus. Reviewers will be able to review Access requests and perform the tasks assigned to them by the other roles.
Risk managers: A user with this role will be able to view the Entities, Summary, Campaigns, Access Reviews and all other menus that a Reviewer has access too. Risk Managers will be able to discover application, people, connection and identity entitlements as a reviewer. They can view the various campaigns and perform access reviews as a part of this role. In addition they can perform all the tasks a Reviewer can perform as well.
For specific assignment of roles based on your business needs, please refer to the following help link: .
Administrators: A user with this role will be able to view the Settings and all the other menus that a Risk Manager has access too. Administrators will be able to control the settings. This includes adding user employee data, integrating applications, viewing all application entitlements in one place, manage rules and saved filters and finally configure system notifications.
At BalkanID, we understand that efficient management of responsibilities and personalized communication are key to maintaining productivity. The Account Preferences tab empowers users to tailor their experience, ensuring that tasks are managed seamlessly and information is received just how they like it.
The "Nominate Delegate" option enables you to assign a delegate who will automatically receive any new reviews created via campaigns or access requests. This ensures that even in your absence, your reviews are promptly attended to, maintaining the flow of work without interruption. This feature is especially useful during periods of high workload or when you are away from the office.
At BalkanID, we understand that efficient management of responsibilities is key to maintaining productivity. To help streamline your workflow, we offer the "Nominate Delegate" feature within the Account Preferences tab. When you are unavailable, this feature allows you to delegate the management of reviews created via campaigns or access requests to a designated person of your choice. Here’s how it works and how you can set it up.
The delegation works in two key scenarios:
New Reviews Created: Any new review generated through access requests or campaigns will automatically be assigned to your nominated delegate instead of coming to you.
Reassigned Reviews: If any review initially assigned to you is reassigned, it will directly go to your nominated delegate if you have activated this option.
To use, follow these simple steps:
Navigate to preferences: Click on the profile icon on the top right of the page > Preferences tab from the dropdown.
Select nominate delegate: Here, you can choose a delegate from a list of your colleagues.
Choose start and end date: Select a start and end date for the delegation. You have flexibility to:
Choose specific dates for the delegation period.
Select 'Start Now' for immediate activation (often a checkbox or default).
BalkanID allows individual users to personalize their notification settings, giving them control over how and when they receive important updates.
Account (Profile Icon) → Preferences dropdown
Opt-In/Opt-Out: Users have the flexibility to choose whether to receive any notifications from BalkanID.
Select Notification Types: Users can precisely pick which types of notifications they wish to receive. This allows for a tailored experience, ensuring that only relevant alerts are delivered while minimizing unnecessary noise. The available notification categories include:
Campaigns: Updates related to the lifecycle and status of access review campaigns.
Navigate to Preferences:
Go to Account → Preferences dropdown.
Set Notification Preferences:
Within this section, you can easily
This document explains the various ways to create an user-purpose access request.
User-purpose access requests are used to request access for an employee through a specific purposes.
There are currently 2 different ways to create a user-purpose access request.
The BalkanID CLI empowers you to take control of your identity and access governance directly from your terminal, offering a robust suite of tools designed to enhance efficiency and flexibility. We understand that managing complex access environments requires precision and adaptability, and our CLI is built to deliver just that. We offer the following services as a part of our CLI suite:
Gain unparalleled control over your BalkanID application with the BalkanID API CLI. This powerful tool allows you to directly interact with BalkanID's APIs using standard cURL commands. This direct access opens up a world of possibilities for advanced users and developers:
Automate Complex Workflows: Script intricate sequences of operations, from user provisioning and de-provisioning to policy enforcement and access reviews, all from your command line.
Custom Integrations: Seamlessly integrate BalkanID into your existing security ecosystem, leveraging the API to connect with other tools and platforms tailored to your unique requirements.
Enhanced Scripting Capabilities: Build custom scripts to generate reports, perform bulk updates, or manage specific identity attributes with granular control.
Accelerate Operations: Drastically reduce manual effort and human error by automating repetitive tasks, freeing up your team to focus on higher-value initiatives.
The BalkanID API CLI provides the flexibility and power you need to truly customize your identity and access governance strategy.
The BalkanID Extractor CLI is designed to provide flexible and on-demand data synchronization from your connected applications. Imagine being able to pull critical identity and access data whenever you need it, directly into your environment for further analysis or integration. While the BalkanID API CLI offers robust control, the Extractor CLI focuses on making data retrieval effortless.
This capability will be enabled for users on demand, allowing us to tailor its deployment to specific customer needs and use cases. We're committed to providing the most effective tools for your data governance, and the Extractor CLI is poised to enhance your ability to gain insights from your connected systems.
Save your settings: After selecting your delegate, make sure to save your preferences to ensure that the changes take effect immediately.
Access Reviews: Alerts specific to individual access reviews assigned to the user or that require their attention.
Integrations: Status updates or issues related to integrated applications.
Access Provisioning: Confirmations or alerts about successful access provisioning actions.
Access De-provisioning: Confirmations or alerts about successful access de-provisioning actions.
Findings: Notifications related to security findings or anomalies detected by BalkanID.
Users can select which of these categories are essential for their role and choose to receive alerts only for those, subject to any restrictions imposed by the tenant administrator (especially if the "Allow user override" option is disabled at the tenant level).

While BalkanID offers robust integrations with your HRIS and Identity Providers for automated user data synchronization, there are scenarios where you might need to add individual users directly through the BalkanID application's user interface. This method is perfect for:
Quick Onboarding: Swiftly add a new user who needs immediate access or review.
Testing Purposes: Create test user accounts for internal validation or campaign testing.
Manual Adjustments: Add users who might not be present in your synced systems, or for temporary access scenarios.
This guide will walk you through the simple process of manually adding a user to your BalkanID tenant.
Follow these steps to directly add users within the BalkanID application:
From the BalkanID dashboard, locate the "Configure" section in the navigation menu.
Under "Configure," click on "Users." This page displays all existing user identities within your BalkanID tenant.
On the "Users" page, find and click the "Add User" button. This button is typically located in the top-right corner of the user table.
A form will appear, prompting you to enter the new user's information. This page is designed to capture all essential details for the user's profile within BalkanID.
Required Fields:
Email: This is a crucial and unique identifier for the user within BalkanID. It's used for notifications, linking to integrated applications, and primary identification.
Fullname: The complete name of the user.
Once you have finished entering the user's personal data, it's essential to assign appropriate roles to this user within BalkanID. User roles determine what permissions the user has within the BalkanID application itself (Administrator, Reviewer, Risk Manager).
By default, a "Reviewer" role is assigned to all users added. One or more roles can be assigned to each user based on the tasks required to be undertaken by them. To learn more about the different user roles and their corresponding permissions, please refer to our documentation.
After carefully reviewing all the entered details and assigned roles, click the "Save" button at the bottom of the page.
Upon successful saving, the new user will be immediately added to your BalkanID tenant. This user's profile will now be available across the platform for access reviews, assignment to campaigns, and inclusion in reporting. The user will also be able to login to the application and access this tenant with the role assigned.
Administrators in BalkanID can manage user accounts on the Users page. To start, log into BalkanID and navigate to the Users page as seen below. This page lists all employees at your company (typically fed via your direct HRIS Integration). To do this, refer to - Integrating Employee Data.
We support three roles with the following capabilities:
Reviewers: Users with this role can view the My Tasks, Access Requests, Profile, Preferences, and Help menus. Reviewers are primarily responsible for reviewing access reviews and requests, and performing tasks assigned to them by other roles.
Risk Managers: This role includes all the permissions of a Reviewer, plus access to the Entities, Summary, Campaigns, and Access Reviews menus. Risk Managers can discover application, people, connection, and identity entitlements, view various campaigns, and perform comprehensive access reviews.
Administrators: This is the highest level of access, encompassing all the menus and capabilities of a Risk Manager. Additionally, Administrators can access the Configure section, allowing them to control system-wide configurations. This includes adding employee data, integrating applications, managing rules and saved filters, and configuring system notifications.
To manage user roles, navigate to the Users page under the Configure section. There are two methods for editing user roles:
Locate the user you wish to edit in the table.
Navigate to the rightmost Actions column and click the Edit button (represented by a pencil icon).
The option to edit the user and their respective role will appear, allowing you to select one or more roles for that specific user, as shown below.
Select the users whose roles you want to edit by checking the box next to their names.
Click on the Actions dropdown menu and select "Bulk Edit Roles."
A sidebar will open, providing the option to edit the roles for all the selected users, as shown below.
BalkanID recommends creating a separate service account for the purposes of this integration, instead of using personal or employee named accounts.
Jira Personal Access Token
Jira Site name
Create a Jira token as described in the .
Instructions on creating a read-only user (the account from which you can create a Jira token for sharing) is also described in the .
Login to the BalkanID application and switch to the tenant you would like to add your integration to.
Head to Integrations > Add Integration, select Atlassian Jira.
Set up the Primary Application owner (mandatory) and the Description, if any. Set up Secondary Application Owner(s), if any.
Click on next to move onto Optional Configuration.
Fill Optional configuration, if required.
Once you filled in the information, click Save. Your integration is now configured and you will see the status of the integration displayed alongside other integrations on the Integrations page. When data is available, the integration Status will read Connected and the integration Message will read Data available.
Mapping SaaS application users to your employees is one of the primary functions supported in BalkanID. We are working hard to programmatically connect data but the BalkanID system still requires some human interaction for some applications.
Identity mapping is important to connect an application identity to an employee. This is an essential step will facilitate entitlement discovery and working with the BalkanID environment in general. The steps to map identities within the BalkanID environment are given below.
There are two ways to map identities to employees:
Through .CSV upload
Directly on the application
Go to the Integrations page under Configurations. Ensure that data has been fetched from applications.
Go to the Identities page under Entities. Here you will see a button, “Map Identities” which may have a number representing the count of unmapped identities in your tenant.
Click the Map Identities button to open a side view with further instructions.
Go to the Integrations page under Configurations. Ensure that data has been fetched from applications.
Go to the Identities page under Entities. Here you will see a button, “Map Identities” which may have a number representing the count of unmapped identities in your tenant.
Select the identities you would like to map. You will see the number of selected identities to map on the Map Identities button. Click on the Map Identities button.
In case of any errors, feel free to reach out to our team for further assistance.
Balkan ID supports in-app notifications, providing users with real-time updates directly within the application. This feature ensures timely communication and allows users to stay informed without the need to check their email inbox frequently.
Notification Feed: Users can access a dedicated panel within the app to view and manage their notifications.
Toast Notifications: When a notification occurs, a toast notification will pop up on the screen, providing relevant information.
The notification feed is divided into three tabs for better organization and management:
All: Displays all received notifications.
New: Shows only unread notifications.
Archive: Contains notifications that the user has archived for future reference.
Open Notification Panel:
Click on "Notifications" with the bell icon located in the top-right corner of the application in the navigation panel.
Navigate Through Tabs:
Use the tabs ("All", "New", "Archive") to browse and manage notifications according to their status.
Users can archive notifications from the "All" or "New" tabs. Archiving helps in decluttering the notification list while keeping important notifications accessible in the "Archive" tab.
To archive a notification, go to the "All" or "New" tab in the notification feed, and click the close (x) icon next to the notification you wish to archive.
For more detailed information or assistance, please contact BalkanID support ().
You can automatically create tickets in freshservice as part of the following cases:
Access Request has been approved
Access Review has been denied
This functionality allows you to automatically create tickets to provision/de-provision resources based on the corresponding access request/review. Let us explore the steps to configure this on your tenant:
Go to Freshservice > Admin > Channels > Email settings and mailboxes. You will be able to see the support email over there.
Note down your Freshservice email.
Go to Configure > Integrations on your BalkanID tenant.
Click on either Add Integration or Edit Integration for a particular integration.
Go to the Optional Configuration section.
You can test your setup by denying access reviews on your tenant. After the campaign has been marked as complete, an email will be sent out and a ticket will be created in Freshservice. It will resemble the one shown in the image given below:
BalkanID relies on specific HRIS data to effectively manage Identity Lifecycle and Governance activities. Essential data fields include names, emails, manager details, start and termination dates and department information. Uploading your employee data to BalkanID allows you to map accounts across your systems to employees for entitlement discovery, assigning access reviews and creating access requests. There are three ways to integrate your users to BalkanID -
Direct Integration to your HR system
Manual flat file (.CSV) upload
Bulk API upload
This article will briefly cover the process for all three. They are given below:
: Merge, our trusted integration partner, seamlessly connects your HRIS systems with BalkanID to ensure real-time accuracy of user data.
Adding users from the UI: BalkanID provides a straightforward way to add individual user accounts directly through the user interface. This method is ideal for quickly onboarding a single user, performing tests, or when a full HRIS/IDP sync isn't immediately available for a new hire.
: You can manually upload user data to integrate it into the BalkanID tenant.
BalkanID recommends creating a separate service account for the purposes of this integration, instead of using personal or employee named accounts.
Slack can be integrated to BalkanID directly from the UI via oauth. To configure Slack, you will need to be an administrator on the organization Slack account.
Login to the BalkanID application and switch to the tenant you would like to add your integration to.
Head to Integrations > Add Integration, select Slack.
Set up the Primary Application owner (mandatory) and the Description, if any. Set up Secondary Application Owner(s), if any.
BalkanID supports integrations to the following ticketing systems. If there is any other ticketing system that you would like us to support, feel free to reach out to the team!
Adobe Workfront
Aha
Asana
Azure DevOps
Basecamp
BugTracker
Bitbucket
ClickUp
Dixa
Freshcaller
Freshchat
Freshdesk
Front
Github
Gitlab
Gladly
Gorgias
HappyFox Service Desk
Heigh
Help Scout
Hive
Hubspot
Intercom
Ironclad
Kustomer
Linear
ManageEngine
PivotalTracker
Rally
Re:amaze
Salesforce Service Cloud
Shortcut
Spotdraft
Targetprocess
Teamwork
Trello
Wrike
Zoho Desk
Zoho Lens
BalkanID provides a user-friendly system for setting up and configuring multi-level review settings at the integration level. This advanced feature is designed to give you granular control over review processes within each integration, allowing for customized reviewer hierarchies and response requirements based on your organization's specific needs. By following a streamlined process, you can efficiently configure these settings, ensuring optimal compliance and oversight across your campaigns.
Go to Configure > Integrations on your BalkanID tenant.
Click on either Add Integration or Edit Integration for a particular integration
Go to the Optional Configuration section.
Specify the order of reviewer precedence among the options by dragging them around: First Line Manager, Business Owner, Risk Manager, and Application Owner.
Select the number of reviewers required from the dropdown menu.
To understand how reviewers interact with multi-level reviews, the progression of decisions, how to manage and interact with multi-level reviews once they're configured, please refer to the section for a detailed guide.
While the multi-level review settings configured at the integration level provide a default structure, it is important to note that these settings can be overridden at the campaign level. This flexibility allows campaign managers to tailor review processes more specifically for individual campaigns, accommodating unique requirements or exceptions. To override these settings during campaign setup, simply select the "Override Defaults" option and specify the desired settings for that particular campaign.
This document explains how to create an user-purpose access request via the slackbot.
Open the Slackbot and run the /purposes command. This will display a list of all purposes in the tenant.
To view the connections/resources the purpose provides access to, click on the three-dot menu and click on "Details". This opens up the purpose details dialog.
To request a purpose, click the "Request" button next to the relevant purpose.
Fill all the required fields on the form and click "Submit" to create a new purpose request.
After creation, the new user-purpose access request will be visible on the Access Requests page. The appropriate reviewer assigned to the request will receive a notification (via email, Slack, or in-app) prompting them to review the request.
Once the request is approved by the reviewer the request was assigned to, the purpose will be assigned to the employee.
To use assigned purposes, refer to .
This document explains how to filter constraints to easily locate specific ones from a list.
Navigate to the ‘Purposes & Constraints’ tab in the side navigation bar and open the 'Constraints' page. This page lists all the constraints that have been set up for your tenant.
Click on the Filters button at the top of the constraints table to open a side panel on the right. This panel contains various fields for filtering constraints.
Select values for the desired filter fields. The filters are automatically applied, and the constraints matching the selected criteria will appear in the results.
To learn more about filtering please refer
This document explains how to edit a constraint.
Navigate to the ‘Purposes & Constraints’ tab in the side navigation bar and open the 'Constraints' page. This page lists all the constraints that have been set up for your tenant.
To edit a constraint, scroll to the right of the constraints table and click on the 'Pencil (Edit)' icon next to the relevant constraint.
Update the desired fields and click Save to apply the changes.
To start a purpose assigned to a user, the user must utilize the Slackbot to initiate their assigned purpose. Follow these steps:
Open the Slackbot and run the /my-purposes command. This will display a list of all purposes assigned to the user.
To start a purpose, click the Start button next to the relevant purpose.
Once the day ends, the user can manually stop the purpose by clicking the Stop button.
When a purpose is started or stopped, the associated connections will be automatically provisioned and de-provisioned accordingly.
If the “Should auto-provision daily?” option was enabled during the creation of the purpose request, the purpose will automatically start and stop based on the specified time window provided during the request setup.
This section explains how to manage and customise notifications within the platform. It includes setting up notification preferences to ensure relevant alerts are received, configuring in-app notifications for real-time updates, and automating ticket creation in systems such as Jira to streamline issue tracking and resolution. We will cover the following topics in this section:
Notification Preferences: Setting up notification preferences for your BalkanID account on the tenant-level by administrators and on the user-level by each individual user.
In-app Notifications: Setting up notification streams to receive within the BalkanID application.
: Setting up automatic ticket creation systems on your environment to provision access to users when access requests are approved and de-provision access from users when access requests are approved or access reviews are denied.
Configure your tenant by integrating applications, SSO and fulfillment options.
This section provides a detailed guide to Application Integrations within BalkanID, a critical step in establishing comprehensive identity and access governance for your tenant. Here, you will learn how to connect your various applications to our platform, enabling the extraction of valuable identity and entitlement data.
We will cover:
Supported Integrations: A comprehensive list of the applications BalkanID natively supports for seamless integration and steps to integrate them.
Identity Mapping: How to effectively map extracted identities from these applications to your employee data, providing a clear understanding of who owns what access.
: Defining automated actions and workflows to be triggered based on the approval or denial of access requests and reviews, ensuring efficient and consistent access management.
: How to upload data manually for your custom applications and other data sources.
By leveraging these powerful integration capabilities, you can gain a unified view of access across your entire enterprise and automate critical governance processes.
This document explains how to edit a purpose.
Navigate to the ‘Purposes & Constraints’ tab in the side navigation bar to open the Purposes page. This page lists all the purposes that have been set up for your tenant.
To edit a purpose, scroll to the right of the purposes table and click on the 'Pencil (Edit)' icon next to the relevant purpose.
Update the desired fields and click Save to apply the changes.
The users assigned to a purpose can be viewed by clicking on the Users tab, located next to the Connections tab on the Edit Purposes page. This tab displays a list of assigned users along with additional details, such as the status, which indicates whether the users have started their purpose or if it has been stopped.
Users can also be removed or unassigned from the purpose by clicking on the Delete/Trash icon located to the right of the user in the table. To assign users to a purpose please refer to
This document explains how to delete a purpose.
Navigate to the ‘Purposes & Constraints’ tab in the side navigation bar to open the Purposes page. This page lists all the purposes that have been set up for your tenant.
To delete a purpose, scroll to the right of the purposes table and click on the 'Trash' icon next to the relevant purpose.
To confirm the deletion click on "Delete". Deleting a purpose will immediately de-provision the access granted to the users assigned to the purpose.
This document explains how to filter purposes to easily locate specific ones from a list.
Navigate to the ‘Purposes & Constraints’ tab in the side navigation bar to open the Purposes page. This page lists all the purposes that have been set up for your tenant.
Click on the Filters button at the top of the purposes table to open a side panel on the right. This panel contains various fields for filtering purposes.
Select values for the desired filter fields. The filters are automatically applied, and the purposes matching the selected criteria will appear in the results.
To learn more about filtering please refer
At BalkanID, flexibility and control in managing review processes are key aspects of our platform. The Multi-Level Review Settings feature allows you to customize review assignments and hierarchies during campaign creation, overriding the default settings set at the integration level. This guide provides detailed instructions on how to configure these settings for your campaigns.
Multi-Level Review Settings give you the ability to specify review hierarchies and requirements explicitly, ensuring that reviews are assigned according to organizational needs and specific risk management protocols.
Campaign creation includes a feature that allows you to select specific insights that are applied to the identities of reviewers whose evaluations require escalation for an additional level of review from their line manager. This feature is configured by selecting an insight in the Exclude reviewers with insights option.
For instance, if a user (employee) has an SoD insight associated with one of their identities and a campaign is created with the Exclude reviewers with insights option set to the SoD insight, then when a review is assigned to that user, both the reviewer's approval and their manager’s approval will be required. In effect, the review is automatically escalated to the reviewer's manager, necessitating two levels of review.
In scenarios where both the reviewer and their immediate manager have an SoD violation insight, the review will bypass the manager and be escalated directly to the manager’s manager. Despite this change in hierarchy, the review process still requires two levels of approval: one from the initial reviewer and one from the manager’s manager.
After successful completion of both review levels in the insight escalation process (i.e., once both approvers have provided their approval), the review will then proceed to the next reviewer in the defined precedence order based on the number of reviewers selected during campaign creation.
What is JITPBAC?
JITPBAC (Just-in-Time Purpose-Based Access Control) is a dynamic and purpose-driven access control framework designed to enhance security and operational efficiency by provisioning access to identities in Cloud, SaaS applications only when it is explicitly required and for a defined period of time. The model reduces the exposure of sensitive resources to potential threats, particularly when credentials are compromised, by adhering to the principle of least privilege.
Key Features of JITPBAC
Default Deny Policy (Zero Trust): Identities have no access by default. Access is provisioned only through assigned Purposes, ensuring strict access control.
Purpose-Centric Access: Access is organized under Purposes
In this article we will give an overview of the Resources page and how to utilize it for entitlement discovery. The Resources page provides a list of different resources available within an application. These resources are extracted from an application during the application integration stage.
To navigate to the Resources page, select the Resources page under the Entities section.
You can view all the resources across your application integrations within your tenant.
Risk Managers can download PDF reports for any active or completed campaigns that will reflect the state of the campaign. Generally, risk managers download such reports for completed campaigns to store audit proof of access reviews being completed. The reports will contain the campaign name, start & end dates, and review status of each identity, application & entitlement included in the access review campaign.
Follow the instructions below to define and setup JIT Purposes for your organization in BalkanID.
Navigate to the ‘Purposes & Constraints’ tab in the side navigation bar to open the Purposes page. This page lists all the purposes that have been set up for your tenant.
To create a new purpose, click on the ‘Create Purpose’ button at the top left of the page. This action will open a new page where you can enter the details for the purpose.
Fill in all the required fields related to the purpose, ensuring that the information provided is accurate and comprehensive. Filling out the optional fields is not mandatory; they are intended for organizing, grouping, and filtering purposes.
BalkanID supports access request management for multiple integrations. For a list of supported integrations, please check the integrations list. Our integrations broadly fall into IDP applications (Okta, Azure AD, etc to name a few), Cloud Service Providers (AWS, GCP, Azure, etc to name a few), Commercial SaaS applications (Salesforce, Github, Netsuite, etc to name a few). Typically, an unsupported integration can be supported immediately upon request within a few days. Note - For guidance on enabling provisioning and de-provisioning options, please refer to this article:
Access requests are broadly categorized into the following types
This document explains how to delete a constraint.
Navigate to the ‘Purposes & Constraints’ tab in the side navigation bar and open the 'Constraints' page. This page lists all the constraints that have been set up for your tenant.
To delete a constraint, scroll to the right of the constraints table and click on the 'Trash' icon next to the relevant constraint.
Understand the creation, assignment, and management of Purposes for secure access control.
In JITPBAC (Just-in-Time Purpose-Based Access Control), a Purpose is a core construct used to define and manage access permissions for identities within Cloud and SaaS applications. A Purpose acts as a structured grouping of access rights, aligning them with specific tasks, responsibilities, or roles within an organization.
This document explains how to create an user-purpose access request via the web app.
To create a new user-purpose access request, navigate to the "Access Requests" page. Click the three-dot menu in the top right corner, and from the dropdown menu, select "New Purpose Access Request".
Fill all the required fields on the form and click Next button at the bottom of the page to proceed to the next step. Multiple users can be selected to request purposes in bulk. The “Purpose Identical To” field allows for easy lookup of the desired purpose based on the information provided during purpose creation.
In the screenshot below, “Purpose Identical To” is set to “Team”, and the purposes under “Team 2” are listed for selection for the chosen users. Alternatively, the “Custom” option can be used to manually select the purposes to assign to the selected users.
Understand the creation and management of JITPBAC Constraints for secure access control.
In Just-in-Time Purpose-Based Access Control (JITPBAC), a Constraint specifies explicit rules or conditions that restrict access for identities within cloud and SaaS environments. A Constraint functions as the opposite of a Purpose. While a Purpose represents a defined set of employees and entities (such as connections and resources) that indicates which users are permitted to access or request access to those entities, a Constraint similarly involves a set of employees and entities, but explicitly prohibits access to the specified entities. In essence, a Constraint establishes a security policy that enforces denial of access, ensuring robust access control and data protection.
Creation: A Constraint is established by specifying the connections, resources, and employees for whom access should be denied for the specified entities.
Usage: Constraints are enforced whenever a user (included in the Constraint) attempts to request access to a Purpose that contains any restricted entities. The Constraint prevents those users from requesting or gaining access to any of the defined entities, even if only one of them is present within the Purpose being requested.
Updates: Administrators can modify Constraint parameters at any time to address evolving security risks or changing organizational requirements.
Relevant Links:
While only Email and Fullname are strictly required, it is highly recommended to populate other available fields as they significantly enhance BalkanID's capabilities for:
Access Reviews: Information like Manager Email allows for accurate assignment of access review campaigns to the correct managers.
Risk Analysis & Insights: Details such as Department, Job Title, Employee ID, and Location provide richer context for risk analysis, outlier detection, and reporting.
Filtering & Reporting: Comprehensive user data enables more granular filtering and insightful reporting across the platform.
Examples of other useful fields you might encounter:
Employment Type
Start Date
End Date
Manager
Job Title
Department


Set Reviewer Precedence and Number:


For more details on multi-level reviews, please refer to the following resource: Configuring multi-level review settings in campaigns.


Direct integration - Provide your Jira Personal Access Token and Jira Organization Site Name obtained above to set up a direct connection with BalkanID.
SCIM integration - Provide SCIM server credentials to set up a SCIM connection with BalkanID.
Manual file upload - Upload Entity and Entity Relations through a .CSV file upload. Contact the team for assistance with this.
Automated upload using API - You can upload data using our with the help of an API key which will be provided to you. Please refer to the and upload docs for specific instructions on uploading your data through the API.
Note: When setting up Jira Personal Access Token, format it as [email protected]:my-api-token, using the email associated with the token. In the JIRA Site Name field, enter the site name from Jira Admin Settings under Products.


Download the CSV file of unmapped identities.
Fill up the columns with information that will help the BalkanID system match these identities to employees (Employee email field is required).
Be sure to add the “IS” or “OWNS” relation to the row to ensure the identity is properly mapped. The IS relations refers to accounts that an employee logs into and uses. The OWNS relation is for mapping service accounts to the employee that is responsible for them.
Once you have updated the .csv file, upload the edited .CSV file in the same sidebar.
You will see a sidebar in the below image open up. You can map multiple identities to one employee at a time through the application. Under Identity Type, select if it is an employee identity or a service account belonging to an employee. You can then either select a user to map it to or you can directly map it to the application owner.
After mapping the identity, it will take 2-3 mins to map the identity. Once updated, you can see the user as a mapped identity in the application.
In Fulfillment options, choose ticket creation. It will open up a section below to select the ticketing system - Freshworks in this case. A text box will also appear to set the Email Address. Add the Freshservice Support Email address from your freshservice admin page. Then hit Save Changes on the side panel.
This is all the configuration you need to do on the tenant. Click on Save.


Direct integration - Obtain your Slack Access Token by clicking the Get Slack Access Token button and follow the OAuth steps to set up a direct connection with BalkanID.
SCIM integration - Provide SCIM server credentials to set up a SCIM connection with BalkanID.
Manual file upload - Upload Entity and Entity Relations through a .CSV file upload. Contact the team for assistance with this.
Automated upload using API - You can upload data using our with the help of an API key which will be provided to you. Please refer to the and upload docs for specific instructions on uploading your data through the API.
Click on next to move onto Optional Configuration.
Fill Optional configuration, if required.
Once you filled in the information, click Save. Your integration is now configured and you will see the status of the integration displayed alongside other integrations on the Integrations page. When data is available, the integration Status will read Connected and the integration Message will read Data available.


This functionality allows you to automatically create tickets to provision/de-provision resources based on the corresponding access request/review. Let us explore the steps to configure this on your tenant:
To enable email-based ticketing with ServiceNow, please ensure that your instance is configured to receive and process inbound emails. Follow the steps below:
Enable inbound email First, confirm that inbound email is enabled in your ServiceNow instance. To do this, navigate to: System Properties > Email Properties and make sure the “Email receiving enabled” option is turned on.
Verify email receiving setup Next, ensure that your instance can successfully receive emails. To do that, go to: System Diagnostics > Email Diagnostics and verify that Email receiving is operational. To be operational:
Inbound email configuration must be enabled (as per step 1).
Your instance must have a valid email account configured using the POP3 protocol.
By default, each ServiceNow instance includes its own POP3 mailbox in the format:
{instance_name}@service-now.com
You can find your instance name in your ServiceNow URL:
For example, if your URL is https://acme.service-now.com/, your default mailbox is [email protected].
If your instance does not have a default POP3 mailbox, please contact BalkanID support () — we’ll guide you through setting it up.
Activate the “Create Incident” inbound action Finally, ensure that the “Create Incident” inbound action is active. To check this, go to: System Policy > Email > Inbound Actions Search for “Create Incident” and confirm that it is marked as Active.
Go to Configure > Integrations on your BalkanID tenant.
Click on either Add Integration or Edit Integration for a particular integration.
Go to the Optional Configuration section.
In Fulfillment options, choose ticket creation. It will open up a section below to select the ticketing system - Servicenow in this case. A text box will also appear to set the Email Address. Add the Mailbox address address mentioned above. Then hit Save Changes on the side panel.
This is all the configuration you need to do on the tenant. Click on Save.
You can test your setup by denying access reviews on your tenant. After the campaign has been marked as complete, an email will be sent out and an incident will be created in ServiceNow.
Follow these steps to set up Multi-Level Review Settings when creating a new campaign:
Start a New Campaign: Initiate the creation of a new campaign.
Override Default Settings:
Find the "Override Defaults" dropdown in the campaign setup form.
Select "Yes" to enable customization of the review settings beyond the default integration-level settings.
Set Reviewer Precedence Order:
Upon selecting "Yes" for overriding defaults, you'll gain access to set the precedence order of reviewers.
Re-order the review order based on precedence among four roles:
First Line Manager
Select Number of Reviewers Required:
A dropdown will allow you to select how many reviewers are required for the campaign, enhancing flexibility based on the sensitivity or importance of the review.
To understand how reviewers interact with multi-level reviews, the progression of decisions, how to manage and interact with multi-level reviews once they're configured, please refer to the Performing Multi-Level Reviews section for a detailed guide.
does not escalate: no escalation notifications will be sent for this campaign
1 day before due date: escalation notifications will be sent to each assigned reviewer and their manager 1 day before the campaign's due date
2 days before due date: escalation notifications will be sent to each assigned reviewer and their manager 2 days before the campaign's due date
2 days before due date: escalation notifications will be sent to each assigned reviewer and their manager 3 days before the campaign's due date
1 week before due date: escalation notifications will be sent to each assigned reviewer and their manager 1 week before the campaign's due date
Each reviewer will receive a notification indicating they have incomplete reviews for the campaign along with a sample of those reviews and a link to the My Tasks > Campaign page in the BalkanID app, where they can complete their reviews. Here is a sample screenshot:
Similarly, each reviewer's manager will receive a notification letting them know their direct report has incomplete reviews for the campaign. Here is a sample screenshot:
Refer to the System notifications and automatic ticket creation section to configure and set up notification systems for you tenant.
This functionality allows you to automatically create tickets to provision/de-provision resources based on the corresponding access request/review. Let us explore the steps to configure this on your tenant:
Go to Zendesk > Settings > Admin Center > Channels > Talk and Email > Email.
Note down your Zendesk support address.
Go to Configure > Integrations on your BalkanID tenant.
Click on either Add Integration or Edit Integration for a particular integration.
Go to the Optional Configuration section.
In Fulfillment options, choose ticket creation. It will open up a section below to select the ticketing system - Zendesk in this case. A text box will also appear to set the Email Address. Add the Zendesk Support Email address from your zendesk admin center. Then hit Save Changes on the side panel.
This is all the configuration you need to do on the tenant. Click on Save.
You can test your setup by denying access reviews on your tenant. After the campaign has been marked as complete, an email will be sent out and a ticket will be created in Zendesk. It will resemble the one shown in the image given below:
Eligibility and Approval: Identity owners must request access to a Purpose and provide supporting details (e.g., duration, time of use). Approval from a risk manager is required to ensure compliance with organizational policies.
Automated Provisioning and De-provisioning: Access is automatically provisioned at the start of a defined time window and de-provisioned at its end. Notifications are sent before de-provisioning to allow extensions if permitted.
Constraints for Enhanced Security: Constraints define rules that limit or restrict access based on organizational policies or specific conditions. Purposes and Constraints are interdependent to prevent violations.
Resource - This field allows you to filter data based on a resource in an application. For example, you can choose to filter arn:aws:apigateway:::/apis/* Resource of type apigateway within AWS by selecting aws/apigateway/arn:aws:apigateway:::/apis/* as a filter from the filter field.
Resource Type - This field filters data based on the type of resources available. For example, you can view all resources that belong to a channel resource type.
Application - This field filters based on the specific Application Integration that you would like to explore. For example, you want to view Azure (Test Environment) data, you can add it as a filter in this field.
Insight Filtering with insights allows you to see which resources have a user with some insights on them. For example, to view the resources which have resources marked with an Outlier insight, you can add Outlier as a filter in this field.
Using multiple filter fields together will help you navigate through the data swiftly and will make your time spent on discovering entities a lot more productive! Refer to working with filters to learn more about filters.
When you select a resource from the list, a detailed view opens, giving you in-depth information about the identities and entities associated with it. This view is organized into two tabs for clarity:
The Accessible By tab provides a consolidated view of all entities that have access to this specific resource. This includes individual identities that have direct access, as well as connections (like groups or roles) that grant access to multiple identities. Think of it as answering: "Who or what can reach and interact with this resource?"
This tab is essential for quickly seeing all paths to a resource, whether directly or indirectly through a connection.
Every data point listed on the "Accessible By" tab is clickable. Clicking on an entity will open a sidebar providing detailed metadata about that specific entity. Each entity, depending on its type and the application it comes from, has its own unique set of metadata that gives you more context about it within the application.
Understanding Permissions
The "Permissions" column within this tab is also clickable. Clicking on the data in this column will reveal metadata specifically about the relationship between two entities shown in the tab.
To understand what each of these fields (like Connection Provider, Project, and Privileges) indicates, please refer to our dedicated guide on Understanding Entities and Entity Relations.
The Identities tab shows a straightforward list of all individual user and service identities that are directly tied to, or have access to, this specific resource. While "Accessible By" provides a broader view of entities, "Identities" focuses purely on the individual identities themselves.
You can use the search bar or filters menu to quickly find specific identities tied to this resource, making it easy to audit who has direct reach to it.

In the Fulfillment Options, select "SCIM" and save the changes.
Once saved, the SCIM will be enabled for the particular application. You can now perform SCIM access requests.
The New SCIM Access Request encompasses three core functionalities:
Entity Creation
Entity Assignment
Entity Deletion
Entity Creation allows you to create new entities (such as identities - for example, users, service accounts, connections - for example, groups, and resources - for example, application) within your system via SCIM access requests. This is typically used when a new user needs to be added, or a new group/resource needs to be created, within the application that supports SCIM integration.
Select an application: Select the application for which you want to create a new entity (only applications with SCIM enabled).
Put the SCIM Endpoint: When setting up the creation request, specify the appropriate endpoint. For example, in the case of creating a user, the endpoint might be '/users' or '/groups' for creating a group. Base URL should not be included in the SCIM endpoint.
For example: Base URL: https://your-api.example.com/scim/v2/ Endpoint for creating a user: /users
Configure Payload: A json form will be presented for configuring the payload. This lets you define the types of connections or resources (e.g., identities, groups, roles, policies for connections, resources and users) and their respective names.
Preview and Create Request: Preview your SCIM entity creation request and submit it by clicking on "Create Request". The request will be visible in the my task page of the reviewer.
Approval and Update: Following approval (from the my task page of reviewer), the SCIM permissions within the application will be updated accordingly.
Entity Assignment allows you to assign entities (such as identities - for example, users, service accounts, connections - for example, groups, and resources - for example, application) within your system via SCIM access requests.
Select an application: Select the application for which you want to create a new entity (only applications with SCIM enabled).
Put the SCIM Endpoint: When setting up the assignment request, specify the appropriate endpoint. For example, in the case of creating a user, the endpoint might be '/group/assign' to assign user to a group. Base URL should not be included in the SCIM endpoint.
Configure Payload: A json form will be presented for configuring the payload. This lets you define the types of connections or resources (e.g., identities, groups, roles, policies for connections, resources and users) and their respective names.
Preview and Create Request: Preview your SCIM assignment request and submit it by clicking on "Create Request". The request will be visible in the my task page of the reviewer.
Approval and Update: Following approval(from the my task page of reviewer), the SCIM permissions within the application will be updated accordingly.
Entity Deletion allows you to remove or delete an entity (such as identities - for example, users, service accounts, connections - for example, groups, and resources - for example, application) within your system via SCIM access requests.
Select an application: Select the application for which you want to create a new entity (only applications with SCIM enabled).
Put the SCIM Endpoint: When setting up the deletion request, specify the appropriate endpoint. For example, in the case of deleting a user, the endpoint might be '/group/delete'. Base URL should not be included in the SCIM endpoint.
Preview and Create Request: Preview your SCIM deletion request and submit it by clicking on "Create Request". The request will be visible in the my task page of the reviewer.
Approval and Update: Following approval(from the my task page of reviewer), the SCIM permissions within the application will be updated accordingly.
Risk Managers can hit the "Generate Audit Report" button at the bottom of every campaign dashboard to generate a PDF audit report. Depending on the size of the campaign, it usually takes few seconds to download.
Click on "Download Report".
Once the report is ready, it will show up within the background processing tab with a download icon as shown in the below image. Clicking that will download the PDF report to the risk manager's desktop.
Here is a sample campaign audit report. The report may be multiple pages depending on the size of the campaign. The reports will contain the campaign name, start & end dates, and review status of each identity, application & entitlement included in the access review campaign. Each page contains a single coarse grain entitlement that was reviewed along with the reviewer name, identity, application name, review status and review completion time stamp.
Easily download Access Reviews based on your current filter selections, ensuring you get exactly the data you need. Choose from the following options:
🔹 Access Review Summary Only – Get a high-level overview of access decisions, approvals, and key insights.
🔹 All Data (Including Activity Log) – Download a comprehensive report, including detailed user activity logs for full auditability.
This capability provides flexibility in reporting, enabling streamlined compliance reviews or deep-dive audits, as needed.
Easily select from pre-defined access report summary templates as well as customize report template using natural language prompts (using our AI Copilot) or standard queries (if you do not want to use our AI Copilot).
This capability provides auditor ready reviewable reports for access reviews.
The Pre-Expiry Notification field allows you to specify whether a notification should be sent to users assigned to the purpose before it expires.
To add connections to the purpose, click on the ‘Add Connection’ button at the top right of the connections table. From the dialog that appears, select the connections you want to associate with the purpose.
Once all details are entered and connections are selected, click on the ‘Save’ button to create the purpose.
The newly created purpose will then appear on the Purposes page.


Creation: A Purpose is created by defining the connections, resources required for access by an administrator.
Assignment: Identity owners request access to a Purpose and provide details such as the reason, expected usage period, and any extensions needed. Access requests are reviewed and approved by first-line manager, app-owners or risk-managers.
Provisioning: Once assigned, access is automatically provisioned at the start of the defined time window. The user can also choose to manually start and stop the purpose as per their convenience.
Usage: Identity owners can access resources as specified by the Purpose during the active period.
De-provisioning: Access is revoked automatically when the time window ends, ensuring no lingering permissions. Notifications alert identity owners of impending de-provisioning, allowing them to request extensions if permitted.
Revocation and Updates: Administrators can revoke access or update Purpose parameters at any time to address security risks or changing requirements.
Relevant Links:
Review the entered details carefully on the confirmation page. If everything is accurate, click Create to submit the new user-purpose access request(s).
After creation, the new user-purpose access request will be visible on the Access Requests page. The appropriate reviewer assigned to the request will receive a notification via Slack prompting them to review the request.
The assigned reviewer can review the access request by navigating to the My Tasks page from the side navigation bar. They should click on the Review button to open and evaluate the request.
Once the reviewer approves the user-purpose access request, the status will update on the Access Requests page. The requested purpose will then be assigned to the employee for whom the request was made.
To use assigned purposes, refer to Starting & Stopping Assigned Purposes.


BalkanID recommends creating a separate service account for the purposes of this integration, instead of using personal or employee named accounts.
Client ID
Client Secret
Tenant Name
Go to your Onelogin Tenant Administration Page.
Hover over Developers and click API Credentials under it.
Click on Create New Credential, and give Read all as the permission.
Paste the same in Balkan ID App Integration setting
Login to the BalkanID application and switch to the tenant you would like to add your integration to.
Head to Integrations > Add Integration, select OneLogin.
Set up the Primary Application owner (mandatory) and the Description, if any. Set up Secondary Application Owner(s), if any.
BalkanID recommends creating a separate service account for the purposes of this integration, instead of using personal or employee named accounts. Make sure that the account has ownership or super admin level permissions.
Personal Access Token
Login to Asana, and Click on your profile photo in the top right corner of the Asana app. Select My Settings... > Apps > Manage Developer Apps.
Follow the below steps to get personal access token from Asana:
Click on Create New Token.
Login to the BalkanID application and switch to the tenant you would like to add your integration to.
Head to Integrations > Add Integration, select Asana.
Set up the Primary Application owner (mandatory) and the Description, if any. Set up Secondary Application Owner(s), if any.
BalkanID recommends creating a separate service account for the purposes of this integration, instead of using personal or employee named accounts.
Tenant Name - This is the same as your tenant URL https://<tenant-name>.twingate.com
API Token
Create your tenant API Token with Read only permissions.
Open your Twingate Tenant Page, and navigate to Settings.
Now go to API and click on Generate Token .
Click on
Login to the BalkanID application and switch to the tenant you would like to add your integration to.
Head to Integrations > Add Integration, select Twingate.
Set up the Primary Application owner (mandatory) and the Description, if any. Set up Secondary Application Owner(s), if any.
This section is your guide to managing and performing access reviews within BalkanID. It details how users with different roles can track the status of all access review campaigns and provides step-by-step instructions on how to take action on individual reviews, ensuring appropriate access for all users.
Let us understand the following to perform access reviews effectively:
Go through the below to understand how users with different roles can perform access reviews using BalkanID.
Users with the Reviewer role can view access reviews from the main menu item My Tasks. From here, they can search, sort, and select campaigns that are on their task list to be completed.
Clicking on the Review button will take you to a dedicated page where you can view all the access reviews assigned to you. Clicking on the Priority Inbox button on a campaign review will take you to a page where you can view the same reviews bucketed by various criteria of your choosing for faster triage.
This page helps you focus on the most important review tasks by using shared filters and groupings that you can create on the reviews page. You can create “buckets” of reviews based on your chosen filters and work through them by priority. Each bucket shows your progress for the related campaign, along with key details about the applications, users, and insights included in that group.
Select Reviews: Choose the specific access reviews you'd like to work on.
Bulk Actions: Click the "Bulk Actions" button on the Access Reviews page.
Perform Operations: From the options provided, select the desired action for the chosen reviews:
The Access Reviews main menu item provides a comprehensive overview of all access review campaigns in your system. Here, you'll find a consolidated list including pending, in-progress, completed, aborted and overdue access reviews. This dedicated view is available exclusively to BalkanID Administrators and Risk Managers.
To efficiently manage your access reviews, follow these steps:
Select Reviews: Choose the specific access reviews you'd like to work on from the list.
Bulk Actions: Click the "Bulk Actions" button on the Access Reviews page.
Perform Operations: From the options provided, select the desired action for the chosen reviews:
Note: To configure de-provisioning after an access review has been denied, please refer to this article for detailed instructions on enabling .
BalkanID recommends creating a separate service account for the purposes of this integration, instead of using personal or employee named accounts.
API Key
Organization ID
The API Key needs to be from an administrator account. To retrieve the API Key follow the JumpCloud instructions here: .
To retrieve the Organization ID follow the JumpCloud instructions here: .
Login to the BalkanID application and switch to the tenant you would like to add your integration to.
Head to Integrations > Add Integration, select JumpCloud.
Set up the Primary Application owner (mandatory) and the Description, if any. Set up Secondary Application Owner(s), if any.
With BalkanID, any team member can request access for themselves or for others to any support application integration. Requests can be either GRANT (provisioning) or REVOKE (de-provisioning). GRANT requests can be permanent or temporary (specified by end time, when the access is automatically de-provisioned).
By default, every access request goes through a review process. Upon successful approval of the access request (by the assigned reviewer - either manager or application owner or whoever is assigned as the designated reviewer), the request shall get fulfilled immediately (either provisioned or de-provisioned, depending on whether its a GRANT or REVOKE request).
If the fulfillment option for an application integration is selected to be direct integration and auto approved provisioning, then a request GRANT shall automatically result in provisioning of the request in the respective application. Similarly, a request REVOKE shall automatically result in de-provisioning of the request in the respective application. All of these are event driven, which means the provisioning/de-provisioning act happens immediately.
This will request access that is identical to a different target user.
This will request access that is identical to the access that users with the target job title have in common.
This will request access that is identical to the access given by the target role.
This allows the requester to chose the exact access changes they wish to apply to the user, including both GRANTs and REVOKEs. Both GRANTs and REVOKEs can be present in the same request.
If an identity for an employee does not exist in an application, BalkanID will automatically create a new identity, corresponding to the access request. If a selected identity is suspended, it will be re-activated and subsequently provisioned or de-provisioned with the requested changes.
Before you submit you're request, you will be presented with a summary of the request details as well as the requested access changes. Once you submit the request, it will be created and be ready for review.
Users, Risk managers and IT administrators can view the list of access requests they have created, along with their progress on the BalkanID dashboard.
Users, Risk managers and IT administrators can view the list of completed access requests on the BalkanID dashboard.
The full audit trail of an access request, starting from creation till the provisioning or de-provisioning is recorded within BalkanID and available to be viewed or downloaded as a report anytime, for audit purposes.
Note: You may see different completion percentages in your My Tasks tab and Access Requests tab for multi level reviews. My Tasks will reflect how much of the actions needed to be taken by you, are completed for a given access request. Whereas Access Requests shows how many total actions by all the reviewers for an Access Request are completed for a given Access Request.
At BalkanID, we aim to make your campaign management process as seamless and efficient as possible. With the "Recurring Campaigns" feature, you can automate the repetition of campaigns at specified intervals, ensuring continuity and consistency in your review processes. This guide will walk you through how to set up and manage Recurring Campaigns on our platform.
The "Recurring Campaigns" feature allows you to schedule a campaign to repeat automatically after a defined period. This is particularly useful for regular compliance checks, routine audits, or any campaign that needs to be conducted on a regular basis without manually setting it each time.
Here are a few simple steps to set up a Recurring Campaign:
Create a New Campaign: Begin by creating a campaign as you normally would. Fill in all necessary details such as campaign name, description etc.
Select Recurrence: In the campaign creation form, you will find an option for setting the campaign to recur. Click on Custom.
3. Provide the specifics regarding when the campaign should repeat. This allows for highly flexible scheduling to match your organization's compliance and review cycles. You can define the recurrence frequency at different granular levels:
Weekly: Specify the number of weeks between recurrences (e.g., every 2 weeks) and select the exact day(s) of the week (e.g., Mondays, Wednesdays, and Fridays) on which the campaign should launch.
Monthly: Define the number of months between recurrences (e.g., every 3 months). For monthly campaigns, you have two options for specificity:
Day of the Month: Choose a specific day (e.g., the 15th of the month).
Edit Recurrence Details later: You can convert an existing campaign to be recurring or edit the recurrence details of a pre-existing recurring campaign via any of the aggregated campaigns views, or the individual campaign page. Clicking on the chip indicating recurrence status should open up a modal as shown below. You can do the same from within the campaign as well.
Note: Campaigns which have already recurred will have a yellow "Re-curred" chip, and their details page will direct you to the next campaign in that recurrence chain. You will be able to edit recurrence settings for the latest campaign in the chain (i.e., the one which hasn't recurred yet).
BalkanID offers extensive notification preferences for both tenant administrators and individual users. These preferences allow for the customization of notification settings, ensuring that users receive relevant notifications through their preferred channels.
Tenant admins can configure notification settings at the tenant level. These settings are what are used as the default for every user who have not set up their own preferences:
Configure Group → System Notifications Tab
Enable/Disable Notifications: Admins can turn notifications on or off entirely or for specific categories.
Notification Channels: Choose which channels (currently email, in-app and slack) to use for sending notifications. Future support can include additional channels like Teams.
Allow User Override: Enable or disable users' ability to customize their notification settings for specific notifications. Disabling this will prevent users from overriding the tenant level settings.
After selecting or changing the notification preferences, the admin has to click on the save button on the bottom right of the application to save the tenant-level preferences.
Individual users can personalize their notification settings under:
Account (Profile Icon) → Preferences dropdown
Opt-In/Opt-Out: Users have the ability to subscribe to or disable specific notifications through their Account (Profile Icon) → Preferences page. However, this control is only available if the tenant admin has enabled the "Allow user override" setting for those notifications. If this setting is turned off, users will not be able to disable or modify the notification preferences on their own.
Notification Selection: When allowed by the tenant admin, users can selectively choose which types of notifications they want to receive. This flexibility depends on the "Allow user override" setting being enabled. If a notification, its group, or all notifications are disabled at the tenant level, users will not be able to opt in to those notifications.
Q: How do I disable notifications entirely?
A: Tenant admins can disable all notifications for users by navigating to Settings → System Notifications.
Individual users can opt out of notifications (if tenant admin has enabled them) entirely via Account (Profile icon) → Preferences by turning off the notification toggles—but only if the tenant admin has enabled the "Allow user override" option for all notifications.
Users cannot disable notifications entirely if:
The "Allow user override" option is turned off for any notification at the tenant level by an admin.
A notification group, or all notifications, are disabled at the tenant level by an admin.
Q: Why can't I change certain notification settings?
A: If the tenant admin has disabled the "Allow user override" option for a particular notification, users will not be able to modify settings for that notification.
Q: Can I choose the channels through which I receive notifications?
A: Yes, tenant admins can configure the channels at the tenant level.
For further assistance, please contact BalkanID support ().
The BalkanID Slackbot integrates powerful identity security and access management capabilities directly into your Slack workspace. It is designed to be your team's central hub for managing application access, ensuring that security workflows are not only robust but also efficient and user-friendly.
By bringing critical notifications and approval processes into the collaborative environment your team already uses, the Slackbot eliminates friction, reduces response times, and enhances your organization's overall security posture.
: Stay on top of user access reviews with automated notifications delivered via Slack. The bot alerts reviewers when campaigns are due, ensuring that standing privileges are regularly examined and access rights remain appropriate, thereby strengthening your security compliance.
Streamlined Access Requests: Empower your users to request, approve, or deny access to applications directly through Slack commands and interactive modals on Slack. This removes the need to switch contexts or log into different platforms, accelerating the entire process from request to fulfillment.
: Receive immediate alerts regarding security risks and misconfigurations discovered by the BalkanID platform. By notifying you directly in Slack, the bot enables your security team to acknowledge and remediate potential threats faster than ever.
This guide will walk you through the simple process of installing and configuring the BalkanID Slackbot for your workspace.
Before you begin, please ensure you have the following permissions. You must be:
An Admin in your BalkanID tenant.
A Workspace Admin in the Slack workspace you wish to connect.
Note: The BalkanID Slackbot currently supports a one-to-one mapping. This means one BalkanID tenant can be connected to only one Slack workspace.
Log in to and select the tenant which you will be linking slack workspace with and then click on the Slackbot installation url. At this time the Slackbot can handle one BalkanID tenant connection with one Slack workspace.
Navigate to the page and under Notification Channels, click the Install BalkanID Slackbot button.
From the top right corner,
After it is installed in your Slack workspace, you can also find the Slackbot by clicking on “Add apps” and then search for “BalkanID”:
The BalkanID Slackbot authenticates users by matching their Slack email address to a user profile in your BalkanID tenant.
Crucial Point: For the Slackbot to work, a user's primary email address in their Slack profile must exactly match the email address associated with their user profile in BalkanID.
For Example:
If a Slack user named Cameron Anderson has the email address [email protected], they must also exist as a BalkanID user with the email [email protected]. If the emails do not match, the Slackbot will not be able to process their requests or commands.
Understanding the various review statuses in BalkanID is crucial for effectively managing user access review campaigns. These statuses provide real-time visibility into the progress and outcome of each review, ensuring accountability and facilitating timely actions. You can update the status of a review at any time until the campaign is either completed or prematurely aborted.
Here's a breakdown of the supported review statuses:
Draft: This initial status indicates that a review has been created but is not yet active. It's a placeholder, allowing reviewers to prepare or set up the review before it officially begins. Reviews in "Draft" status do not yet require action from reviewers.
Pending: Once a review campaign is launched, all outstanding reviews will move to a "Pending" status. This signifies that the review is active and awaiting action from the assigned reviewer(s).
Waiting for info: This status indicates that the review process is blocked because the reviewer needs additional information to make a decision. The review can be actioned upon but indicates that the reviewer is still awaiting on a response from a stakeholder.
Overdue: If a "Pending" review is not completed by its designated due date, its status will automatically change to "Overdue." This indicates that the review requires immediate attention to keep the campaign on track.
Overdue, Waiting for info: This status combines two conditions: the review is past its due date, and it's currently blocked because the reviewer is awaiting additional information. It signifies an urgent need for the requested information to unblock the overdue review.
Approved: This status indicates that the reviewer has affirmed the user's current access or entity relation. The access is deemed appropriate and will remain unchanged.
Denied: This status signifies that the reviewer has determined the user's access or entity relations are no longer appropriate and should be revoked. This decision can lead to one of the three statuses below:
Denied, notification sent: This status applies when a "Denied" review has resulted in a notification being sent to the relevant parties (e.g. the user, their manager, or IT). This is the final status of a "Denied" review when a notification system is set up, but there is no de-provisioning or ticketing system configured, or if the de-provisioning or ticket creation process failed.
Denied, ticket created: This status is assigned when a "Denied" review has led to the creation of a ticket in an integrated ticketing system. This is the final status of a "Denied" review when a ticketing system is set up, but there is no de-provisioning system configured, or if the de-provisioning process failed.
All status updates, along with the user who performed the action, are meticulously recorded in the audit logs for each review. This provides a clear and transparent history of all decisions and changes.
We also track previous appearances of access review items in campaigns which have already been completed. You can view this information in the Access Change Status column, and filter by these values via the filter panels/dialogs.
Added Access: this access item (entity -> has access to pair) was completely new, and had not been actioned upon and completed as of the current campaigns time of creation.
Unchanged Access: this access item appeared unchanged in a previous completed campaign, and was actioned upon. Click on this chip to view more info (such as the past action and action trail).
Modified Access: this access item appeared in a previous completed campaign, but with different permissions or other metadata. Click on this chip to view more info (such as the exact different in metadata and permissions).
BalkanID Risk Managers can get daily alerts for Findings via the BalkanID Slackbot, keeping them up to date on the access issues that should be addressed without needing to visit the app (contact [email protected] to enable this alert).
For each Finding Rule that has any findings, an alert will be sent via BalkanID Slackbot to each Risk Manager at 9AM CT every day.
Each such alert message includes the name and severity of the Finding, a summary of number of employees, identities and app integrations affected and a link back to the BalkanID web app for further information.
Additionally a list of matched Users and Identities is shown. See the screenshot below for a couple example alerts.
These alerts can be configured on the Configure > System Notifications page under Findings, where the alert can be toggled on and off for all and for individual Finding Rules. Additionally, the alerts for individual Finding Rules can be sent to Slack Channels instead of direct messages from BalkanID Slackbot.
Findings (Daily alert) notifications can be disabled entirely with the notification group level toggle, and individually for specific Findings.
The alerts for each Finding can be be sent to a Slack Channel instead of direct message using the Send to Channel option. Default Channel can be set as a fallback for Findings without a channel individually specified.
If you'd rather not receive alerts for lower priority findings, but don't want to manage individually toggling specific Finding alerts on and off, you can set the Severity Level option, which is the minimum Finding Severity for which an alert will file. The default Severity Level is High to avoid noisy alerts, but it can be lowered or raised as needed.
To summarize and reduce notification noise further, multiple Findings can be combined with less details in a single alert, by setting the Rollup toggle for those Findings.
See for more details on configuring notification preferences such as the Allow user override toggles.
In this article, we will walkthrough the Applications page in BalkanID. The Applications page gives a list of all applications that have been integrated within the BalkanID tenant.
To navigate to the Applications page, select the Applications page from Entities group.
You can use the search box and filters to explore the applications integrated with BalkanID. The following filter fields are available for this page:
In this article we will give an overview of the Connections page and how to utilize it for entitlement discovery. The Connections page provides a list of different connections available within an application integration. These connections are extracted from an application during the application integration stage.
To navigate to the Connections page, select the Connections page from the Entities group.
You can view all the connections with respect to the application that belong to your organization from here.
BalkanID makes it easy to integrate Single Sign-On (SSO) with your existing Identity Provider (IdP), helping you streamline authentication and improve security across your organization. By connecting your Identity Provider, you can centralize authentication, reduce password-related risks, and provide a seamless login experience for your users.
We support a wide range of industry-standard IdPs out of the box. Whether you're using a popular cloud IdP like Okta or Azure Entra ID, or a custom in-house solution that supports SAML or OIDC, BalkanID offers flexible support to meet your needs.
BalkanID currently supports the following IdPs:
Access reviews in BalkanID can be configured for a single reviewer or for multiple reviewers in a sequential order. This section explains how multi-level reviews work, ensuring user access reviews are thorough and accountable.
Multi-level reviews are designed to add layers of oversight to the access review process. When you set up a multi-level review, you define a specific reviewer order, creating a chain of approval.Each reviewer in the sequence must take action before the review progresses to the next level. Only one reviewer at each level needs to approve for the review to proceed to the subsequent stage in the hierarchy.
A key aspect of multi-level reviews is that a user can edit their review decision at any time
BalkanID supports multiple fulfillment options, allowing seamless configuration for how identities, connections, and resources are provisioned or deprovisioned across all connected applications.
This comprehensive approach offers both a streamlined setup process and the versatility to integrate with your existing infrastructure. You can configure fulfillment via your Identity Provider (IdP), directly manage provisioning, connect via a SCIM server, create tickets for management through your Ticketing and Work Management solutions, or even trigger custom actions by calling webhooks and playbooks.
Note: To enable Fulfillment Options for your account, please .
The options are:
The New Connection Access Request System offers three primary functions:
Connection Creation
Connection Assignment
Connection Deletion
Each function can be easily accessed through a simple selection process using radio buttons on our interface. Detailed steps on how to perform each action are provided below.
Insights can be , or generated as part of our process while connecting new applications. These may include insights about missing MFA, unused access for a period of time, terminated users, or users who act in the capacity of a manger, among others (plus custom insights you might have defined yourself).
Some of these may not be relevant after a while, or may be adding to the noise while reviewing access in a tenant with a large number of insights. Alternatively, some discovered and created insights might have a degree of overlap. In this case, you can hide insights. This will make it so that hidden insights are not shown anywhere on the tenant, for any user.

Risk Manager
Primary Application Owner
Business Owner


De-provisioned: This is the final status for a "Denied" review where BalkanID has automatically removed the specified access from the user successfully. This signifies that the system has successfully completed the action requested by the reviewer.


Navigate to the insight visibility section
In the navigation sidebar, go to the Rules & Playbooks section and select the Insight Visibility tab.
Filter and/or search for the insight you wish to disable
You can search by insight or application name, and filter by insight status (hidden, visible, all). Remember — insights are on a per application basis. For instance, you may decide that the MFA Missing insight is not important for App A, but you want to see it while reviewing access for App B.
Toggle visibility for the insight
This will instantly hide any reference to this insight across the tenant.
Note that this is distinct for the active/inactive toggle on the Custom Insights page — that controls whether your custom created insights are applied alongside discovered insights, while this controls actual visibility of all currently available insights on your tenant regardless of the source.


Click on Save and copy the Client ID and Client Secret.
Copy and save both of them You will be prompted to enter them on the Application integration settings on Balkan ID.
Check the URL of your OneLogin tenant, it should be of format https://<tenant-name>.onelogin.com
Copy the tenant-name (in this case, its balkanid-dev ).
Direct integration - Provide your Onelogin Client ID, Client Secret and Tenant Name obtained above to set up a direct connection with BalkanID.
SCIM integration - Provide SCIM server credentials to set up a SCIM connection with BalkanID.
Manual file upload - Upload Entity and Entity Relations through a .CSV file upload. Contact the team for assistance with this.
Automated upload using API - You can upload data using our with the help of an API key which will be provided to you. Please refer to the and upload docs for specific instructions on uploading your data through the API.
Click on next to move onto Optional Configuration.
Fill Optional configuration, if required.
Once you filled in the information, click Save. Your integration is now configured and you will see the status of the integration displayed alongside other integrations on the Integrations page. When data is available, the integration Status will read Connected and the integration Message will read Data available.


Type a Purpose for which you want to create a Token. Click Create token.
Copy the Token value and store it securely.
Direct integration - Provide your Personal Access Token obtained above to set up a direct connection with BalkanID.
SCIM integration - Provide SCIM server credentials to set up a SCIM connection with BalkanID.
Manual file upload - Upload Entity and Entity Relations through a .CSV file upload. Contact the team for assistance with this.
Automated upload using API - You can upload data using our with the help of an API key which will be provided to you. Please refer to the and upload docs for specific instructions on uploading your data through the API.
Click on next to move onto Optional Configuration.
Fill Optional configuration, if required.
Once you filled in the information, click Save. Your integration is now configured and you will see the status of the integration displayed alongside other integrations on the Integrations page. When data is available, the integration Status column will read Connected and the integration Message will read Data available.


CopyCopy the token and save it. You will have to enter it within the BalkanID application when prompted.
Copy the tenant name and save it. You will be prompted to enter it within the BalkanID application.
Direct integration - Provide your Twingate Tenant Name and API Key obtained above to set up a direct connection with BalkanID.
SCIM integration - Provide SCIM server credentials to set up a SCIM connection with BalkanID.
Manual file upload - Upload Entity and Entity Relations through a .CSV file upload. Contact the team for assistance with this.
Automated upload using API - You can upload data using our with the help of an API key which will be provided to you. Please refer to the and upload docs for specific instructions on uploading your data through the API.
Click on next to move onto Optional Configuration.
Fill Optional configuration, if required.
Once you filled in the information, click Save. Your integration is now configured and you will see the status of the integration displayed alongside other integrations on the Integrations page. When data is available, the integration Status will read Connected and the integration Message will read Data available.


Deny: Deny the user's access to the permission.
Reassign: Reassign the access review to a new reviewer.
Request More Information: Add a note or request more information.
Deny: Deny the user's access to the permission, initiating a process for removal.
Reassign: Reassign the access review to a different reviewer.
Request More Information: Add a note or request more information from other stakeholders.


Direct integration - Provide your API Key and Organization ID obtained above to set up a direct connection with BalkanID.
SCIM integration - Provide SCIM server credentials to set up a SCIM connection with BalkanID.
Manual file upload - Upload Entity and Entity Relations through a .CSV file upload. Contact the team for assistance with this.
Automated upload using API - You can upload data using our with the help of an API key which will be provided to you. Please refer to the and upload docs for specific instructions on uploading your data through the API.
Note: For Last Login Days, pick the number of days you would like to monitor for last login. For example, if you select 90 then the integration will generate entitlements with a Permission named access in last 90 days that will have Permission Value true if last login was within last 90 days, and false otherwise.
Click on next to move onto Optional Configuration.
Fill Optional configuration, if required.
Once you filled in the information, click Save. Your integration is now configured and you will see the status of the integration displayed alongside other integrations on the Integrations page. When data is available, the integration Status column will read Connected and the integration Message will read Data available.


Weekday Occurrence: Select a specific weekday occurrence (e.g., the second Tuesday of the month).
Yearly: Set the number of years between recurrences (e.g., every year). For yearly campaigns, you can choose:
Specific Date: Pick a precise month and day (e.g., January 1st).
Month and Weekday Occurrence: Select a specific weekday occurrence within a chosen month (e.g., the first Monday of June).


The Slackbot is now installed in your workspace, and you'll be returned to the Configure > System Notifications page.


Application - This field filters based on the specific Application Integration that you would like to explore. For example, to view Azure (Test Environment) data, you can add it as a filter in this field.
Application Type - This field filters based on the type of application and returns all integrations for that type of application. For example, choosing AWS as the application type will return all application integrations into your tenant which have AWS.
Primary Owner - This field filters based on the Primary Owner of the application. For example, to view all application integrations owned by Abbot Reese, add it as a filter in this field.
Using multiple filter fields together will help you navigate through the data swiftly and will make your time spent on discovering entities a lot more productive. Refer to working with filters to learn more about filters.
When you click on an application from the list, a dedicated page opens, providing a more detailed view of that specific integration. This page is designed to give you comprehensive insights into the data extracted from that application. You'll find the following tabs within an individual application page:
The Overview tab serves as a dashboard, presenting key summarized data extracted from this specific application integration. Here, you'll find various chart components that provide a high-level visual representation of your application's access posture.
Each of these chart components is clickable, which will take you to a more detailed view of their respective data, allowing you to drill down into specific metrics and trends.
The Access tab offers a clear and granular representation of who has access to what within this particular application integration. This tab allows you to:
Examine Individual Entities: See users, groups, or service accounts.
Discover Reach: Understand the specific resources these entities can access.
View Detailed Permissions: See the precise level of control each entity holds over various assets and functionalities within the application.
This tab provides a deep, granular view, enabling you to thoroughly understand the exact level of control each entity possesses.
Every data point listed on the "Access" tab is clickable. Clicking on an entity will open a sidebar providing detailed metadata about that specific entity. Each entity, depending on its type and the application it comes from, has its own unique set of metadata that gives you more context about it within the application.
Understanding Permissions
The "Permissions" column within this tab is also clickable. Clicking on the data in this column will reveal metadata specifically about the relationship between two entities shown in the tab.
To understand what each of these fields (like Connection Provider, Project, and Privileges) indicates, please refer to our dedicated guide on Understanding Entities and Entity Relations.
The Connections tab provides a detailed list of all the connections (e.g., security groups, roles, permission sets) that exist within this specific application. These connections are often the conduits through which identities gain access.
Clicking on any connection in this list will take you to a more detailed view, providing specific information regarding the application identities and entitlements that the chosen connection provides access to.
The Identities tab displays a comprehensive list of all individual user and service identities that have been extracted from this particular application.
You can click on any identity in this list to show a more detailed view of its associated accesses. Additionally, you can utilize the search bar or filters menu to quickly find specific identities within this application's data.
If the the following requirements are satisfied, then you can also perform actions like triggering a password reset, creating an identity deletion request, creating an identity suspension request and creating an identity reactivation request from this page -
Application supports the action type
Identity supports the action type
Application has Direct Configuration Extraction Type
Application has Direct Provisioning Fulfillment Option
For an Administrator or Risk Manager, all Identities are visible on this page. For a Reviewer, only the Identities belonging to the Reviewer and the Identities belonging to the Reviewer's direct reports are visible on this page.
The Resources tab provides a comprehensive inventory of all the resources discovered within this specific application integration. These are the assets (e.g. databases, buckets, APIs, instances) that identities and connections can interact with.
Clicking on a resource in this list will navigate you to a more detailed view outlining the specific access an application's connections or identities have to that resource, including the various identities and entities associated with it. For instance, arn:aws:apigateway:*::/account refers to all API Gateway accounts within AWS, indicating that a connection provides access to manage or interact with these API Gateway resources.
Connection - This field allows you to filter data based on a connection in an application. For example, you can choose to filter admin connection in a group connection type within Confluence by selecting confluence/group/admin as a filter from the filter field.
Connection Type - This field filters data based on the type of connections available. For example, you can view all connections that have a group connection type.
Application - This field filters based on the specific Application Integration that you would like to explore. For example, you want to view Azure (Test Environment) data, you can add it as a filter in this field.
Insight - Filtering with insights allows you to see which connections have a user with some insights on them. For example, to view the connections which have connections marked with an Outlier insight, you can add Outlier as a filter in this field.
Using multiple filter fields together will help you navigate through the data swiftly and will make your time spent on discovering entities a lot more productive! Refer to working with filters to learn more about filters.
When you select a connection from the main list, a detailed view opens up, providing in-depth information about the entities associated with that specific connection. This view is organized into three distinct tabs to help you understand the connection's relationships:
The Accessible By tab offers a consolidated view of all identities and other connections that are members of, or gain access through, this particular connection. Think of it as answering the question: "Who or what can use this connection?"
This tab is crucial for understanding the direct beneficiaries of the connection. For instance, if you're looking at a security group, the "Accessible By" tab would list all the users and other nested groups that are part of it.
Every data point listed on the "Accessible By" tab is clickable. Clicking on an entity will open a sidebar providing detailed metadata about that specific entity. Each entity, depending on its type and the application it comes from, has its own unique set of metadata that gives you more context about it within the application.
Understanding Permissions
The "Permissions" column within this tab is also clickable. Clicking on the data in this column will reveal metadata specifically about the relationship between two entities shown in the tab.
To understand what each of these fields (like Connection Provider, Project, and Privileges) indicates, please refer to our dedicated guide on Understanding Entities and Entity Relations.
The Has Access To tab reveals which other connections and resources this specific connection can access. This answers the question: "What can this connection do or reach?"
This tab provides a critical insight into the permissions and scope of the connection itself. For example, if you're examining a role, the "Has Access To" tab would show you the specific resources (like a database, an S3 bucket, or another application's API) and other connections (like other roles or groups) that this role is permitted to interact with.
Every data point listed on the "Has Access To" tab is clickable. Clicking on an entity will open a sidebar providing detailed metadata about that specific entity. Each entity, depending on its type and the application it comes from, has its own unique set of metadata that gives you more context about it within the application.
Understanding Permissions
The "Permissions" column within this tab is also clickable. Clicking on the data in this column will reveal metadata specifically about the relationship between two entities shown in the tab.
To understand what each of these fields (like Connection Provider, Project, and Privileges) indicates, please refer to our dedicated guide on Understanding Entities and Entity Relations.
The Identities tab presents a straightforward list of all individual user and service identities that are directly tied to or associated with this connection. This tab helps you understand the immediate individuals or service accounts that leverage this specific connection for their access.
While the "Accessible By" tab might show broader entity types, the "Identities" tab focuses specifically on the individual identities that ultimately benefit from this connection's permissions.

This functionality allows you to automatically create tickets to provision/de-provision resources based on the corresponding access request/review. Let us explore the steps to configure this on your tenant:
Go to Jira > Settings > System > Mail > Incoming Mails.
Go to Mail Handlers.
Click on Add a incoming mail handler to create a new mail handler with the following configurations:
Provide a name such as “Email Notifications” or something relevant to your use.
Set your incoming mail server to the Default Cloud Mail Server available.
Set the mail handler type to - Create a new issue or add a comment to an existing issue.
Let your folder name be left blank blank (set to default) to let it scan the inbox. If your emails are directed to some other folder within your mail, you will be required to configure that in this field. Go to the
To understand more about mail handlers and mail servers inside Jira, refer to this document - https://support.atlassian.com/jira-cloud-administration/docs/create-issues-and-comments-from-email/.
Go to Configure > Integrations on your BalkanID tenant.
Click on either Add Integration or Edit Integration for a particular integration
Go to the Optional Configuration section.
In Fulfillment options, choose ticket creation. It will open up a section below to select the ticketing system - Jira in this case. A text box will also appear to set the Email Address.
Add the email corresponding to your jira default cloud mail server. () You can find your jira default cloud mail server in jira as shown in the below image. Then hit Save Changes on the side panel.
This is all the configuration you need to do on the tenant. Click on Save.
You can test your setup by denying access reviews on your tenant. After the campaign has been marked as complete, an email will be sent out and a ticket will be created in Jira within the project you configured for denied access reviews. It will resemble the one shown in the image given below:
In case things do not work, add an email as the forward email in the corresponding mail handler. All of jira’s debugging trails while trying to read the templated email will be forwarded to the email set in the forward email field.
Auth0
Azure EntraID
Classlink
Cyberark
Descope
Duo
Google Workspace
Jumpcloud
Keycloak
Lastpass
Microsoft AD FS
miniOrange
Okta
Onelogin
PingOne
PingFederate
Salesforce
Each of these providers can be configured to enable secure, seamless SSO login for your users within BalkanID.
If your Identity Provider isn’t listed above, no problem! BalkanID also supports any custom SAML 2.0 or OIDC (OpenID Connect)-compliant provider. This flexibility ensures you can still set up SSO, regardless of which IdP you use.
Before setting up your SSO integration, make sure you have the following:
Admin access to your Identity Provider
Your SAML metadata or OIDC configuration details
Admin access to your BalkanID Tenant
Log in to the BalkanID.
Under the configure section click Global Settings > SSO Configuration.
Click on the Generate SSO link button.
After clicking "Generate SSO Link," a pop-up or notification will provide you with a unique URL. You'll also see an option to email this link to yourself for convenience.
Clicking on the provided URL will open the SSO Suite, a step-by-step guided experience. This suite will walk you through the configuration process tailored to your chosen SSO provider, ensuring a smooth and accurate setup.

Let's consider a scenario where the reviewer order is set as:
First Line Manager
Risk Manager
Application Owner
Here's how BalkanID handles review assignments based on the "Reviewer Count" (the number of reviewers required at each level):
Single Reviewer (1 Count): Only one reviewer is required to act upon the review, which will be the first person in the reviewer order. If the first person in the order (e.g., the First Line Manager) is unavailable or if the identity's mapped employee has no first-line manager, the task will automatically escalate and be assigned to the next individual in the defined order (e.g., the Risk Manager).
Two Reviewers (2 Count): Two reviewers are required to act upon the review, which will be in the order of precedence (here, First Line Manager and Risk Manager). If the First Line Manager is unavailable, the review tasks will automatically be distributed to the next two available individuals in the order (e.g., the Risk Manager and the Application Owner).
Three Reviewers (3 Count): Three reviewers are required to act upon the review, which will be in the order of precedence (here, First Line Manager, Risk Manager and Application Owner). If the First Line Manager is missing and only two other reviewers are available in the sequence, the system will automatically adjust the number of required reviewers to two, assigning the tasks to those available individuals based on the set order.
The system is designed to automatically adjust to the availability of assigned reviewers:
Automatic Reassignment: If the identity under review is unmapped or does not have an associated manager(in case the reviewer is the first line manager), the review will automatically be assigned to the next person in the predefined precedence order.
The multi-level review process follows a strict progression, and each reviewer's decision impacts who can take action next. Let's look at an example with the sequence: Reviewer A → Reviewer B → Reviewer C.
Reviewer A Approves:
The review moves to Reviewer B.
Reviewer A can no longer change their decision (Deny) once the review progresses.
Reviewer B can Approve or Deny.
Reviewer C cannot take any action yet.
Reviewer A Denies: No further action can be taken by subsequent reviewers. The access is considered to be denied at this stage.
Reviewer B Approves:
The review moves to Reviewer C.
Reviewer B can no longer change their decision (Deny) once the review progresses.
Reviewer C can Approve or Deny.
Reviewer B Denies: No further action can be taken by subsequent reviewers once Reviewer B denies, even if Reviewer A approved. The access is considered to be denied at this stage.
Reviewer C Approves:
The review is now marked as Approved overall.
Reviewer C is the only one who can still Deny the review at this point (until the campaign is marked as complete by a Risk Manager or an Administrator).
Reviewer A and
This structured approach ensures that reviews progress through the designated hierarchy, with clear accountability and the ability to correct decisions until the campaign is finalized.
The user account will be provisioned in / deprovisioned from the IDP of the tenant.
SaaS Direct
The user account will be provisioned in / deprovisioned from the app itself.
Ticket Creation
The system will create a ticket to the ticketing system for manual provisioning / deprovisioning.
SCIM
The account provisioning / deprovisioning will happen via SCIM (Needs to be done first).
Webhook
The webhook configuration will be triggered post actions (Needs first).
Playbook
The playbook server will be called post actions (Needs to be done first).
The current set of applications supported are:
Fulfillment Option
Description
SSO
Custom
SaaS Direct
AWS, AzureAD, Google, Okta, and other apps on demand
Ticket Creation
Refer to .
SCIM
All applications
Webhook
All applications
Playbook
All applications
Go to the Configure > Integrations > Add Integration OR Select the three dots on an application -> Edit (If you want to edit an already configured application)
If adding a new integration, configure the application integration and click Next.
Under the Optional Configuration settings, Select the fulfillment options as required.
Click on Save to apply this to that integration.
Voilà, all set! Your newly set fulfillment options will be taken into account if any event takes place on the event in the system.
Fulfillment Option
Description
SSO
API Key
Domain Name- organization’s domain name(for example: https://organization.atlassian.net)
Email - Email ID of admin who has access to all organizational resources.
Login into the admin account for Confluence. Click your profile image and select Profile from the menu.
Navigate to Security and click on Create and Manage API token.
Click on Create API token. Provide a label for the token (like “balkan setup” or something similar) and create token.
Save the token in a secure location.
Login to the BalkanID application and switch to the tenant you would like to add your integration to.
Head to Integrations > Add Integration, select Confluence.
Set up the Primary Application owner (mandatory) and the Description, if any. Set up Secondary Application Owner(s), if any.
Select the Extraction Type and fill in the fields for successful extraction.
From here, you can configure your application using one of the following methods:
Direct integration - Provide your API key, Domain Name and Email obtained above to set up a direct connection with BalkanID.
SCIM integration - Provide SCIM server credentials to set up a SCIM connection with BalkanID.
Manual file upload - Upload Entity and Entity Relations through a .CSV file upload. Contact the team for assistance with this.
Automated upload using API -
Click on next to move onto Optional Configuration.
Fill Optional configuration, if required.
Once you filled in the information, click Save. Your integration is now configured and you will see the status of the integration displayed alongside other integrations on the Integrations page. When data is available, the integration Status will read Connected and the integration Message will read Data available.
Creating a new connection is a straightforward process that allows you to add connections like groups, roles, or policies to your chosen applications efficiently.
Select Creation: Choose the "Creation" radio button to initiate the connection creation process. Choose an Application: Select the application where you want to establish a new connection.
Fill the Payload: Upon selecting an application, a visual (payload) form will appear on the page. Complete this form with the necessary information to create the new connection.
Preview Your Request: After filling out the form, proceed to the next page to preview your request. This ensures that all provided information is correct.
Create Request: Click the "Create Request" button. Your request will be submitted for approval. The request will be visible in the my task page of the reviewer.
Approval and Verification: Once approved(from the my task page of the reviewer), the connection will be added to the selected application. You can verify the addition by checking within the respective application.
The assignment function allows you to grant or revoke access to various resources and connections for an existing connection.
Select Provisioning option: Choose a configuring option. Select Assignment: Choose the "Assignment" radio button to begin the process of assigning resources to a connection.
Select Application and Connection Name: Choose the application and then select the connection you wish to assign resources to.
Configure Grants and Revokes: On selection of connection name, you will see a table where you can grant/revoke accesses. Select the required access to grant/revoke for the selected connection.
Grants: Specify the access rights you wish to grant to the connection.
Revokes: Specify the access rights you wish to revoke from the connection.
Preview and Create Request: Like the creation process, preview your request on the next page and then click on "Create Request" to submit it for approval. The request will be visible in the my task page of the reviewer.
Approval and Update: Once approved(from the reviewer's my task page) the connection's assignments within the application will be updated according to your specifications.
Deleting a connection removes it from the selected application.
Select Deletion: Choose the "Deletion" radio button to initiate the connection deletion process.
Select Application and Connection: Choose the application and then the connection you wish to delete.
Preview and Create Request: Preview your deletion request on the next page and click on "Create Request" to submit it for approval.The request will be visible in the my task page of the reviewer.
Approval and Deletion: After the request is approved(from the reviewer's my task page),the connection will be deleted from the application as per the Balkan provisioning process.


In this article we will explain how to use the Identities page for access discovery. Here you will see a list of all the identities in your BalkanID environment, which includes employees, service accounts, and unmapped identities. You can use the filter menu or search bar to drill down for individual identities or groupings of identities, such as identity types, departments, or managers.
Keep in mind that this a list of application identities, not employees, and multiple identities are often tied back to one employee as a user account or service account.
To navigate to the Identities page, select the Identities page from the Entities section.
You can view the various identities associated with different applications.
You can use the search box and filters to explore the applications integrated. The following filter fields are available for this page:
Identity - This field filters data based on the specific identity within an application. For example, to view information about alicegh in the GitHub (test) integration, use "alicegh (GitHub test)" as a filter in this field.
Identity type - You can filter your identities based on a user being an employee, service account or an unmapped identity.
Identity Name - This field filters data based on the name of the identity irrespective of the application integration type. For example, to view information about alice identity in all AWS integrations, enter the filter in this field.
Using multiple filter fields together will help you navigate through the data swiftly and will make your time spent on discovering entities a lot more productive! Refer to to learn more about filters.
When you click on an identity from the list, a detailed view appears, presenting comprehensive access information specific to that individual or service.
This detailed view provides a granular understanding of an identity's access footprint across your entire system.
The Has Access To tab reveals which connections and resources this specific identity can access. This answers the question: "What can this connection do or reach?"
This tab provides a critical insight into the permissions and scope of the identity itself. For example, if you're examining an identity like "[email protected]" in your Azure integration, the "Has Access To" tab would show you:
Resources Spencer can access (e.g., the "Production SQL Database," the "Dev Virtual Machine").
Connections (like Azure groups or Azure RBAC roles) that Spencer is a member of (e.g., the "Admin-HR" group), which in turn grants him further access.
Every data point listed on the "Has Access To" tab is clickable. Clicking on an entity will open a sidebar providing detailed metadata about that specific entity. Each entity, depending on its type and the application it comes from, has its own unique set of metadata that gives you more context about it within the application.
Understanding Permissions
The "Permissions" column within this tab is also clickable. Clicking on the data in this column will reveal metadata specifically about the relationship between two entities shown in the tab.
To understand what each of these fields (like Connection Provider, Project, and Privileges) indicates, please refer to our dedicated guide on .
The following fields are required from AWS Identity Center:
Access Key
Secret Access Key
AWS Region
Login to your AWS Console.
Select "Security Credentials" on the dropdown when you hover over your user email on the top-right.
Scroll down, until you see a section called "Access Keys". You will see a section shown in the below image:
Access Key is used for authentication. The authenticated IAM User needs to have access to the Identity Center for the integration to work correctly. The IAM User needs to have the following policies attached to it:
Login to the BalkanID application and switch to the tenant you would like to add your integration to.
Head to Integrations > Add Integration, select AWS Identity Center.
Set up the Primary Application owner (mandatory) and the Description, if any. Set up Secondary Application Owner(s), if any.
BalkanID recommends creating a separate service account for the purposes of this integration, instead of using personal or employee named accounts.
Client ID
Client Secret
Environment ID
Region Name
Login to Ping Identity, and navigate to Connections > Applications.
Use the PingOne admin console to create your first application connection. To create the application connection:
Click Connections.
Login to the BalkanID application and switch to the tenant you would like to add your integration to.
Head to Integrations > Third Party Applications and click Add Integration, select Ping Identity. Set up the Primary Application owner and the Description, if any.
Ping Identity would have been added to the list of applications. Click on the Configure and Integrate button beside the integration name, and configure the fields with the values that were noted prior. It should look like this:
BalkanID recommends creating a separate service account for the purposes of this integration, instead of using personal or employee named accounts.
Two extra configuration fields were introduced recently namely,Bitbucket App Password and Bitbucket Account Username , which utilizes v1 APIs and requires different credentials, steps have been mentioned below.
Workspace access token needs new additional scopes namely, Projects > Admin, and Repositories > Admin.
Since these are breaking changes to the integration, if you already have an existing Bitbucket integration, you would need to delete the current Bitbucket integration and add a new app Integration for Bitbucket.
Bitbucket Access token of Workspace (Organization)
Bitbucket API Url (example: “”)
Username of Workspace ID (example: “myworkspace”)
Bitbucket Account Username (example: "janesmith")
On the Bitbucket Workspace Page, navigate to Settings.
Go To Access Tokens.
Click on Create Workspace Access Token.
Go to the Workspace settings.
Copy the Workspace ID.
Store the Workspace ID in a secure location.
This is your account username, You can go to and copy your username under Bitbucket Profile Settings
Go to or Settings > Bitbucket Personal Settings > Access Management > App Password
Click on Create App Password and give the respective permissions.
Copy the App Password somewhere securely
To configure your integration, paste the URL in the following format: https://api.your_bitbucket_domain.org.
Simply replace your_bitbucket_domain.org with the actual domain URL of your Bitbucket instance as shown in the image.
Login to the BalkanID application and switch to the tenant you would like to add your integration to.
Head to Integrations > Add Integration, select Bitbucket.
Set up the Primary Application owner (mandatory) and the Description, if any. Set up Secondary Application Owner(s), if any.
BalkanID recommends creating a separate service account for the purposes of this integration, instead of using personal or employee named accounts.
Okta Token
Okta Site URL
The following permissions are required by BalkanID in order to effectively pull users, groups and applications along with their respective accesses from Okta.
View users and their details
View groups and their details
Manage group membership
Needed to get user membership to groups. Okta does not provide read only permission. This permission only allows to remove a user out of a group, but does not grant ability to add a user to a group. If this permission is not provided, anything that is granted through a group will not be connected to the user. Only applications assigned directly to the user will show up in BalkanID for that user.
You can either create the token from an existing Super User Admin account or create a new service account to create this token. Creating a new service account within Okta for creating this token is out of scope of this document. This document should be assuming, you are logged into Okta account with the relevant permissions and steps involved in creating a token. Create an Okta token:
In Okta’s admin console, navigate to Security > API.
Click the Create Token button.
Provide a name for the token.
Login to the BalkanID application and switch to the tenant you would like to add your integration to.
Head to Integrations > Add Integration, select Okta.
Set up the Primary Application owner (mandatory) and the Description, if any. Set up Secondary Application Owner(s), if any.
Once you filled in the information, click Save. Your integration is now configured and you will see the status of the integration displayed alongside other integrations on the Integrations page. When data is available, the integration Status will read Connected and the integration Message will read Data available.
To perform a manual .CSV upload in the application, you will need a CSV file containing user data (including employees, contractors etc). All HR / payroll / employee source of truth tools should allow you do to download this data. Please ensure that your data is formatted as per the format attached at the bottom of this page.
User ID
Required fields: Work email, Start date
Metadata is a JSON object and has a corresponding Metadata Version. Metadata Versions and their respective allowed fields which are currently supported -
"v1"
"location" - JSON with the following fields:
"address" - String
Even though the "Internal use" fields are supported, they are meant for internal use and are only supported for the purpose of being able to download from an Employee integration (like Merge or Google) and then upload after edits to the Employee without losing relevant information about the original extraction from the integration.
Once you have processed your data and converted it into the suitable format, proceed to upload the .CSV file in the Configure > Users page. Click on "Bulk Upload".
You will be able to see a side screen as shown below. Under the Employees Upload section, upload your formatted .CSV file.
You will be intimated regarding the status of the upload through the snackbar on the top-right of the screen while the BalkanID environment ingests your data and updates your tenant.
You can automatically create tickets in Jira as a part of the following cases:
Access Request has been approved
Access Review has been denied
This functionality allows you to automatically create tickets to provision/de-provision resources based on the corresponding access request/review. Let us explore the steps to configure this on your tenant:
Go to Jira > Settings > System > Mail > Incoming Mails.
Go to Mail Handlers.
Click on Add a incoming mail handler to create a new mail handler with the following configurations:
To understand more about mail handlers and mail servers inside Jira, refer to this document - .
Go to Configure > Integrations on your BalkanID tenant.
Click on either Add Integration or Edit Integration for a particular integration
Go to the Optional Configuration section.
You can test your setup by denying access reviews on your tenant. After the campaign has been marked as complete, an email will be sent out and a ticket will be created in Jira Service Management within the project you configured for denied access reviews. It will resemble the one shown in the image given below:
In case things do not work, add an email as the forward email in the corresponding mail handler. All of jira’s debugging trails while trying to read the templated email will be forwarded to the email set in the forward email field.
What is a Service Account?
A service account in Balkan is like a digital key for applications to automatically do tasks and talk to each other without needing a person to step in. It's similar to having special IDs in other platforms, like Service Principals in Azure or IAM Roles in AWS, which let software access resources or perform actions securely. This setup helps in automating workflows, keeping things secure, and making sure different apps can work together smoothly.
The Service Account Management System encompasses three core functionalities:
Service Account Creation
Service Account Assignment
Service Account Deletion
Each function is accessible via a simple selection using radio buttons on our interface. Below, you will find detailed steps on how to execute each function.
To create a new service account, follow these simple steps to add the account to your selected applications efficiently
Select Creation: Initiate the creation process by choosing the "Creation" radio button. Choose an Application: Select from the list of applications where you want to add a new service account.
Choose a Service Account Type: Select from the list of service account types that are supported for the application.
Fill the Payload: A form will appear on the page once you select an application. This form needs to be completed with the necessary details to create a new service account.
Note - Not supported indicates we don't support creating a service account for the selected application but it will be supported in the future.
Preview Your Request: Proceed to the preview page to review your request, ensuring all provided information is accurate.
Create Request: Submit your creation request by clicking on the "Create Request" button. Your request will then undergo an approval process.(In the my task page of the reviewer)
Approval and Verification: After your request has been approved(from the my task page of the reviewer), the new service account will be added to the selected application. Verify the addition by checking within the application.
This functionality allows you to manage the permissions of existing service accounts by granting or revoking access to various resources.
Select Assignment: Begin the assignment process by choosing the "Assignment" radio button.
Select Application and Service Account: Pick the application and then the service account you wish to manage.
Configure Grants and Revokes: A table will be presented for configuring "grants" and "revokes". These arrays let you define the types of connections or resources (e.g., groups, roles, policies for connections, and applications for resources) and their respective names.
Note - In the Service Account Access Request System, the payload you see during the assignment process allows you to customize access rights for a connection within an application by granting or revoking permissions. You can modify this payload by removing objects you no longer need or adding new ones, provided you use the source types already presented in the example on your screen. It's important to note that adding new types not displayed in the example is not supported, ensuring the system processes your request correctly and efficiently.
Grants: Details the permissions you wish to grant to the service account.
Revokes: Details the permissions you wish to revoke from the service account.
Preview and Create Request: Similar to the creation process, preview your assignment request and submit it by clicking on "Create Request". The request will be visible in the my task page of the reviewer. Approval and Update: Following approval(from the my task page of reviewer), the service account's permissions within the application will be updated accordingly.
Deleting a service account involves removing its access from the specified application.
Select Deletion: To initiate the deletion process, choose the "Deletion" radio button.
Select Application and Service Account: Select the application and then the service account you intend to delete.
Preview and Create Request: Preview your deletion request and submit it by clicking on "Create Request". The request will be visible in the my task page of the reviewer.
Approval and Deletion: Once the request is approved(from the my task page of the reviewer), the service account will be deleted from the application, following the Balkan provisioning protocol.
In the context of application integrations, Business Owners are crucial individuals responsible for managing and overseeing access to connections and resources within an integrated application. These owners play a vital role in ensuring that access reviews, access requests, and other important tasks are properly handled for the connections and resources they're assigned.
This documentation will guide users through the concept of Business Owners, how to assign them, and the responsibilities associated with each role.
Business Owners are designated individuals or groups with the authority to manage access to specific resources and connections within an integrated application (e.g., Okta, GitHub, Salesforce, etc.). They play a critical role in maintaining an organization's security posture by:
Reviewing Access: Periodically assessing who has access to what.
Approving or Denying Requests: Making decisions on new access requests.
Ensuring Compliance: Keeping permissions up-to-date and aligned with the organization's security policies.
In essence, Business Owners are the key stakeholders who oversee access to the resources and connections under their purview.
To provide flexibility, no single point of failure and ensure continuous oversight, you can assign two types of Business Owners:
Primary Owner: This is the main individual designated as responsible for overseeing the application's resources and connections. The primary owner is typically the first point of contact for all access review campaigns and requests related to that application, and is expected to handle most of the required actions.
Secondary Owner(s): These are additional individuals who can take over responsibilities if the primary owner is unavailable. Functionally, secondary owners have the exact same capabilities and authority as the primary owner. The key distinction is in their role: while the primary owner is the designated lead, secondary owners serve as crucial backups to ensure continuity in access management, preventing delays and ensuring that all necessary actions are taken promptly in the primary owner's absence.
To configure business owners for an application integration, follow these steps:
Open the Application Integration Setup Modal Navigate to the Integrations page under the Configure section. A list of application integrations will be displayed.
Select an application to setup business owners Choose which application integration you'd like to setup business owners. Click on the "Setup Business Owner" option. This will open a dialog with a table showcasing a list of connections and resources within your integration.
Many enterprises have multiple applications federated with their primary Identity Provider (IDP) application (e.g., Okta, OneLogin). These federated applications are treated as separate resources during entitlement discovery. Since each resource is an application in itself, different users typically manage and oversee access to each application.
By assigning primary and secondary business owners to these application integrations, each set of owners can take responsibility for their specific application’s access reviews and requests. The primary owner is the main point of contact for managing and approving access, while the secondary owner serves as a backup.
This approach ensures that access reviews and requests are handled by the right individuals with the appropriate expertise for each application, improving efficiency. It also helps in maintaining segregation of duties, as different owners are responsible for different applications, reducing the risk of conflicts or errors. Ultimately, this helps in streamlining access management and ensuring that the right approvals are made in a timely and compliant manner.
Ensure Clear Responsibility: Clearly assign the primary business owner to avoid confusion and ensure accountability. The primary owner should be someone who is actively involved in managing the connections/resources they are assigned to.
Use Secondary Owners for Continuity: While there's no difference in the functional capabilities between a primary and secondary owner, we highly recommend assigning secondary owners for your applications. The primary owner is typically the main point of contact for all access management tasks related to the application. However, in cases where the primary owner is frequently unavailable, secondary owners can step in to perform any required actions on their behalf. This ensures continuity in access management, helps prevent delays, and guarantees that approvals and other critical tasks are handled promptly, even if the primary owner is out of office.
Insights provide valuable, actionable information about how users interact with resources and help identify potential security risks or misconfigurations in your identity and access management system. They are based on the data from entities like users, resources, and connections, and they provide valuable context for understanding access patterns and identifying potential security risks.
Examples of insights include:
MFA Missing: This insight identifies users who do not have Multi-Factor Authentication (MFA) enabled, indicating a security gap that needs to be addressed.
Over-entitled: This insight highlights users who have excessive access to resources beyond what is necessary for their role, posing a potential security risk.
SoD (Segregation of Duties): This insight flags potential conflicts of interest by identifying users who have access to multiple resources or actions that should be separated to prevent fraud or errors (e.g., a user who can both approve payments and manage accounts).
Unused Access: This insight detects access permissions that have not been used in a while, which could indicate unnecessary or outdated access rights that should be reviewed and potentially revoked.
By setting up entity filters and creating insights, you can track important security findings like MFA missing, over-entitled users, segregation of duties (SoD) violations, or unused access.
Navigate to the Insights Section
In the navigation sidebar, go to the Rules & Playbooks section and select the Insights / Custom Insights tab.
Create a New Insight
Insights are a powerful tool for improving the visibility and security of your IAM system. They allow you to:
Identify Security Gaps: Insights like MFA Missing help you spot areas where users may not be following best security practices. This allows you to take action to mitigate risks and ensure a stronger security posture.
Monitor Excessive Access: Insights like over-entitled users can help you identify individuals who have been granted too many permissions. This is a key component of least privilege access management, helping you ensure users only have access to the resources they need.
Ensure Compliance: Insights related to Segregation of Duties (SoD) help you maintain compliance with internal controls and regulatory requirements. They flag situations where access should be restricted to prevent conflicts of interest.
Let’s say you want to track over-entitled users (users with excessive access). You would:
Set up filters to find users with access to resources beyond what’s required for their job.
Create an insight with the name "Over-entitled Users" and a concise label name like "Excessive Access."
Once the insight is created, it will automatically appear on relevant entity pages, and you’ll be able to identify and review over-entitled users quickly.
Getting started
BalkanID recommends creating a separate service account for the purposes of this integration, instead of using personal or employee named accounts.
Personal Access Token
Organization Name
Create a personal access token using the instructions found
Ensure that token scopes are according to image given below.
To use a personal access token (classic) with an organization that uses SAML single sign-on (SSO), you must first authorize the token.
For the personal access token, you'd like to authorize, click Configure SSO. If you don't see Configure SSO, ensure that you have authenticated at least once through your SAML IdP to access resources on GitHub.com. For more information, see "."
More details .
Login to the BalkanID application and switch to the tenant you would like to add your integration to.
Head to Integrations > Add Integration, select Github.
Set up the Primary Application owner (mandatory) and the Description, if any. Set up Secondary Application Owner(s), if any.
The RBAC Analyzer is a unique capability provided by BalkanID that maps the current accesses within an organization to role buckets based on a combination of HRIS data (Department, Job titles, etc.) and integrated application data (connections, resources, etc.). This analysis produces a blueprint that helps organizations understand their current Role-Based Access Control (RBAC) posture based on realtime data. Through this analysis, BalkanID's heuristics provide insights into how employees, their unique identities, and connections are grouped into BalkanID roles. These system-generated roles are further given unique names to help users identify how and why these groups were created.
The BalkanID Generated Roles do not actually exist in your systems, but its a virtual mapping of how your existing connections, resources and permissions can be grouped. You should be able to use the BalkanID Generated Roles from the RBAC Analyzer to refine your IDP roles such as Okta groups or Azure AD groups. This can help organizations keep their RBAC (that typically end up becoming stale) up-to-date at all times.
AI-driven Role Creation: The RBAC Analyzer automatically generates roles based on HR, IT, and usage data across all your enterprise applications.
Confidence Levels: The heuristics-driven confidence levels on employee → connection → role mapping help define and audit your RBAC posture.
Data-driven Approach: Advanced analytics provide the necessary telemetry to proactively detect and remediate both security and compliance issues.
Risk-based Remediation: Achieve least privilege while right-sizing your permissions without disrupting business activities.
The Generated Roles tab in BalkanID serves as a blueprint for the baseline access privileges automatically granted to new employees during the onboarding process. These roles ensure that individuals receive the appropriate level of access from day one—tailored to their position, responsibilities and team structure, enabling them to be productive immediately and securely.
BalkanID intelligently classifies these roles into distinct categories based on organizational structure and access patterns:
Organization Birthright: Access privileges that are granted to all employees across the organization, regardless of department, role, or location. These typically include universal tools or systems such as email, messaging platforms, etc.
App Birthright: Baseline access that every user has within a particular application. This ensures that all users have consistent foundational permissions in apps they are expected to use, while more specific privileges can be added based on their role or function.
Department Birthright: Access privileges assigned to all employees within a specific department. For example, everyone in the Engineering department may receive access to code repositories, development tools, and issue tracking systems relevant to their function.
Furthermore, administrators can drill down into individual BalkanID generated roles to obtain a detailed list of identities, connections, resources and entitlements associated with that role by clicking on that particular role. This will lead to the BalkanID Generated Role Details Page providing a granular view that facilitates a deeper understanding of the access privileges granted by each role, i.e the list of connections, resources and identities.
The Role Confidence tab provides a comprehensive mapping between departments, job titles, and the roles they have been assigned within BalkanID, along with their respective Role Confidence Scores. These roles are generated through an advanced algorithm that calculates the most relevant roles for each department and job title based on their access patterns and permissions.
Along with identifying BalkanID roles for RBAC, we calculated the significance of the role for a job title, department and manager (confidence score). In our technical analysis, we aim to discern the importance of roles within job titles and departments, spotlighting those that are prevalent or considered "birthright." Additionally, we want our approach to draw attention to a specific role within a job title and department that warrants closer monitoring to prevent potential security issues, ensure productivity (address any decline in performance) or clean-up due to employee’s lateral or upward movement.
The confidence score is calculated based on 3 factors - department, job title and manager. High scores indicate strong alignment between the roles and the department, job title, manager. Lower scores highlight areas that may require further review.
Green means greater than 75% of employees with a job title and department and manager have access to the role (high confidence).
Yellow means greater than 50% and less than equal to 75% of employees with a job title and department and manager have access to the role (medium confidence).
Orange means greater than 25% and less than equal to 50% of employees with a job title and department and manager have access to the role (low confidence).
To improve confidence scores:
For roles with lower confidence scores, review the associated permissions and compare them with the actual needs of the department or job title under a manager.
Adjust role assignments as necessary to ensure that each role accurately reflects the permissions required for the specific functions of the department or job title.
Regularly update the roles and their associated permissions based on evolving organizational needs and feedback.
Findings: Findings are security discoveries that are based on the analysis of your IAM posture. They identify potential risks or weaknesses in how users and resources are configured or accessed. Findings are generated based on the rules you create, using entity filters to select relevant data. For example, a finding might identify that a user has access to a sensitive resource without appropriate controls in place, or that a user’s permissions are too broad for their role.
Finding Rule: A finding rule defines the criteria that need to be met in order for a finding to be generated. The rule is based on the entity filters you select, and it can be customized with different fields such as the name, severity, and description of the finding. Depending on the severity level you set, the findings will be grouped accordingly and displayed in the IAM Risk Analyzer for further review and action.
Creating finding rules is a crucial part of monitoring and understanding the security posture of your identity and access management (IAM) system. Findings are security discoveries based on how access to resources is structured and managed. A finding rule allows you to set specific criteria that will help identify potential security risks or gaps in your system. These findings are then grouped and displayed in the IAM Risk Analyzer, where you can analyze them in detail.
Navigate to the Rules & Playbooks Section
In the navigation sidebar, go to the Rules & Playbooks section and select the Finding Rules tab.
Create a New Rule
Let's say you want to create a rule that flags any user who has access to a highly sensitive resource but doesn't have the appropriate role. You would:
Set up filters to look for users (identities) with access to sensitive resources.
Apply a severity of high to indicate that this is a serious risk.
Optionally, provide recommendations on how to reduce access or assign appropriate roles to these users.
Once the rule is created, the system will automatically generate a finding whenever a user with inappropriate access to a sensitive resource is detected. These findings will be displayed in the IAM Risk Analyzer for you to review and take action on.
BalkanID API CLI is a command line interface that can be installed on any system and provides commands to interact with the BalkanID APIs, both downloading and uploading data.
The bulk-download-cli allows you to retrieve various datasets from your BalkanID tenant.
The bulk-upload-cli allows you to upload various datasets to your BalkanID tenant.
Here are some examples demonstrating how to use the bulk-download-cli commands. Remember to replace <SECRET> and <API_KEY> with your actual credentials. The usage pattern for bulk-upload-cli follows a similar structure.
To download campaigns data, you can specify whether to include completed and draft campaigns.
Command Help:
Output:
Running the Command:
The CLI will then prompt for further details:
You will receive a download URL where you can retrieve the campaign data.
To download reviews for a particular campaign, you'll need its Campaign ID.
Running the Command:
The CLI will prompt for the Campaign ID:
The system will periodically check if the file is ready and provide a download URL once it's available.
If you need any help or assistance with the BalkanID API CLI or any other part of the platform, don't hesitate to reach out to the BalkanID team at [email protected].
This guide explains how to notify and remind reviewers about their pending access reviews. You can send manual email reminders for specific campaigns or leverage the BalkanID Slackbot for automated, real-time notifications directly within Slack.
As a Risk Manager or Administrator, you can send ad-hoc email notifications to remind reviewers about active campaigns. This is useful for nudging specific departments or individuals to complete their pending tasks.
Navigate to Your Campaign: From within the campaign details page for any active campaign, click the Notify button, located at the top of the page.
Choose Your Audience: A "Notify" modal will appear. You have two options for targeting your notifications:
By Department: Select the "Department" tab and check the boxes next to the departments you wish to notify.
By Reviewer: Select the "Reviewers" tab and check the boxes next to the individual reviewers you wish to notify.
The reviewers with pending reviews will get notified on their mails regarding their pending notifications so that they can take action on it.
For a more integrated and immediate notification experience, the BalkanID Slackbot delivers alerts directly to your reviewers in Slack. This reduces email clutter and helps your team respond to tasks more efficiently.
Getting Started: No Extra Setup Needed!
This is the best part for a beginner: access review notifications are automatically enabled once the BalkanID Slackbot is installed in your workspace. You do not need to configure anything else. Once installed, reviewers will automatically receive Slack notifications whenever a review is assigned to them.
How It Works
When an access review is created (either from a new access request or as part of a campaign), the assigned reviewer will instantly receive a notification in the Messages tab of the BalkanID Slackbot. This notification includes:
A summary of the access review.
A direct link to the BalkanID app's My Tasks page, where they can immediately act on the review.
Types of Slackbot Notifications
The BalkanID Slackbot keeps you informed throughout the entire lifecycle of an access review. Here are the different notifications you can expect to see:
New access review notifications for campaigns: Sent when a new access review is assigned to you.
Access reviews escalated notifications for campaigns: Sent if the initial reviewer does not act on a review and it is escalated to you as the next-level reviewer (e.g., their manager).
Access reviews overdue notifications for campaigns: A reminder sent to you if your assigned access review has passed its due date.
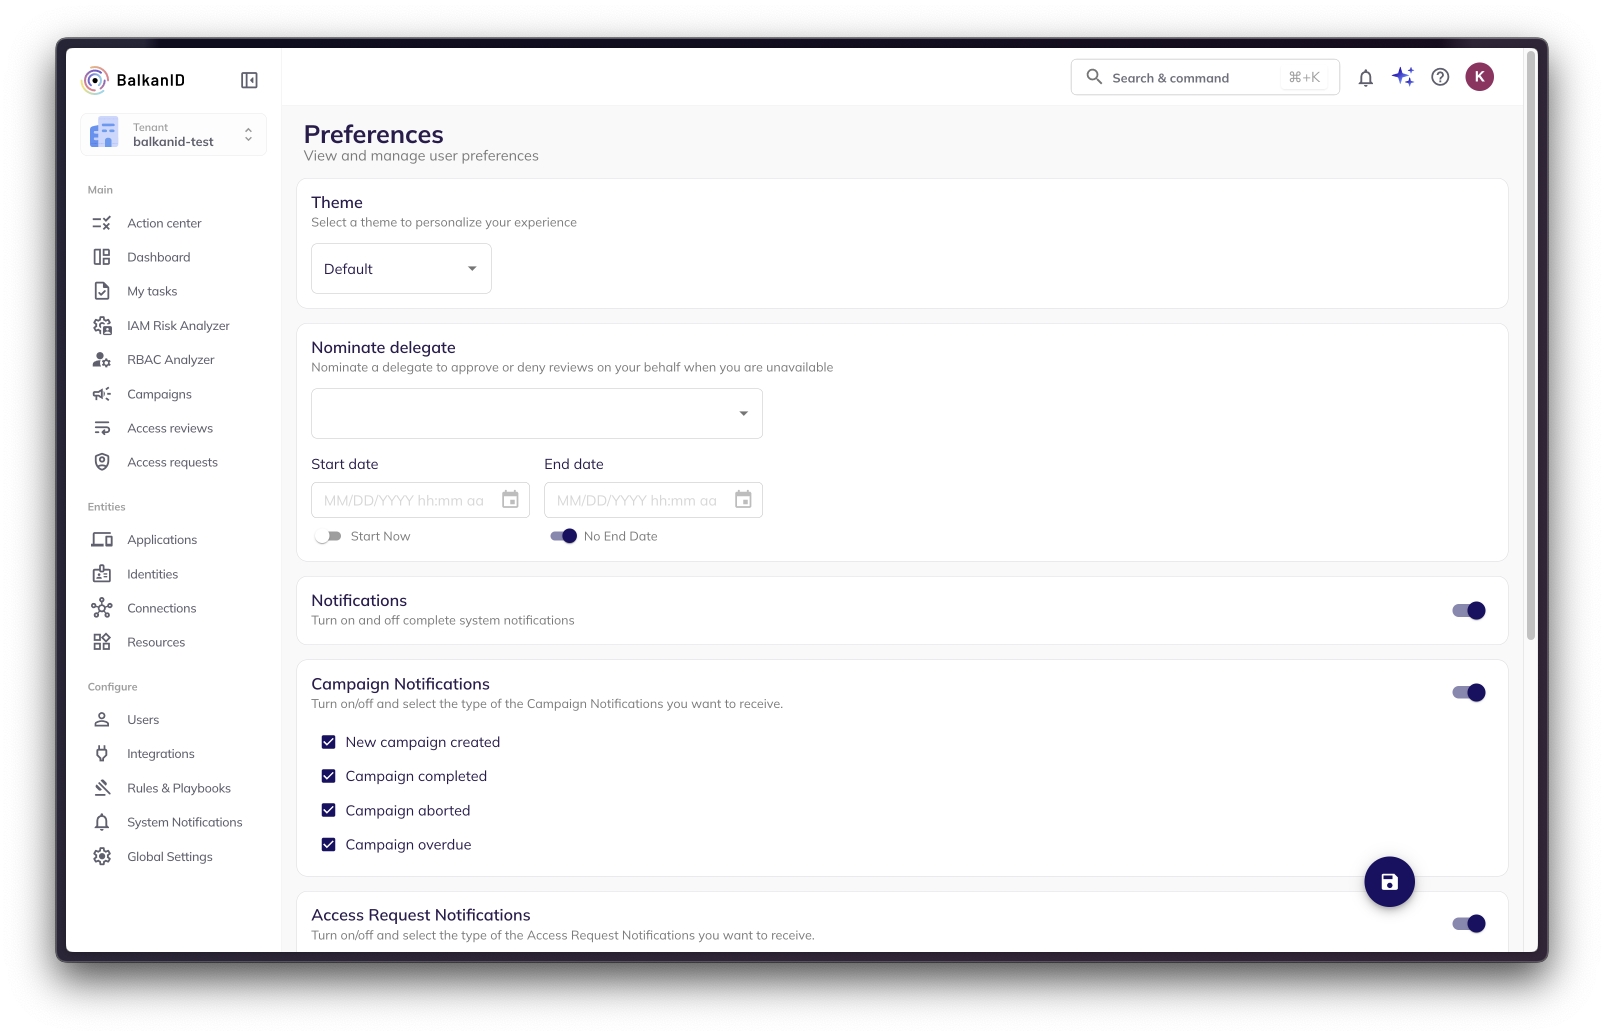
This page details how to connect and synchronize BalkanID with your Human Resource Information System (HRIS). By configuring these integrations with your HRIS, you ensure seamless data exchange, enabling efficient management of employee information, access permissions, and identity updates within BalkanID.
BalkanID securely integrates with various HRIS systems via Merge, our trusted integration partner.
Creating filters is an important step in setting up rules and generating insights for your data. The insights or findings you see are primarily based on how you set up these filters and what data they select. Filters allow you to focus on specific sets of data to generate meaningful insights based on your needs. Let’s walk through how you can create filters using the different fields available to you.
The New Identituy Access Request System offers three primary functions:
Identity Creation
Identity Assignment
Identity Deletion
Each function can be easily accessed through a simple selection process using radio buttons on our interface. Detailed steps on how to perform each action are provided below.
Here's a revised and improved version of your documentation content, focusing on clarity, conciseness, and a user-friendly structure for a customer-facing page.
This section guides you through how BalkanID helps you discover and manage accesses and entitlements across all your integrated applications. Our system organizes the vast amount of data extracted from your applications into foundational building blocks called Entities.
The Review Table is your central hub for managing and acting on access reviews. It provides a comprehensive display of all access relationships relevant to your campaigns, showing what entity (Identity or Connection) has access to what other entity (Connection or Resource), and with what specific permissions, all within a given application integration.
{
"grants": [
{
"type": "<type_of_connection_or_resource>",
"source_name": "<name_of_the_entity>",
"source_id": "<id_of_the_entity"
}
],
"revokes": [
{
"type": "<type_of_connection_or_resource>",
"source_name": "<name_of_the_entity>",
"source_id": "<id_of_the_entity>"
}
]
}Reviewer A can no longer take any action on this review.
Identity Status - You can filter your identities based on whether the identity is active or inactive.
Days Since Last Access - You can filter identities based on their last access times. For example, to see all identities that haven't accessed their account in the last 6 months, you can select "last 6 months" as an option within this filter field.
User - You can use this filter to look for identities that belong to a particular employee. For example, to see all the identities that belong to an employee Alice, select "Alice" as a filter in this field.
Application - This field filters based on the specific Application Integration that you would like to explore. For example, to view identities within Azure (Test Environment) data, add it as a filter in this field.
Connection - This field allows you to filter data based on a connection in an application. For example, to view all identities associated with the admin connection in a group connection type within Confluence, add it as a filter in this field.
Connection Type - This field filters data based on the type of connections available. For example, to view all the identities that belong to a group connection type, add it as a filter in this field.
Resource - This field is used to filter out identities which have privileges to a resource. For example, to view all the identities that have access to the sales vault in 1password, pass "1password/vault/sales" as a filter in this field.
Resource Type - This field is used to filter out identities which have privileges to a resource type. For example, to view all the identities that have access to different vaults in 1password, pass "vault" as a filter in this field.
Insights - Filtering with insights allows you to see which identities have insights on them. For example, to view the identities which are Privileged, you can add "Privileged" as a filter in this field.
Manager - You can filter identities based on the manager of the employee that this identity is tied to. For example, to find all the identities associated with employees managed by Bob, add him as a filter in this field.
Job Title - You can filter identities based on the job title of the employee that this identity is tied to. For example, to find all the identities associated with employees with the job title as ML Engineers, add it as a filter in this field.
Department - You can filter identities based on the department that the employee belongs to. For example, to find all the identities associated with employees in the Engineering department, add it as a filter in this field.
Employment Type - You can filter identities based on the employment type of the employee that this identity is tied to. For example, to find all the identities associated with "Part-time Intern" employees, add it as a filter in this field.
Permission - The Permission field allows you to filter identities based on the permission they have to a resource. For example, to view all identities which have read permission on repositories in GitHub, add "github/read" as a filter in this field.
Permission Value - The Permission value field allows you to filter identities based on the permission value they have to a resource. For example, to view all identities which have true permission value, add it as a filter in this field.


"manager id" - String
"manager name" - String
"employee" - String
"role id" - String
"app" - String (Internal use)
"correlation id" - String (Internal use)
"tenant" - String (Internal use)
"timestamp" - String (Internal use)
Full Name
First Name
Last Name
Work Email
Department
Title
Start Date
End Date
Employment Type
Organization
Manager
Manager Work Email
Source User ID
BalkanID Roles
Metadata Version
Metadata
12345
John Q
John
Q
Ops
Engineer
01/01/2002
Full time
Security
Jane Doe
111111
reviewer
v1
{"employee":"John Q","role id":"1","location":{"address":"123 Main Street, Office Suite 111, Anytown, USA 12345"}}
67890
Jane Doe
Jane
Doe
Ops
Manager
01/01/2002
Full time
Security
222222
reviewer, risk manager, administrator
v1
{"employee":"Jane Doe","role id":"2","location":{"address":"123 Main Street, Office Suite 222, Anytown, USA 12345"}}


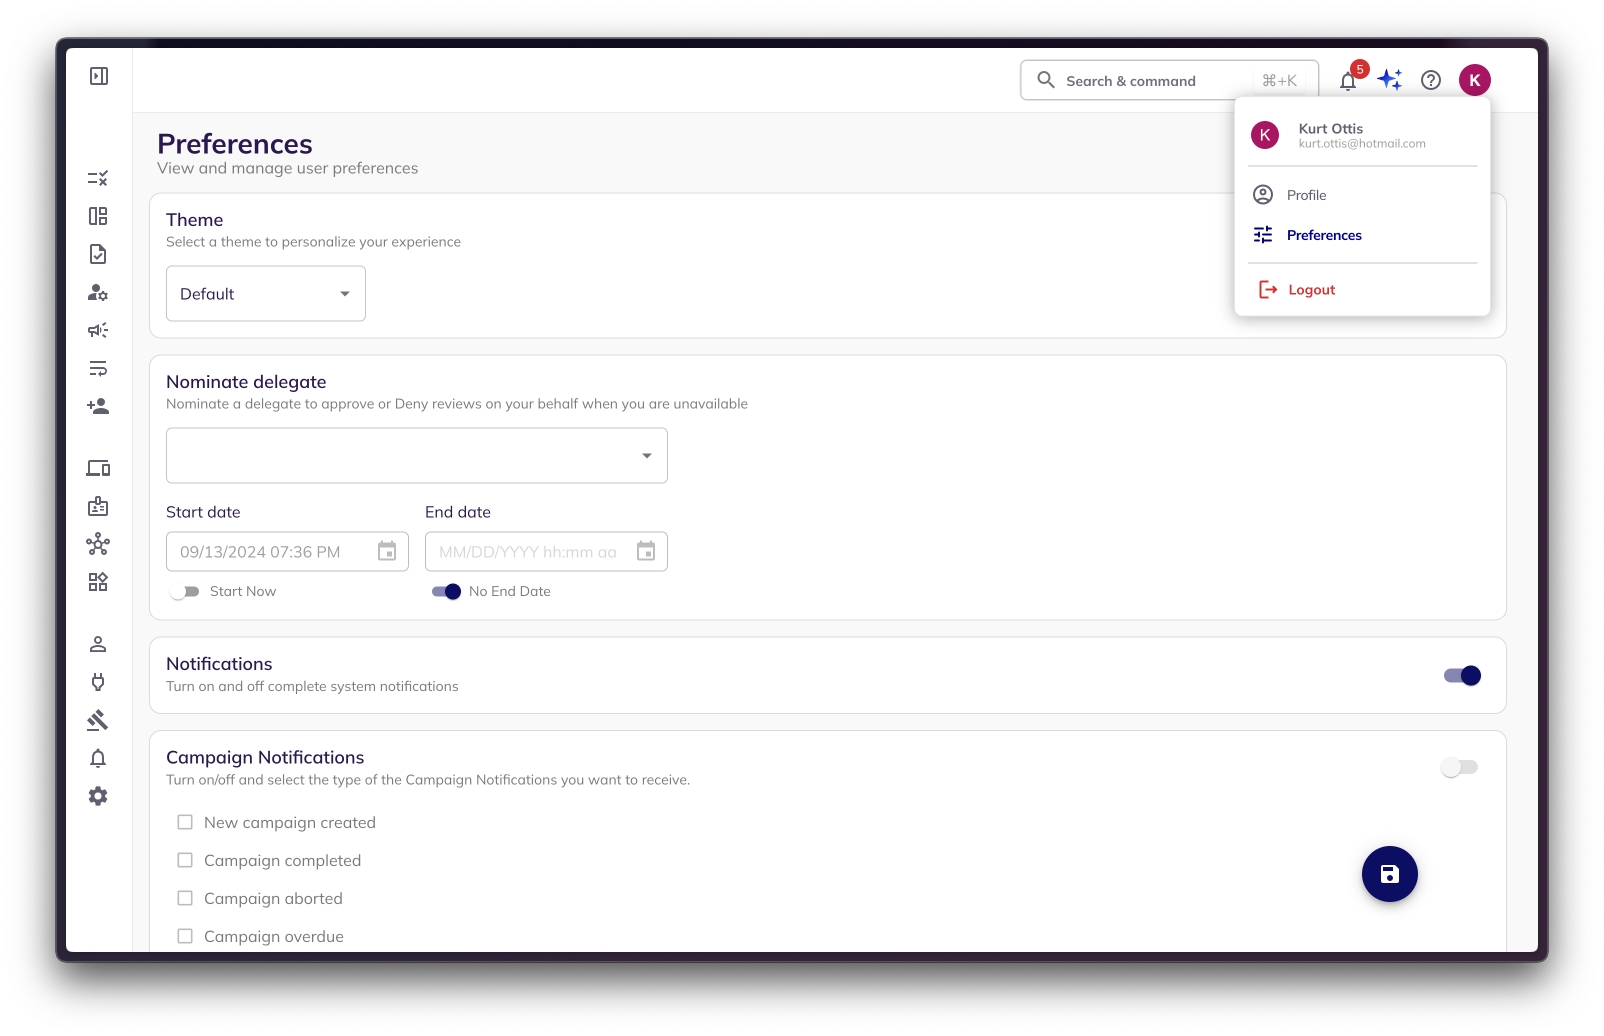
bulk-download-cli --help
Usage:
bulk-download-cli [command]
Available Commands:
admins Download admins data
applied-labels Download applied labels data
apps Download apps data
business-owners Download business owners data
campaigns Download campaigns data
completion Generate the autocompletion script for the specified shell
custom-insights Download custom insights data
employees Download employees data
entities Download entities data
entity-finding-rules Download entity finding rules data
entity-insights Download entity insights data
entity-rbac Download entity rbac data
entity-relations Download entity relations data
entitlements Download entitlements data for an integration
filters Download filters data
findings Download findings data
help Help about any command
integrations Download integrations data
labels Download labels data
playbook-templates Download playbook-templates data
privileged Download privileged data
purposes Download purposes data
relations Download employees identities relations data
requests Download access requests data
reviews Download all reviews
reviews-by-campaign Download reviews for a campaign
rules Download rules data
webhook-templates Download webhook-templates data
Flags:
-h, --help help for bulk-download-cli
Use "bulk-download-cli [command] --help" for more information about a command.bulk-upload-cli --help
Usage:
bulk-upload-cli [command]
Available Commands:
admins Upload admins data
applied-labels Upload applied labels data
apps Upload apps data
business-owners Upload business owners data
campaigns Upload campaigns data
custom-insights Upload custom insights data
employees Upload employees data
entities Upload entities data
entity-finding-rules Upload entity finding rules data
entity-insights Upload entity insights data
entity-rbac Upload entity rbac data
entity-relations Upload entity relations data
entitlements Upload entitlements data for an integration
filters Upload filters data
findings Upload findings data
help Help about any command
integrations Upload integrations data
labels Upload labels data
playbook-templates Upload playbook-templates data
privileged Upload privileged data
purposes Upload purposes data
relations Upload employees identities relations data
requests Upload access requests data
reviews Upload all reviews
reviews-by-campaign Upload reviews for a campaign
rules Upload rules data
webhook-templates Upload webhook-templates data
Flags:
-h, --help help for bulk-upload-cli
Use "bulk-upload-cli [command] --help" for more information about a command.> bulk-download-cli campaigns --helpDownload campaigns data
Usage:
bulk-download-cli campaigns [flags]
Flags:
--api-key string API Key
-h, --help help for campaigns
--include-completed string Include completed campaigns? (y/n)
--include-draft string Include draft campaigns? (y/n)
--secret string API Key Secretbulk-download-cli campaigns --secret <YOUR_API_SECRET> --api-key <YOUR_API_KEY>Include completed campaigns? (y/n): y
Include draft campaigns? (y/n): y
Downloading campaigns data...
Download URL: https://<your_download_url>bulk-download-cli reviews --secret <YOUR_API_SECRET> --api-key <YOUR_API_KEY>Campaign ID: 01HBKKYMCTG5YBCF2F1FXC9YWV
Downloading reviews data...
File is not ready yet. Retrying in 5 seconds...
File is not ready yet. Retrying in 5 seconds...
...
File is not ready yet. Retrying in 5 seconds...
Download URL: <your_download_url>Set a Jira Service Management project for your issues to be created. All issues created for this purpose will be redirected to this project.
Set the type of issue you would like to have created for your purpose. (We consider provisioning/de-provisioning resources to be a task and hence we have set our issue type as a Task).
Assign a Default Reporter for all the issues being created.
You can assign a forward email for troubleshooting purposes.
Save your configurations.


Please provide a description for this (For Example: BalkanID access) and press "Create Access Key". You will then be taken to a page looking like the below image:
Make a note of the Access Key and Secret Access Key. Your Region will be the AWS Region in which your AWS Identity Center is configured. To find out which region, please click on the region name beside your email on the top right corner of the screen, and copy the code. For example, the region in the screenshot below is "us-east-1".
Select the CloudTrail Service:
On the "Create policy" page, select CloudTrail from the list of services under the "Specify permissions" section.
Enable LookupEvents Permission:
Within the CloudTrail permissions, expand the "Read" section and select the LookupEvents permission. Ensure the checkbox next to it is enabled.
LookupEvents permission for CloudTrailDefine Policy Name and Description: Review the policy, then define a clear and descriptive Policy name. You may also add an optional description to provide more context for the policy's purpose. Click "Create policy" to finalize.
Assign the Policy to Your User: Once this policy is successfully created, you must attach it to the IAM user that BalkanID uses to interact with your AWS environment. This will grant BalkanID the necessary permissions to extract last access and last login information.
Direct integration - Provide your Access Key, Secret Access Key and Region obtained above to set up a direct connection with BalkanID.
SCIM integration - Provide SCIM server credentials to set up a SCIM connection with BalkanID.
Manual file upload - Upload Entity and Entity Relations through a .CSV file upload. Contact the team for assistance with this.
Automated upload using API - You can upload data using our with the help of an API key which will be provided to you. Please refer to the and upload docs for specific instructions on uploading your data through the API.
Click on next to move onto Optional Configuration.
Fill Optional configuration, if required.
Once you filled in the information, click Save. Your integration is now configured and you will see the status of the integration displayed alongside other integrations on the Integrations page. When data is available, the integration Status will read Connected and the integration Message will read Data available.


In the Application Name field, enter an application name.
Under Choose Application Type, click Worker.
Click Save.
On the application's Roles page, assign the following roles to the worker app and save the changes. (Note: The roles listed below grant both read and write access to entities. If you only need to extract data for UAR and do not require lifecycle management, it is recommended to create a custom role with read-only permissions based on the built-in roles listed below.)
Identity Data Admin
Environment Admin
Application Owner
Custom Roles Admin
DaVinci Admin
On the application's Overview page, click the toggle at the upper right to enable the application.
Get the Credentials
Click the Application's Configuration tab.
Scroll down to the General section.
Copy the client-id, client-secret, env-id.
Paste these in the BalkanID tenant.
Get the Region from the following link - PingOne Sign On
Select a region from one of them and accordingly use the API domain.
Once you filled in the information, click Save changes. Your integration is now configured and you will see the status of the integration displayed alongside other integrations on the Integrations page. Integrations are synced daily. When data is available, the integration Status column will read Connected and the integration Message will read Data available.
BitBucket App Password
Accounts > Read,Repositories > Read and Projects > Read.
Copy the Workspace Access Token.
Store the generated Access Token securely.
Direct integration - Provide your Bitbucket Access Token, URL, Workspace, Account Username and Account App Password obtained above to set up a direct connection with BalkanID.
SCIM integration - Provide SCIM server credentials to set up a SCIM connection with BalkanID.
Manual file upload - Upload Entity and Entity Relations through a .CSV file upload. Contact the team for assistance with this.
Automated upload using API - You can upload data using our with the help of an API key which will be provided to you. Please refer to the and upload docs for specific instructions on uploading your data through the API.
Click on next to move onto Optional Configuration.
Fill Optional configuration, if required.
Once you filled in the information, click Save. Your integration is now configured and you will see the status of the integration displayed alongside other integrations on the Integrations page. When data is available, the integration Status column will read Connected and the integration Message will read Data available.


View application and their details
View Roles and their details (Scope required okta.roles.read)
Copy the token value to your clipboard. Store it securely for future purposes.
Direct integration - Provide your Okta Token and Site URL obtained above to set up a direct connection with BalkanID.
SCIM integration - Provide SCIM server credentials to set up a SCIM connection with BalkanID.
Manual file upload - Upload Entity and Entity Relations through a .CSV file upload. Contact the team for assistance with this.
Automated upload using API - You can upload data using our with the help of an API key which will be provided to you. Please refer to the and upload docs for specific instructions on uploading your data through the API.
Click on next to move onto Optional Configuration.
Fill Optional configuration, if required.
Read Only (Access Review) Scopes
Lifecycle Management Scopes
okta.roles.read
okta.roles.manage
okta.factors.read
okta.factors.manage
okta.groups.read
okta.groups.manage
okta.apps.read
okta.apps.manage
okta.users.read
okta.users.manage


Provide a name such as “Email Notifications” or something relevant to your use.
Set your incoming mail server to the Default Cloud Mail Server available.
Set the mail handler type to - Create a new issue or add a comment to an existing issue.
Let your folder name be left blank blank (set to default) to let it scan the inbox. If your emails are directed to some other folder within your mail, you will be required to configure that in this field. Go to the next page after this.
Set a Jira Service Management project for your issues to be created. All issues created for this purpose will be redirected to this project.
Set the type of issue you would like to have created for your purpose. (We consider provisioning/de-provisioning resources to be a task and hence we have set our issue type as a Task).
Assign a Default Reporter for all the issues being created.
You can assign a forward email for troubleshooting purposes.
Save your configurations.
In Fulfillment options, choose ticket creation. It will open up a section below to select the ticketing system - Jira Service Management in this case. A text box will also appear to set the Email Address.
Add the email corresponding to your jira default cloud mail server. (jira@<organization-name>.atlassian.net) You can find your jira default cloud mail server in jira as shown in the below image. Then hit Save Changes on the side panel.
This is all the configuration you need to do on the tenant. Click on Save.

There are two methods for assigning Business Owners:
Mapping via UI Select the connections/resources to map. Clicking on the "Map Business Owner(s)" will open a sidebar. Click on "Save changes" After selecting the desired Business Owners or click on "Map to App Owner(s)" to map the selected connections/resources to the application integration owner.
Bulk Business Owner Mapping: Business Owners can be mapped by uploading the Business Owner mapping CSV. Simply click the “Map Business Owner(s)” button without selecting any connections or resources. This will open a side panel where you can download the mapping CSV. After filling in the CSV with the primary and secondary owner emails for a set of entities (connections/resources), upload it back using the same panel. The secondary owner emails should be separated by a semicolon (;). Once the mapping is complete, upload the CSV in the designated section of the side panel and click the “Upload New Mapping” button. The mapping will be processed and updated in the UI within a few minutes.


Click the Create Insight button located at the top left corner of the page. This will open a modal where you can configure your new insight.
Select Entity Filters
In the modal, choose the entity filters you would like to apply to this insight. These filters will help you select specific data (such as users, resources, or connections) that you want to evaluate for potential issues.
Enter Insight Details
Name: Give your insight a clear and descriptive name.
Description: Provide a brief explanation of what this insight will track and why it’s important.
Label Name: This field determines how the insight will appear on entity pages across the tenant. Choose a concise and meaningful label name, as it will be displayed alongside entities in your system.
Save the Insight
After filling in the fields, click Save to create the insight.
View the Insight
After saving, the new insight will appear in the Insights table within the Rules & Playbooks section. Within a short period of time (1-5 minutes), you will start seeing the label associated with the insight applied to relevant entity tables across your tenant.
Reduce Unwanted Access and Risk: Insights such as unused access highlight permissions that no longer serve a purpose, reducing the potential attack surface and simplifying your access control management.

Direct integration - Provide your Github Personal Access Token and Organization obtained above to set up a direct connection with BalkanID.
SCIM integration - Provide SCIM server credentials to set up a SCIM connection with BalkanID.
Manual file upload - Upload Entity and Entity Relations through a .CSV file upload. Contact the team for assistance with this.
Automated upload using API - You can upload data using our with the help of an API key which will be provided to you. Please refer to the and upload docs for specific instructions on uploading your data through the API.
Click on next to move onto Optional Configuration.
Fill Optional configuration, if required.
Once you filled in the information, click Save. Your integration is now configured and you will see the status of the integration displayed alongside other integrations on the Integrations page. When data is available, the integration Status will read Connected and the integration Message will read Data available.
admin:enterprise -> read:enterprise
admin:enterprise
audit_log
audit_log
project
project
repo
repo
write:packages -> read:packages
write:packages -> read:packages
admin:org -> read:org
admin:org
admin:public_key -> read:public_key
admin:public_key -> read:public_key
admin:repo_hook -> read:repo_hook
admin:repo_hook -> read:repo_hook
user


user
Manager Birthright: Access given to all employees who report directly to a specific manager. This ensures consistency in access among team members working under the same leader, based on shared responsibilities or team-wide tools.
Job Title and Department Birthright: A combined classification that assigns access based on both the employee's job title and their department. For example, a “Product Designer” in the Design department may require different access than a “Product Designer” in the Marketing department. This role ensures precision in access provisioning by accounting for both factors.
Team Birthright: A refined category that represents access based on a unique combination of Department and Job Title and Manager. This approach allows for highly tailored access configurations for specific team structures, particularly useful for cross-functional or matrixed organizations.
Click on the Create Rule button located at the top right corner of the page. This will open a modal where you can configure your new rule.
Select Entity Filters
In the modal, choose the entity filters you want to apply for this rule. These filters will help you select specific data (like users, resources, or connections) that you want to evaluate for findings.
Enter Rule Details
Name: Give your rule a descriptive name.
Description: Provide a brief description to explain the purpose of the rule.
Severity: Choose the severity level of the finding (e.g., informational, low, medium, high, critical) based on the importance of the risk identified by this rule.
Optional Fields: You can also add recommendations, references, and mitigations to provide additional context or actions related to the rule.
Preview Entities
Once you’ve entered the rule details, you can preview the entities that match the filters you’ve set. The table on the right-hand side will show you the selected entities.
Save the Rule
When you’re satisfied with your configuration, click on Save. This will create the rule and it will appear in the Finding Rules table within the Rules & Playbooks section.
View Findings
After a short processing time (typically 1-5 minutes), your findings will start to be generated based on the rule you created. These findings are security discoveries that highlight potential risks or misconfigurations within your IAM system.
You can view these findings in the IAM Risk Analyzer by going to the Findings tab.

Preview and Send: After selecting your audience, a preview of the notification email will be displayed. Review the content to ensure it's correct, then click Send.
Access reviews denied notifications: Informs the original requestor that their access request has been denied after review.
Campaign reminder notifications: A general reminder sent during a campaign to all reviewers who still have pending reviews.
Campaign overdue notifications: Sent to all reviewers with pending tasks after the campaign's end date has passed.
Campaign aborted notifications: Notifies relevant users that a campaign has been stopped before completion.
Campaign completed notifications: Notifies relevant users that a campaign has been successfully completed.
Access provisioning/deprovisioning notifications: Alerts notifying that the accesses has been de-provisioned according to fulfilment options setup for integrations after a campaign has been successfully completed.
Notification - Access review denial and de-provisioning:
Notification - De-provisioning of access reviews was unsuccessful
Notification - Access reviews were partially de-provisioned
Notification - All access reviews were successfully de-provisioned


From the list of available integrations, search and select Merge.
In the description field, add a description which indicates that this is an integration with your specific HRIS system. Select a Primary Application Owner and Secondary Application Owners (optional) for this integration.
Select Direct Configuration and select Get Access Token.
Select or search for your integrations from the list of integrations, pick the one you need to connect with, and follow the steps.
You will be intimated regarding the status of the sync in the Integrations page while the BalkanID environment ingests your data and updates your tenant.
After your employee data has been extracted and synced, you'll be able to view all of the integrated data from the Users tab under the Configure section in BalkanID. If you encounter any issues during this process, please don't hesitate to contact the BalkanID team for assistance!
BalkanID securely integrates with a wide array of HRIS systems via Merge, including:
7Shifts
Access People HR
ADP
AlexisHR
AllianceHCM
Altera
Bamboo HR
Breathe
Ceridian Dayforce
Cezanne
Charlie
ChartHop
Clay HR
CyberArk
Darwinbox
Dayforce
Deel
Employment Hero
Factorial
Freshteam
Google Workspace
GreytHR
Gusto
Hailey
HeavenHR
HiBob
HRCloud
HRPartner
Humaans
Humi
Insperity
Intelli HR
Iris Cascade
Jumpcloud
Justworks
Kallidus
Keka
Kenjo
Kiwi HR
Lano
Lucca
Microsoft Entra ID
Namely HR
Nmbrs by Visma
Officient
Okta
Onelogin
Oracle HCM Cloud
Oyster
PayCaptain
Paychex Flex
Paycom
Paycor
PayFit
Paylocity
Peoplestrong
Personio
Ping Identity
Planday
Proliant
QuickBooks Online Payroll
RazorpayX Payroll
Remote
Rippling
Run Powered by ADP
Sage HR
Sage People
Sapling
SAP SuccessFactors
Sequoia One
Sesame
Square Payroll
TriNet
UltiPro (UKG Pro)
UKG Ready
Wave
Workday
Zelt
Zenefits
Zoho People
Zwayam
Navigate to any page on which supports filtering In this example, we are using the entities page which can be discovered while creating a filter to create a new rule. You can navigate to this rule by: Rules & Playbooks > Create rule > Create new filter
Open the filters panel On the top left corner of the page, click the Filters button to open the filter slideout.
Use different fields to set your filter In the filter slideout, you can combine different fields to select the data that fits your needs. Here’s a breakdown of the various fields available in the filter slideout.
Select the filter configuration you wish to save.
Click the Save filter button at the bottom of the Filters menu.
Name and click Save Filter to save the filter configuration.
You can view the list of Saved Filters on your tenant by visiting the Saved Filters tab in your Global Settings page.
Most filter fields are intuitive in nature. Here are descriptions for some that might not be straightforward, which is available across the application:
Name: Select the specific name of the entity you want to filter. For example, you can filter by the name of a resource/identity/connection/insight.
Entity Type: Choose the type of entity you want to filter. You can filter by identity, resource, connection, or insight.
Source Type: This field refers to the terminology used in the applications that provide the data (e.g., in GitHub, a "team" is mapped as a connection entity and a "repository" is mapped as a resource entity in our model. Here the terms "team" and "repository" are referred to as source types).
Source System: This field filters data based on where the entity comes from. It could be an application integration, the system that assigns roles and permissions (RBAC), or the source of insights.
App: Select from the list of applications that have been integrated into your tenant. This helps filter entities based on specific apps. There can be multiple integrations of the same application but with different credentials.
Integration: Choose an application integration that has been set up in your tenant. This allows you to filter based on the specific integration you want to focus on.
User: Filter entities based on the user selected. This is useful if you want to see data tied to a specific user.
Manager: Filter by a manager. This helps you select data tied to users managed by the person you select.
Department: Use this filter to select entities tied to a department users belongs to. You can filter data based on the department.
Job Title: Filter based on the job title of users. For example, you can filter for all data associated with users who have the job title "Engineer."
Employment Type: Filter entities based on the employment type (e.g., full-time, part-time) of users.
Insights: This filter shows entities tied to specific insights set up in your tenant. You can filter based on the insights you’ve created for analysis.
The Having section is particularly useful when filtering based on how different entities are connected. An example of when this section can be used:
To select resources that an identity has access to through a connection, you can simply choose an identity as the entity type and use the having section to specify the connection that you want to see which the identity has access to.
The Having field allows you to filter based on these relationships. You can use it to narrow down data based on whether an identity has access to a resource, or if certain insights are tied to the data you're interested in. Those specified above are just a few examples for using the having field. You could get innovative and try selecting data you desire accurately if these fields are used efficiently.
Saved filters can be used anywhere the Filters menu is available.
To apply a saved filter:
Open the Saved Filters drop down menu and select the Saved Filter you would like to apply.
Once Saved Filter is applied, filtered results are immediately visible on the page.
Go to the Saved Filters tab in your Settings page.
Click on the edit icon on the filter you want to edit.
The filter page opens up. Make the required changes to your filter and click on the Save Filter button.
A dialog box for entering the name of the filter will open.
Select the filter you want to edit from the drop-down box. Click on Save filter to save the changes.
Navigate to the Global filters tab in the Global Settings page.
Click on the "Delete" icon on whichever filter you would like to delete.
You will get a dialog box to confirm. Click on "Delete" again to delete your Saved filter.
Now that you understand the fields, you can create a filter by choosing a combination of them that fits your needs. For example, if you want to know which users in the Sales department have accessed a specific resource, you can set filters for Department = Sales and Resource = [specific resource]. Or, if you're looking for a report on how often users with a Manager job title are accessing a specific application, you can filter based on Job Title = Manager and App = [specific app].
By combining these fields in different ways, you can create customized filters to help you setup meaningful insights and rules based on your specific requirements.
Username
Consumer Key
To obtain the above, you can following instructions on your Salesforce Portal.
The integration needs only 2 administrative permissions.
It is best to create a profile for this purpose.
Create a BalkanID profile.
Grant the following 2 Administrative permissions:
View Setup and Configuration
View Roles and Role Hierarchy (prerequisite)
Connected App
A Connected App must be configured for authentication.
Go to SalesForce Setup by clicking the Gear icon at the top right.
Go to Apps -> App Manager in the left sidebar.
Add a new app by clicking New Connected App:
Connected App Name: Balkan ID
API Name: Balkan_ID
Contact Email:
Enable Enable OAuth Settings.
Use https://app.balkan.id/api/oauth/sfdc/redirect for Callback URL. The URL is required but not used.
Check Use digital signatures
Click "Choose File" and choose salesforce.crt
BalkanID team will have provided the salesforce.crt prior to this
For Selected OAuth Scopes, add Manage user data via APIs (api) and Perform requests on your behalf at any time (refresh_token, offline_access).
Enable Require Secret for Web Server Flow.
Enable Require Secret for Refresh Token Flow.
Click Save to save.
On the resulting “View” Connected App page, locate and copy the Consumer Key.
You will then use this value in the ‘Consumer Key’ field within your BalkanID integration configuration. Note: This key is unique to your specific Salesforce instance and must be configured individually for each customer.
On the same “View” connected app page, click Manage.
Click Edit Policies.
In the OAuth policies section, change Permitted Users to Admin approved users are pre-authorized.
Change IP Relaxation to Relax IP restrictions.
Click Save to save.
Back on the app page again, in the Profiles section, click Manage Profiles.
On the Application Profile Assignment page, assign the Read Only profile.
Click Save to save.
Continue to create the Integration User.
The integration impersonates a user. It is best to create a user for this purpose with Read Only access.
Create a BalkanID user with the following information:
Lastname: BalkanID
Alias: BalkanID
Email: BalkanID
User License: Salesforce
Role: <None specified>
Profile Read Only
Username: [email protected]
Email: [email protected]
Login to the BalkanID application and switch to the tenant you would like to add your integration to.
Head to Integrations > Add Integration, select Salesforce.
Set up the Primary Application owner (mandatory) and the Description, if any. Set up Secondary Application Owner(s), if any.
Select the Extraction Type. From here, you can configure your application using one of the following methods:
Direct integration - Provide your Salesforce User Name and Consumer Key obtained above to set up a direct connection with BalkanID.
SCIM integration - Provide SCIM server credentials to set up a SCIM connection with BalkanID.
Manual file upload - Upload Entity and Entity Relations through a .CSV file upload. Contact the team for assistance with this.
Automated upload using API -
Click on next to move onto Optional Configuration.
Fill Optional configuration, if required.
Once you filled in the information, click Save. Your integration is now configured and you will see the status of the integration displayed alongside other integrations on the Integrations page. When data is available, the integration Status will read Connected and the integration Message will read Data available.
Creating a new identity is a straightforward process that allows you to create new identities in the existing applications.
Select Creation: Choose the "Creation" radio button to initiate the identity creation process. Choose a Provisioning Option: Select a provisioning option. Choose an Application: Select the application where you want to create a new identity.
Choose a User Account Type: Select from the list of user account types that are supported for the application. Select a name: Select a name for the new access request.
Fill the Payload: Upon selecting an application, a form (payload) will appear on the page. Complete this form with the necessary information to create the new identity.
(Optional) Map the new identity with an existing user.
Preview Your Request: After filling out the form, proceed to the next page to preview your request. This ensures that all provided information is correct.
Create Request: Click the "Create Request" button. Your request will be submitted for approval. The request will be visible in the my task page of the reviewer.
Approval and Verification: Once approved(from the my task page of the reviewer), the identity will be added to the selected application. You can verify the addition by checking within the respective application.
The assignment function allows you to grant or revoke access to various resources and connections for an existing connection.
Select Assignment: Choose the "Assignment" radio button to begin the process of assigning resources to a connection.
Select provisioning option and application: Choose the provisioning option and then select the application of the identity you wish to grant/revoke access to.
Select a user account: Select the user for which you want to grant/revoke access.
Select grant/revoke connections: From the visual view, select the accesses you want to grant/revoke from this user's account.
Preview and Create Request: Like the creation process, preview your request on the next page and then click on "Create Request" to submit it for approval. The request will be visible in the my task page of the reviewer.
Approval and Update: Once approved (from the reviewer's my task page) the identity's assignments within the application will be updated according to your specifications.
Deleting an identity deletes it from the selected application.
Select Deletion: Choose the "Deletion" radio button to initiate the identity deletion process.
Choose a Provisioning Option: Select a provisioning option. Choose an Application: Select the application from which you want to delete an identity. Select user account: Select the user account (identity) which you want to delete from the selected application.
Preview and Create Request: Preview your deletion request on the next page and click on "Create Request" to submit it for approval.The request will be visible in the my task page of the reviewer.
Approval and Deletion: After the request is approved (from the reviewer's my task page), the identity will be deleted from the application.
Suspending an identity suspends it from the selected application. Only non-Suspended Identities can have Suspension requests created for them.
Select Suspension: Choose the "Suspension" radio button to initiate the identity suspension process.
Choose a Provisioning Option: Select a provisioning option. Choose an Application: Select the application from which you want to suspend an identity. Select user account: Select the user account (identity) which you want to suspend in the selected application.
Preview and Create Request: Preview your suspension request on the next page and click on "Create Request" to submit it for approval.The request will be visible in the my task page of the reviewer.
Approval and Suspension: After the request is approved (from the reviewer's my task page), the identity will be suspended in the application.
Reactivating an identity reactivates it from the selected application. Only Suspended Identities can have Reactivation requests created for them.
Select Reactivation: Choose the "Reactivation" radio button to initiate the identity reactivation process.
Choose a Provisioning Option: Select a provisioning option. Choose an Application: Select the application from which you want to reactivate an identity. Select user account: Select the user account (identity) which you want to reactivate in the selected application.
Preview and Create Request: Preview your reactivation request on the next page and click on "Create Request" to submit it for approval.The request will be visible in the my task page of the reviewer.
Approval and Reactivation: After the request is approved (from the reviewer's my task page), the identity will be reactivated in the application.
In BalkanID, Entities are fundamental representations of identities, resources, connections, and insights within your system. They are designed to be flexible and can be extended to cover new data types (like logs) in the future.
We categorize the data extracted from your application integrations into the following core entity types:
Identity:
Represents a user or service account in your system.
Extracted directly from your application integrations.
Examples include individual users (e.g., "Alice Smith"), customer profiles, or different types of service accounts, each with unique access rights.
Resource:
Represents the assets or services that users can access.
Extracted directly from your application integrations.
Can be anything from documents, databases, or reports to specific features within your applications.
Connection:
Represents the access provider that grants an Identity access to a Resource.
Derived from entities granted through your application integrations.
Often represents roles, groups, or memberships.
Insight:
Provides valuable, actionable information about how resources are being accessed.
Generated by BalkanID's analysis of your data (unlike Identities, Resources, and Connections, which are directly extracted).
Insights are derived from the relationships and data captured by other entities, helping you understand access patterns and potential risks.
Entity relations describe how two entities are connected and interact with each other. They provide the context for how identities gain access to resources within your environment.
To illustrate, let's consider a GitHub integration example:
Scenario:
A user, "alicegh" (Identity) within a GitHub integration, belongs to the "Engineering" group (Connection). Because of her membership in "Engineering", Alice has access to two repositories: "customer-application" (Resource) and "admin-application" (Resource).
Entities Involved:
alicegh (Identity)
Engineering (Connection)
customer-application (Resource)
admin-application (Resource)
Entity Relations:
alicegh → Engineering
Meaning: Alice is a member of the Engineering group. This is a direct relationship.
Engineering → customer-application
Meaning: The Engineering group has access to the customer-application repository.
Engineering → admin-application
Meaning: The Engineering group has access to the admin-application repository.
alicegh → customer-application (Connection Provider: Engineering)
Meaning: Alice has access to customer-application because she is part of the Engineering group.
alicegh → admin-application (Connection Provider: Engineering)
Meaning: Alice has access to admin-application because she is part of the Engineering group.
Entity relations also carry important metadata that provides deeper context:
Connection Provider:
What it is: This optional field identifies the entity that causes two other entities to be related. It's the "reason" or "path" through which access is granted.
Example from above: In the relations alicegh → customer-application and alicegh → admin-application, Engineering is the Connection Provider. This signifies that Alice gains access to these repositories only by virtue of being in the Engineering group. If she wasn't part of Engineering, she wouldn't have this access.
When it's absent: Direct relationships (like alicegh → Engineering) typically do not have a Connection Provider.
Project:
What it is: This field is used to denote the specific account number, domain, or tenant to which entities belong, especially when a single integration manages multiple accounts.
Purpose: It clarifies the organizational context within an integration. For example, if a single AWS integration connects to two different AWS accounts, the Project field specifies which account the entities and their relations belong to.
Privileges:
What it is: This field describes the specific permissions or level of access that a parent entity has on a resource it can access.
Example from above: For alicegh → customer-application, Alice might have "Read/Write" privileges. However, for alicegh → admin-application
By understanding these entities and their relations, you gain a powerful, granular view of all access within your BalkanID tenant, enabling more effective security and compliance management.
The Entity Discovery section provides essential guidance for configuring entity management. It includes discovering entities across various application integrations to ensure comprehensive visibility and control. Additionally, it covers how to work with filters to refine data and perform impact analysis to assess the effects of changes on access and security.
Every piece of information presented in the review table is designed to be interactive, allowing you to quickly dive into more context:
Clickable Data Points: Every Identity, Connection, or Resource listed in the table is clickable.
Detailed Sidebar: Clicking on any entity will open a sidebar providing detailed metadata about that specific entity. This metadata gives you rich context about the entity as it exists within its integrated application.
Clickable Permissions Column: The data displayed in the "Permissions" column within the review table is also clickable.
Relationship Metadata: Clicking on these permissions will reveal a sidebar or modal providing metadata specifically about the relationship between the two entities shown in that review row. This clarifies how and why the access exists.
To understand what each of these fields (like Connection Provider, Project, and Privileges) indicates, please refer to our dedicated guide on Understanding Entities and Entity Relations.
The Access Provider column helps you understand how a user has access to an application or resource by showing the complete chain of relationships that grant that access. This includes both direct assignments and indirect (nested) access paths through groups or roles.
For example, if a user inherits access through multiple nested groups, the Access Provider column will display the full hierarchy — such as:
User → Group A → Group B → Resource X
This gives reviewers full visibility into what provided the access and through which entities it flows, making it easier to verify if access is appropriate or excessive.
BalkanID offers two ways to view your reviews, allowing you to choose the best option for your review workflow: Ungrouped and Grouped by Entity.
When reviews are Ungrouped, each individual access relationship is displayed as a separate row in the table. This view allows you to approve or deny each access at a granular level, giving you precise control over every entity relationship.
When reviews are Grouped by Entity, all access relationships associated with a single Identity or Connection are consolidated into one row in the table. This grouping allows you to action upon all reviews associated with that specific entity at one time, streamlining the review process for entities with many accesses.
To see all the individual reviews associated with a grouped entity, simply click on the "Eye" icon in that entity's row. This will open a detailed view showing all underlying granular accesses.
BalkanID provides a detailed Audit Log for each access review, allowing you to track all decisions and changes made over time. This audit trail is crucial for compliance, understanding decision-making, and troubleshooting.
The way you access the audit log depends on whether you're in the "Ungrouped" or "Grouped by Entity" view of your reviews.
When viewing reviews in the Ungrouped format (where each access is a separate row), you can directly access the action log for any specific review:
Navigate to the "Details" column for the review row you want to investigate.
Clicking on the detail icon in this column will open a sidebar. This sidebar provides comprehensive information about the review, including its full details and a chronological audit log of all actions taken on that specific review.
When reviews are Grouped by Entity, you first need to access the granular details for the entity before viewing individual review action logs:
First, click the Eye icon in the main review table row for the entity you're interested in. This will open a detailed view sidebar showing all the granular reviews associated with that entity.
Within this sidebar's table, look for the details icon (as shown in the image below) in the "Details" column for each individual granular review.
Clicking this icon will then open another sidebar, providing the specific details and audit log for that particular granular review, similar to the ungrouped view.


There are two kinds of information that can be pulled from Google Workspace into BalkanID - namely HRIS data (using Google as a HRIS source of truth) and Entitlement data (who has access to what, etc). The following setup applies to both.
By default, typically Google Workspace integration may be setup in your tenant in such a way that it pulls in just entitlement data. To start using Google as an HRIS source of truth, please contact [email protected] and we will enable that.
BalkanID recommends creating a separate service account for the purposes of this integration, instead of using personal or employee named accounts.
Domain
Super-Admin Email
Service Account
Granting Access to BalkanID
This step is only needed if you would like to create a new project instead of using an existing project for the integration.
Create a project ().
You should be able to walk through the wizard after clicking Create Project from the section of the console. You will specify a project name and select an organization.
For additional details refer to
Login to the BalkanID application and switch to the tenant you would like to add your integration to.
Head to Integrations > Add Integration, select Google Workspace.
Set up the Primary Application owner (mandatory) and the Description, if any. Set up Secondary Application Owner(s), if any.
BalkanID recommends creating a separate service account for the purposes of this integration, instead of using personal or employee named accounts.
Option 1 - Using an IAM Role
IAM Role ARN
Option 2 - Using an IAM User
Access Key ID
Secret Access Key
Option 1 - Using an IAM Role
We use an IAM User called balkan-service-user, which assumes the IAM Role provided by you, to connect to your AWS Account.
To create an IAM Role which the balkan-service-user can assume, follow the steps below.
Navigate to the section.
Click "Create role":
Set the "Trusted entity type" to "Custom trust policy" and paste the following policy into the section below it:
In the "Permissions policies" section, filter policies for IAMReadOnlyAccess and select as in image:
In the next section, set the IAM Role Name and Description. The IAM Role Name will be part of the IAM Role ARN. Click "Create role" to create the IAM Role.
Once the IAM Role is created, set the "Maximum session duration" to be 12 hours:
Option 2 - Using an IAM User
To generate an access key ID and secret access key, follow the steps below.
Navigate to the section.
Click “Create user”:
Provide a username and click on next.
Navigate to the "Security credentials" tab. Scroll down, until you see a section called "Access Keys". You will see a section shown in the below image:
Click on "Create Access Key", select "Other" when prompted to enter use-case and click "Next".
Please provide a description for this (For Example: BalkanID access) and press "Create Access Key". You will then be taken to a page looking like the below image:
Make a note of the Access Key and Secret Access Key.
Login to the BalkanID application and switch to the tenant you would like to add your integration to.
Head to Integrations > Add Integration, select Amazon Web Services.
Set up the Primary Application owner (mandatory) and the Description, if any. Set up Secondary Application Owner(s), if any.
Set up & manage Insights & Findings within BalkanID, enabling users to define rules, prioritize findings, and automate actions to mitigate risks effectively.
The IAM Risk Analyzer allows organizations to prioritize risks and findings by defining custom rules based on system-generated or user-defined insights. This feature ensures that the platform highlights actionable findings tailored to the organization’s unique requirements.
1. Define Insights: Enable users to identify and label entities with specific risks or attributes.
2. Generate Findings: Combine multiple insights into actionable findings that trigger alerts or playbooks.
3. Automate Actions: Empower users to take swift action on findings using playbooks and user actions.
4. Enable Contextual Understanding: Provide detailed information about insights and findings, including risk severity, mitigation options, and reference links.
An Insight is a system or user-defined label that identifies a potential risk or characteristic associated with an entity.
System-Generated Insights Examples:
Weak MFA
Over Entitled
Duplicate Connection
Insight Name: Descriptive name (e.g., Okta Weak MFA)
Description: Context of the insight (e.g., “Identities with weak Okta MFA factors.”)
Details: Additional information about the risk (e.g., “Weak MFA methods: SMS or call.”)
Inherent Risk Rating: Pre-assigned risk level for the insight (Low, Medium, High).
A Finding aggregates multiple insights into an actionable risk alert. Findings provide a broader risk context and are used to trigger automated workflows.
Example Finding:
Name: Weak MFA Okta User with SoD Violation
Description: “User has weak MFA on Okta and violates SoD policies by accessing finance applications.”
Risk Rating: High
Insights → Findings: Findings are built from one or more insights.
Entities → Insights: Insights are associated with entities (e.g., users, connections).
Finding Rules: Logical expressions that define how findings are generated from insights.
Step 1: Define Insight
Navigate to the Configure > Rules & Playbooks > Insights section.
Click Create Insight and enter:
Name: A descriptive title (e.g., Okta Weak MFA).
Description: Explanation of the insight.
Step 2: Select Entities
Define the entities this insight applies to (e.g., users, connections).
Apply entity filters to narrow the scope (e.g., MFA methods = SMS or call).
Step 3: Review and Save
Verify the details of the insight and save it.
Step 1: Select Insights and Entities
Navigate to Configure > Rules & Playbooks > Finding Rules section.
Click Create Finding Rule and enter:
Name: Descriptive title (e.g., Weak MFA with SoD Violation).
Description: Explanation of the risk.
Step 2: Assign Risk Rating
Assign a Finding Risk Rating to represent the combined risk level.
Step 3: Review and Save
Confirm selections in a review modal and save the finding rule.
Navigate to the IAM Risk Analyzer dashboard > Findings section.
Click on a finding to:
View the contributing insights and details.
Take user actions (e.g., Review Access, Notify, Execute a Playbook, Execute a Webhook).
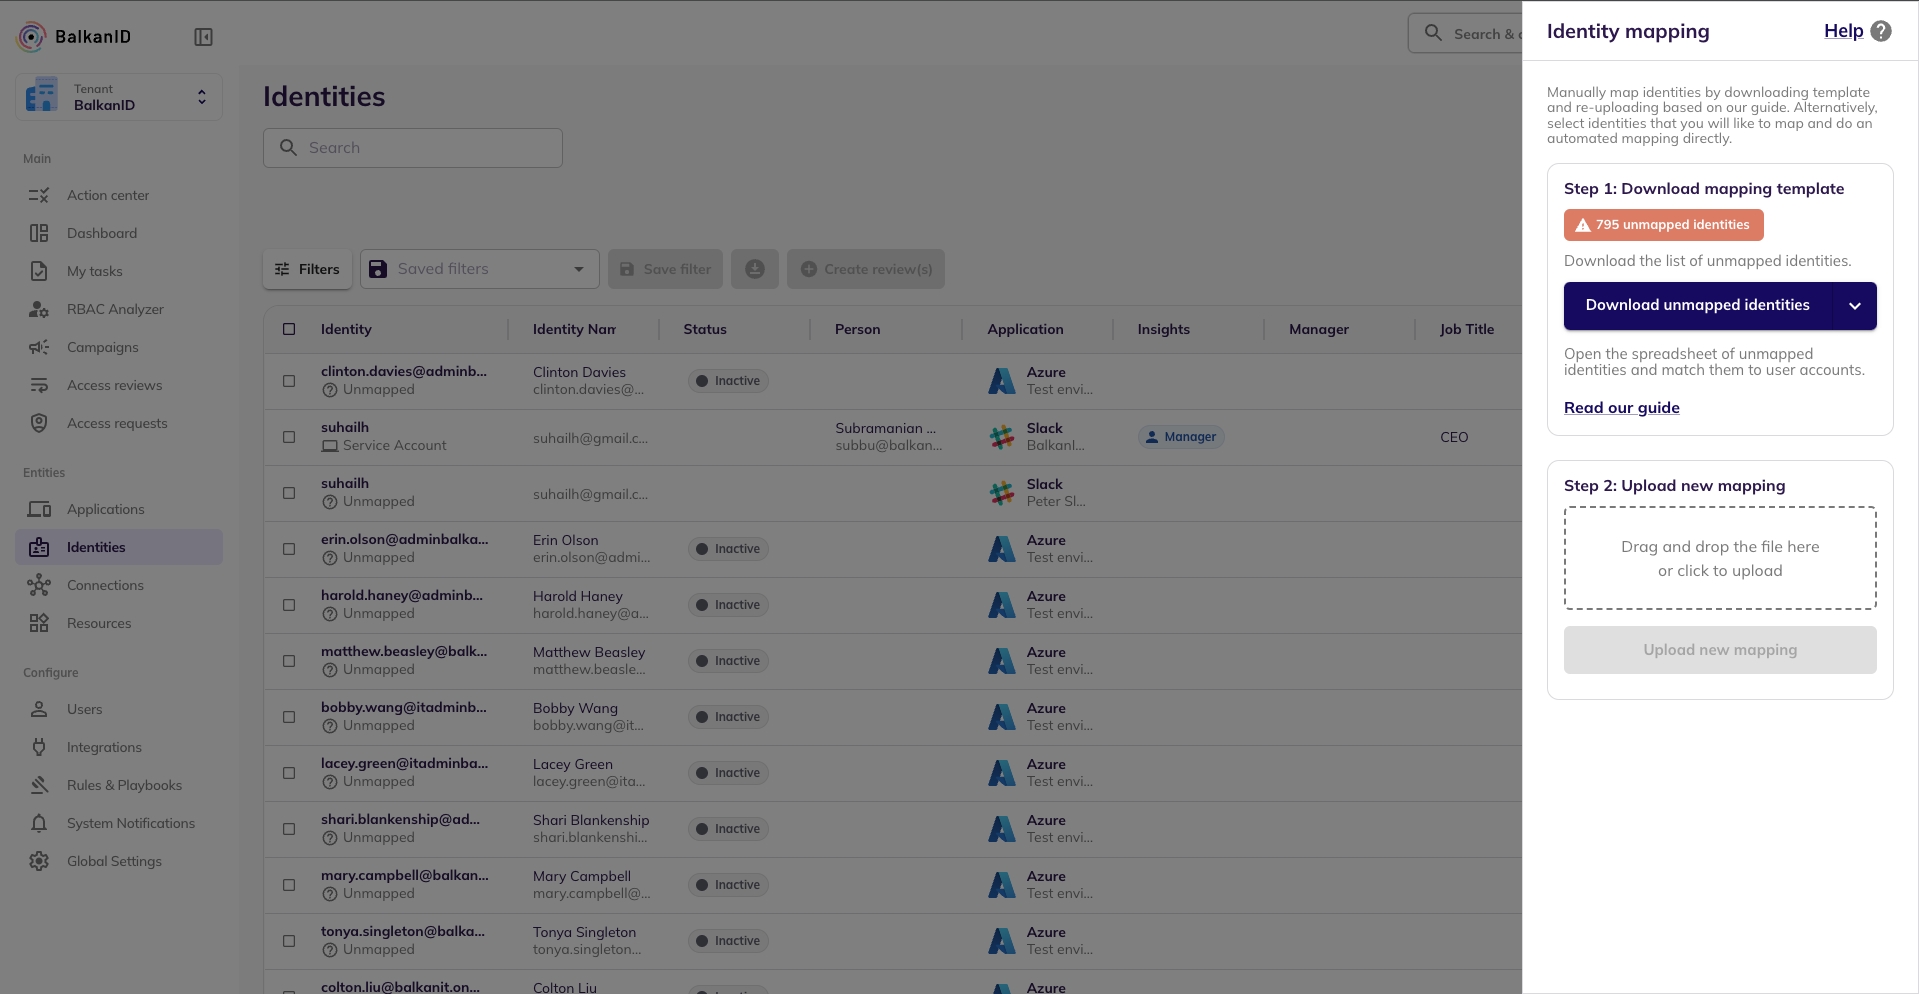
Once a campaign is created, Administrators and Risk Managers can review the progress of all campaigns via the main campaign dashboard. Campaigns are broken up into the following sections: Draft, In-progress, Overdue, Completed and Aborted. We have three different views for campaigns:
Grid:
The BalkanID Slackbot empowers any team member to request access to applications and resources directly within Slack. This guide explains how to create different types of access requests, ensuring you can get the tools you need efficiently while maintaining security through a standard approval process.
If the BalkanID Slackbot isn't set up for your tenant, please refer to to enable it.
All requests are for GRANT access (provisioning) and can be either Permanent or Temporary. Temporary requests require an end date, after which the access will be automatically de-provisioned.
{
"grants": [
{
"type": "<type_of_connection_or_resource>",
"source_name": "<name_of_the_entity>",
"source_id": "<id_of_the_entity"
}
],
"revokes": [
{
"type": "<type_of_connection_or_resource>",
"source_name": "<name_of_the_entity>",
"source_id": "<id_of_the_entity>"
}
]
}Examples: a premium feature, a cloud storage bucket, an API service, or a specific repository.
Example: If a user gains access to admin resources because they are part of an "Admin" role, then the "Admin" role serves as the Connection.
Engineering


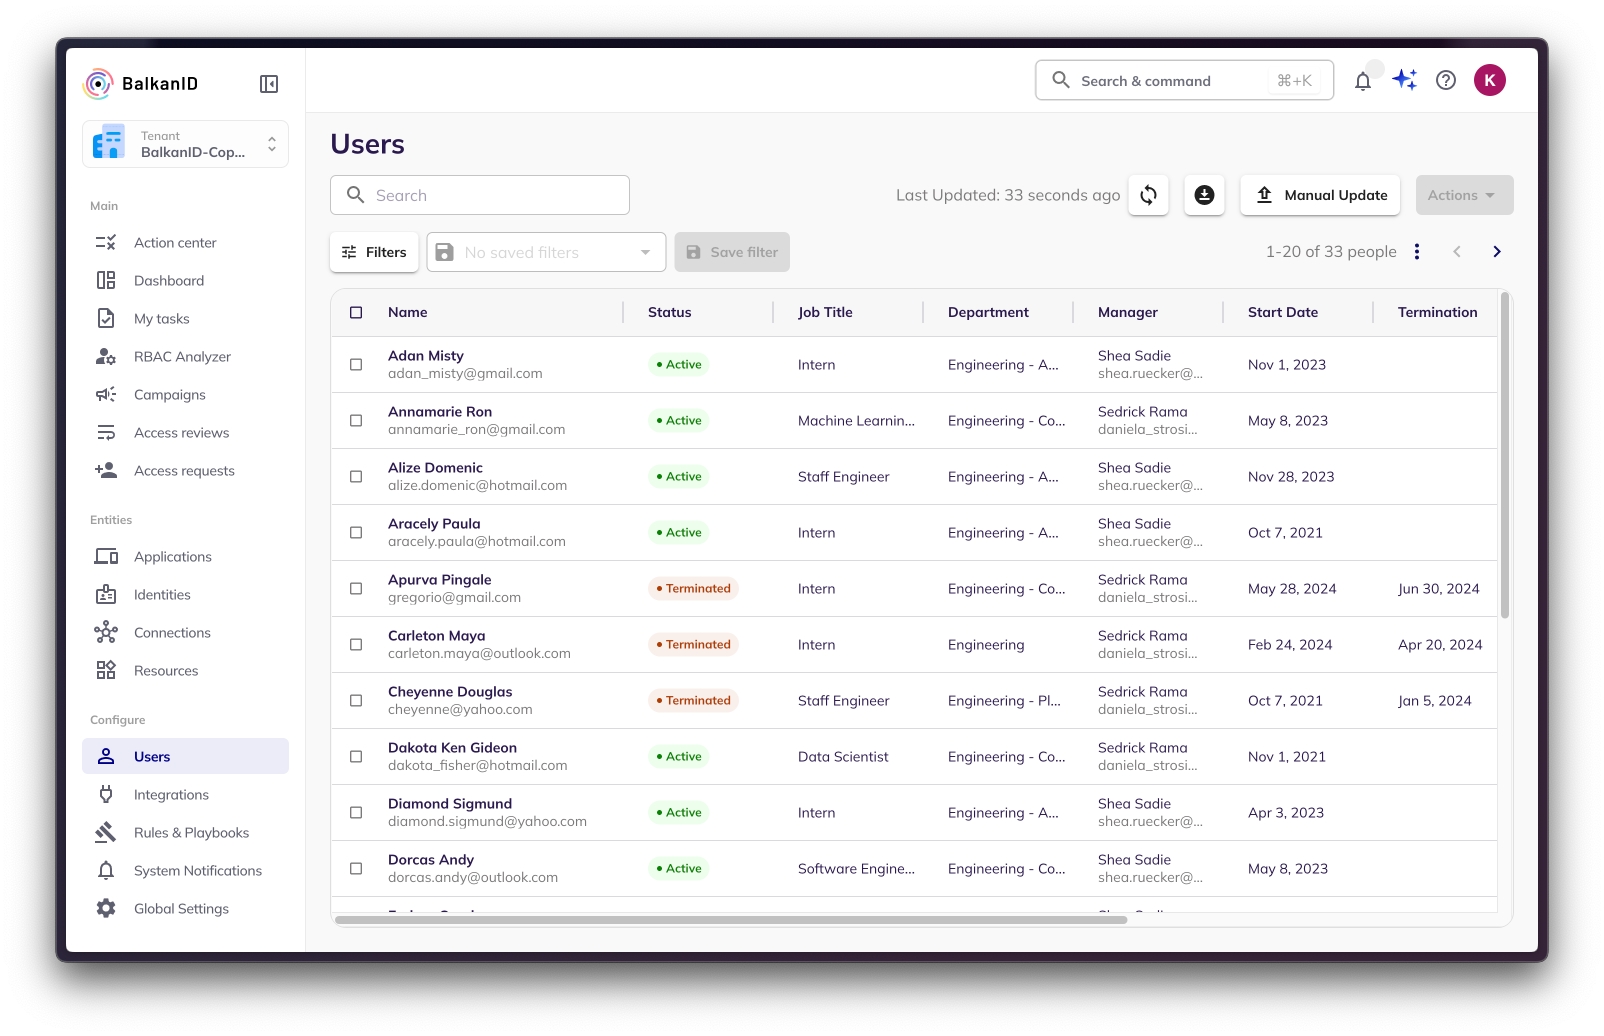


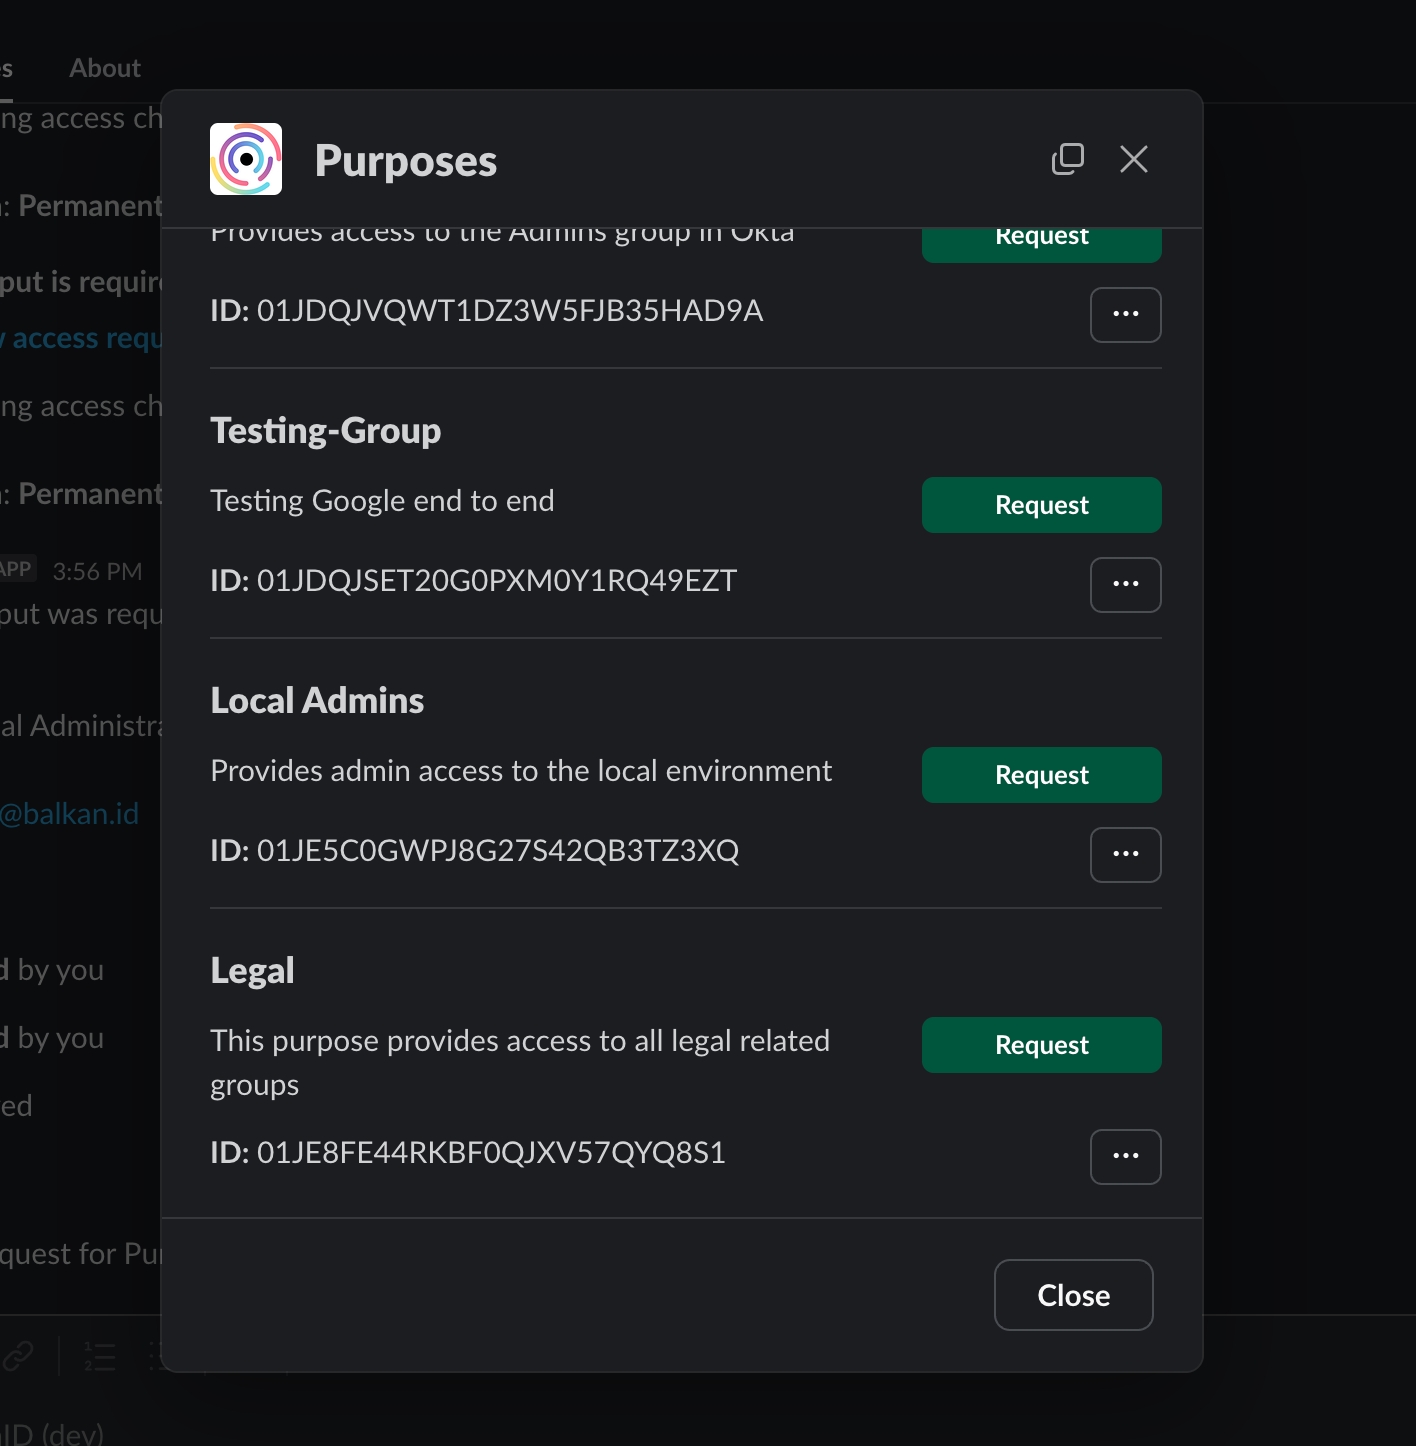
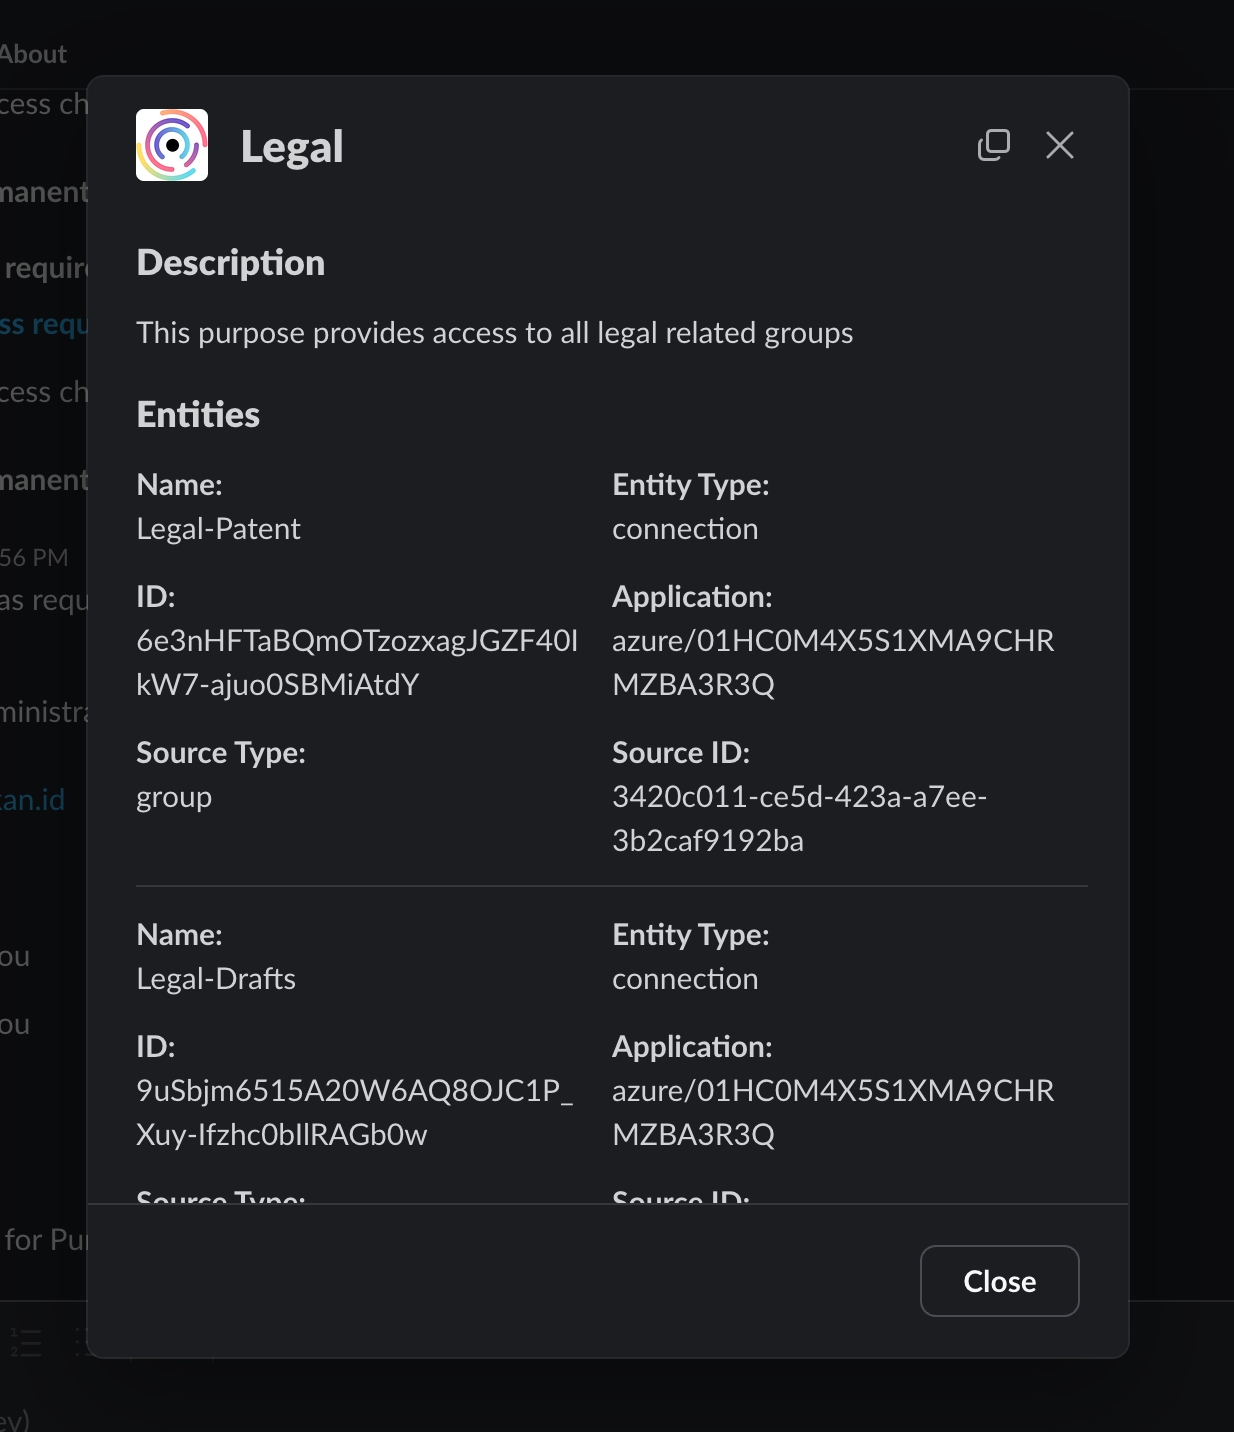
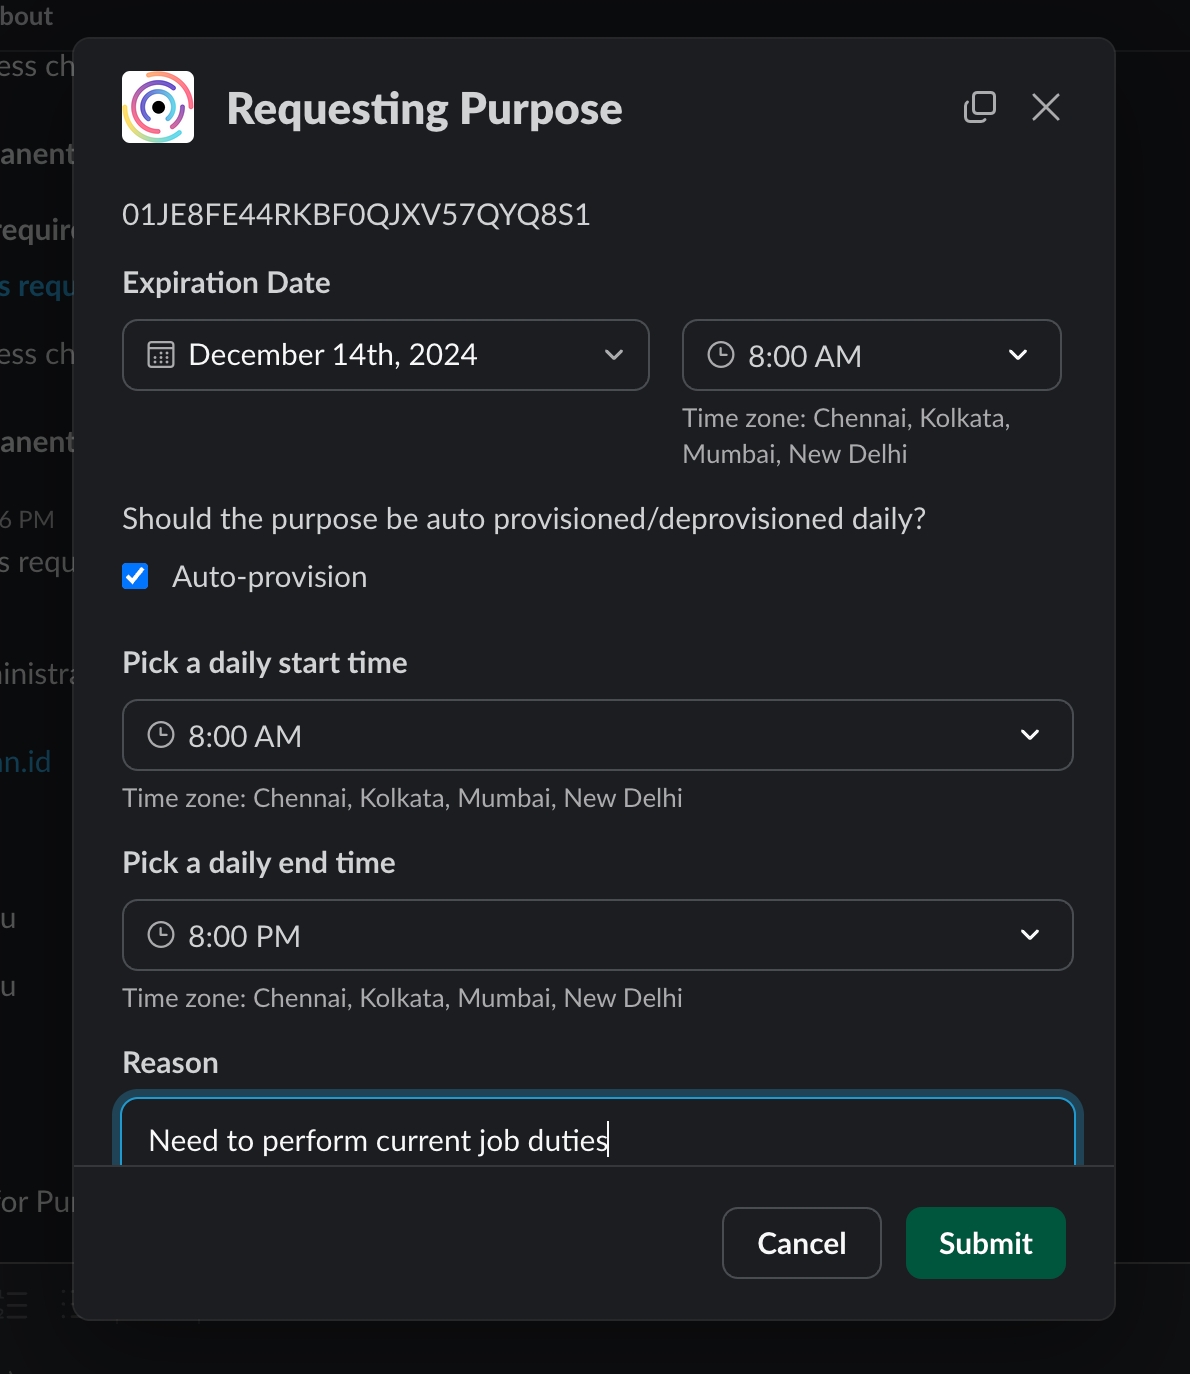
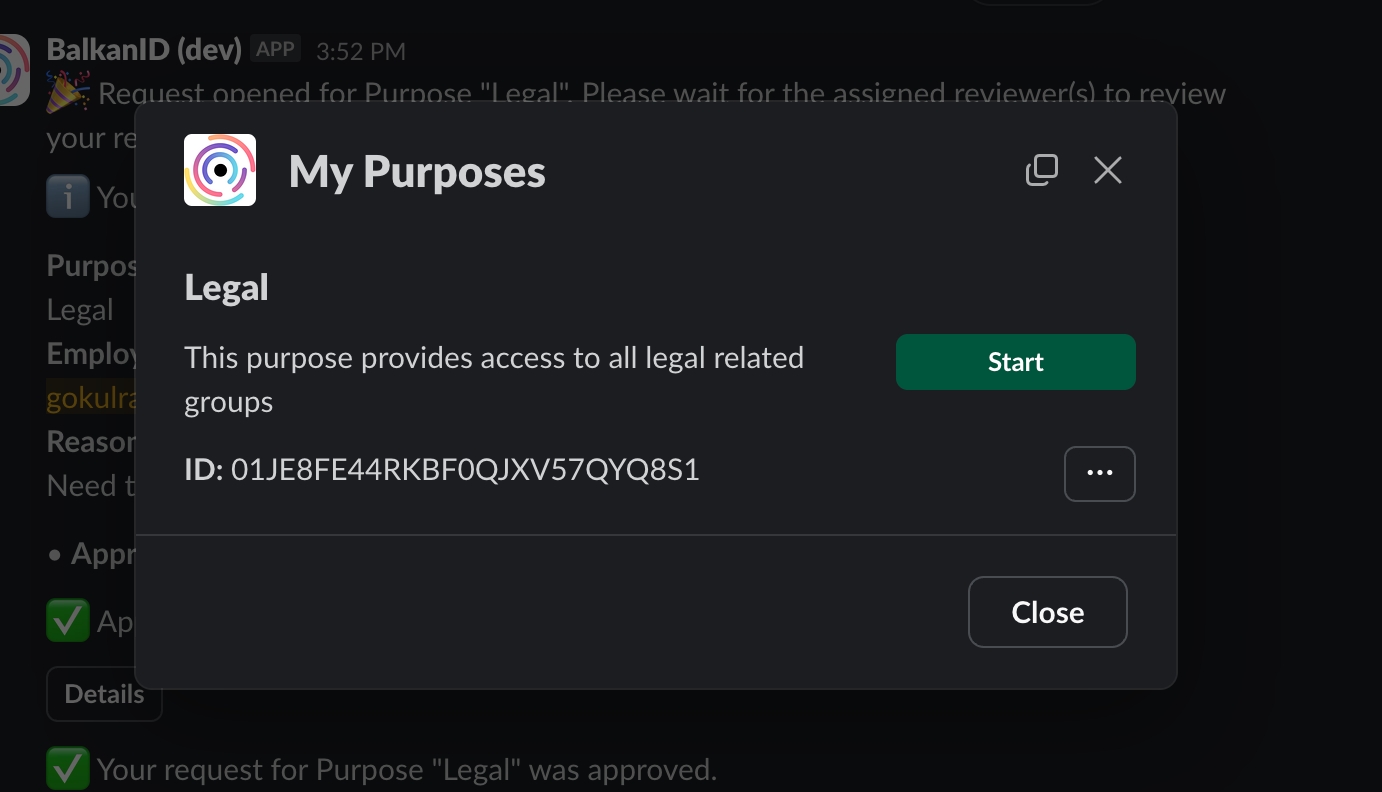
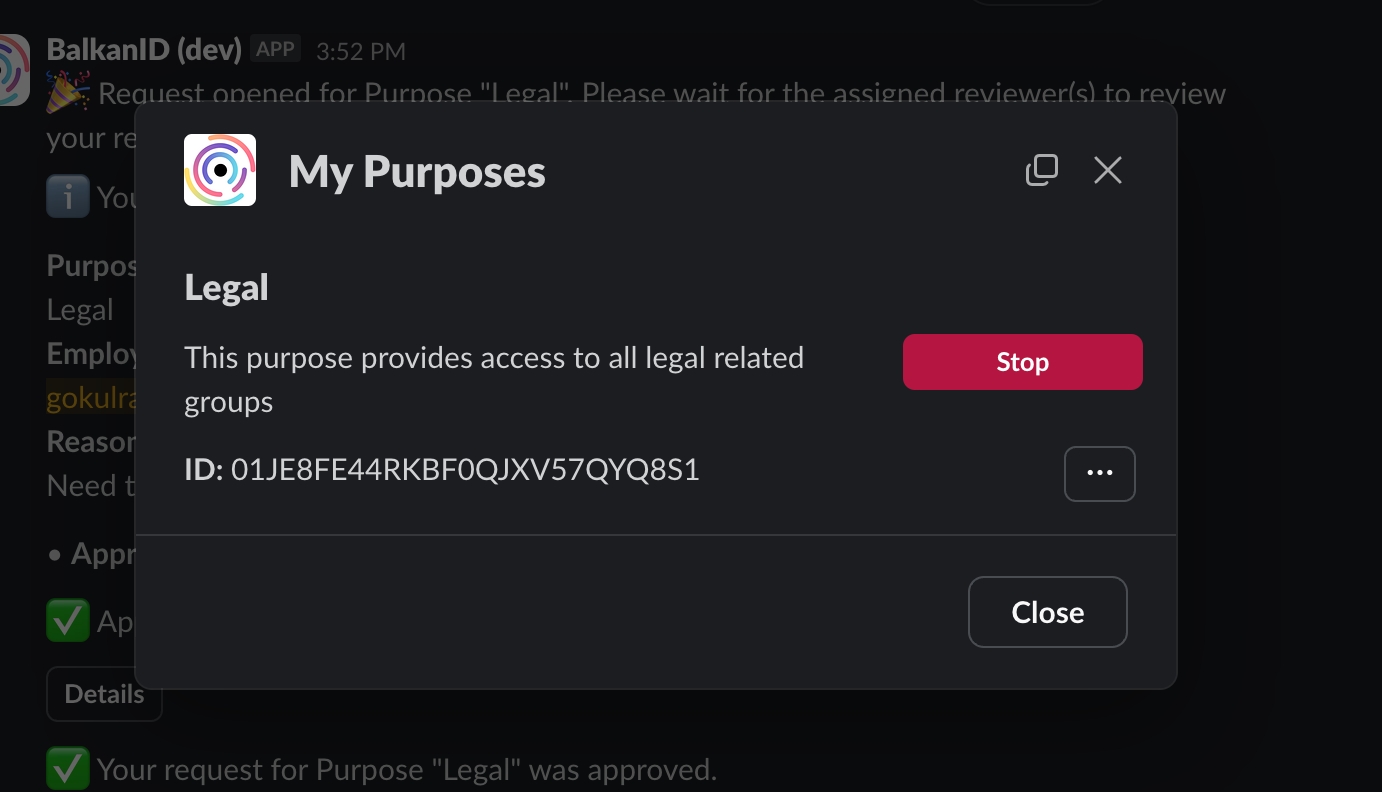
Go to Google Cloud → APIs and service → Enabled APIs and services, search for the required APIs and enable it.
Search and enable the following APIs
Create a service account in project created in the previous step (https://console.cloud.google.com/iam-admin/serviceaccounts)
You should be able to walk through the wizard after clicking “Create Service Account” from the ‘Service Accounts’ section of the console. You will specify a service account name, and the rest of the fields will auto-fill based on that. You can just hit Create and Continue. You will not need to specify any of the optional steps listed on the wizard. This step is only needed if you would like to create a new service account instead of using an existing service account for the integration.
Copy and save the OAuth 2 Client ID as well as the service account email address from the main service accounts listing page (the items under the columns underlined in red below).
Upload existing key to the service account
Click Add New > Upload Existing Key.
Use the certificate received from BalkanID.
Remember to save the email address of the service account to enter into the configuration for BalkanID from the service account listing page as stated in the previous section.
Enable Admin SDK API (https://console.cloud.google.com/apis/library/admin.googleapis.com)
Click Enable.
Delegate domain access (https://admin.google.com/ac/owl/domainwidedelegation)
Click Add New.
Enter the OAuth 2 Client ID created in the previous step.
Add the following OAuth Scopes:
Direct integration - Provide your Google Domain, Super-Admin Email and Service Account Email obtained above to set up a direct connection with BalkanID.
SCIM integration - Provide SCIM server credentials to set up a SCIM connection with BalkanID.
Manual file upload - Upload Entity and Entity Relations through a .CSV file upload. Contact the team for assistance with this.
Automated upload using API - You can upload data using our with the help of an API key which will be provided to you. Please refer to the and upload docs for specific instructions on uploading your data through the API.
Click on next to move onto Optional Configuration.
Fill Optional configuration, if required.
Once you filled in the information, click Save. Your integration is now configured and you will see the status of the integration displayed alongside other integrations on the Integrations page. When data is available, the integration Status will read Connected and the integration Message will read Data available.
Read Only (Access Review) Scopes
Lifecycle Management Scopes
https://www.googleapis.com/auth/admin.directory.user.readonly
https://www.googleapis.com/auth/admin.directory.user.security
https://www.googleapis.com/auth/admin.reports.audit.readonly
https://www.googleapis.com/auth/admin.directory.user
https://www.googleapis.com/auth/admin.directory.user.security
https://www.googleapis.com/auth/admin.datatransfer
https://www.googleapis.com/auth/admin.reports.audit.readonly
https://www.googleapis.com/auth/admin.directory.orgunit.readonly
https://www.googleapis.com/auth/admin.directory.orgunit
https://www.googleapis.com/auth/admin.directory.group.readonly
https://www.googleapis.com/auth/admin.directory.customer.readonly
https://www.googleapis.com/auth/cloud-identity.groups.readonly
https://www.googleapis.com/auth/admin.directory.group
https://www.googleapis.com/auth/admin.directory.customer.readonly
https://www.googleapis.com/auth/cloud-identity.groups
https://www.googleapis.com/auth/admin.directory.rolemanagement.readonly
https://www.googleapis.com/auth/admin.directory.rolemanagement


You can copy the ARN from the "ARN" section (just above "Maximum session duration" in the image above).
Refer to the Configure AWS in your BalkanID tenant section below to complete setup.
Attach existing policies directlyIAMReadOnlyAccessReview the user's information and click “Create User”:
Once done, the new user will show up on the table. Click on the user to go into his profile page:
Direct integration - Provide your Access Key ID, Secret Access Key and Role ARN obtained above to set up a direct connection with BalkanID. Note: If the Role ARN is provided, then Access Key ID and Secret Access Key need not be provided. If all three are provided, then the Role ARN is the one which will take priority and be used.
SCIM integration - Provide SCIM server credentials to set up a SCIM connection with BalkanID.
Manual file upload - Upload Entity and Entity Relations through a .CSV file upload. Contact the team for assistance with this.
Automated upload using API - You can upload data using our with the help of an API key which will be provided to you. Please refer to the and upload docs for specific instructions on uploading your data through the API.
Click on next to move onto Optional Configuration.
Fill Optional configuration, if required.
Once you filled in the information, click Save. Your integration is now configured and you will see the status of the integration displayed alongside other integrations on the Integrations page. When data is available, the integration Status will read Connected and the integration Message will read Data available.
Read Only (Access Review) Scopes
Lifecycle Management Scopes
IAMReadOnlyAccess (policy)
IAMFullAccess (policy)


User-Generated Insights Examples:
SoD Violation
Privileged
Proposed Mitigations: Steps to mitigate the risk (e.g., Enforce TOTP, biometric login).
References: Links to external guidelines or frameworks (e.g., PCI DSS, MITRE).
Components:
Weak MFA Insight
SoD Violation Insight
Details: Add specifics like weak MFA methods or resource details.
Risk Rating: Assign an inherent risk level.
Proposed Mitigations: Suggest actions to resolve the issue.
References: Add relevant links or frameworks for context.
Select Insights: Choose insights to include in the rule.
Entity Filters: Add filters to refine the scope of the findings.
Use filters to view:
Insights: A list of all active insights with details.
Findings: Aggregated alerts with risk ratings.


List:
Kanban:
Clicking on a campaign will give you details on the campaign progress by application and reviewer respectively. The dashboard is composed of three sections:
Summary - The status of all access reviews for that given campaign
Pending - Access reviews that are pending to be reviewed, but within the due date of the campaign
Overdue - Access reviews that have not yet been completed and are past the due date of the campaign
Aborted - Access reviews that have been prematurely stopped for a particular reason by the admin.
Completed - Access reviews that have been reviewed and have reached a final state (Denied or Approved)
Progress by Application - A table summary of the current progress of access reviews by each individual application.
Progress by Reviewer - A table summary of the current progress of access reviews by each individual reviewer.
Further, you can click on the data in the table such as Application name, reviewer name or even the number of items under Pending, Overdue, Aborted statuses etc, to be taken to a detailed page of all the reviews in those buckets (For example, under Okta, clicking on the number 34 that is Overdue will take you to that specific filtered page to show what is overdue within the Okta application for this specific campaign).
By clicking the three dots located in the top right corner of a campaign card or within the campaign's detail view, you'll unlock a suite of available actions.
When a campaign is in a Draft state, it means it's still being set up and is not yet active. Here are the actions you can take:
Publish: This action makes your campaign active and initiates the access review process. Reviewers will begin receiving notifications and can start actioning on their assigned reviews. You can track the status of publishing through the snackbar.
How to Publish:
From the Campaign Dashboard: Click the action's menu on the campaign card and select "Publish."
From the Edit Page: While editing a draft campaign, you'll find a "Publish" option to activate it directly.
Once you hit publish using either of the ways shown above, a dialog box will appear as shown in the below image, asking you to confirm publishing the campaign. This dialog box will also warn you if any integrations used in the campaign are out-of-sync, indicating that the data you are basing the campaign on might not be up to date.
If there are no out-of-sync integrations, you will see a plain dialog box.
Edit: This action allows you to modify the campaign's configuration, including filters, review details, reviewers, and fulfilment options, before it goes live.
Abort: This action immediately stops a campaign and halts all associated access reviews. All review statuses will be updated to "Aborted."
Delete: This action permanently removes the campaign and all its associated data. Once a campaign is deleted, all review data, history, and configuration related to that campaign are irretrievably lost.
Difference from Abort: An aborted campaign preserves its data with an "Aborted" status, allowing you to review its history. Deleting a campaign erases all its historical data.
Once a campaign is Published, it is actively running and reviewers are working on their assigned tasks.
Abort: This action immediately stops a campaign that has been published but hasn't fully completed. This action halts all associated access reviews. Any access reviews within that campaign that have not yet been approved or denied will have their status updated to "Aborted."
Note: Once a campaign is aborted, no further de-provisioning, ticket creation, or notification sending will occur for any review from that campaign, regardless of its prior status.
Clone: The Clone action creates a duplicate version of the selected campaign and is saved as a Draft campaign. All the reviews and data is duplicated. This campaign will need to be published to perform reviews.
Delete: This action permanently removes the campaign and all its associated data. Once a campaign is deleted, all review data, history, and configuration related to that campaign are irretrievably lost.
Difference from Abort: An aborted campaign preserves its data with an "Aborted" status, allowing you to review its history. Deleting a campaign erases all its historical data.
Reassign reviewers: The Reassign reviewers action is used to re-assign access reviews to a different reviewer. You can select whose reviews would you like to re-assign and to whom.
Close campaign early: The Close campaign early action closes the campaign before completion. You can perform the following actions when you close a campaign early:
You can Reassign and Approve them
You can Reassign and Deny them
Once all reviews within a campaign have been actioned upon, it transitions to a state where final processing can occur.
Complete: This action is used to complete a campaign once all the reviews within the campaign have been actioned upon. This marks the end of the campaign and signifies that no more changes can be made on the reviews belonging to this campaign. Once the campaign is complete, all de-provisioning, notifying and ticket creation processes will be undertaken depending on the fulfilment options set for the integrations. You can learn more about these processes here.
Clone: The Clone action creates a duplicate version of the selected campaign and is saved as a Draft campaign. All the reviews and data is duplicated. This campaign will need to be published to perform reviews.
Delete: This action permanently removes the campaign and all its associated data. Once a campaign is deleted, all review data, history, and configuration related to that campaign are irretrievably lost.
Application (client) ID
BalkanID Secret Key
Directory (tenant) ID
Note: The organization should possess an Entra ID Premium P1/P2 license and assign it to the user responsible for setting up the configuration. It is recommended for this user to have the Global Administrator Role.
Within your Azure portal, from the Dashboard search and navigate to App Registrations.
Click New Registration.
Fill in the details to register the application as mentioned in the screenshot.
Copy the Application (client) ID and Directory (tenant) ID after app registration. You will need these values to configure Azure within BalkanID.
Within your Azure portal, navigate to API Permissions and select Add a permission. Select Microsoft Graph.
Within Microsoft Graph section, you will see a choice between Delegated or Application permissions. Select Application permissions.
As shown in the screenshots below:
From the RoleManagement section, select RoleManagement.Read.All
From the AuditLog section, select AuditLog.Read.All.
From the AdministrativeUnit section, select AdministrativeUnit.Read.All.
From the Application section, select Application.Read.All.
From the Directory section, select Directory.Read.All.
From the Group section, select Group.Read.All.
From the User section, select User.Read.All.
Click Grant admin consent.. link for whatever permissions were assigned recently in the above steps (in example below, the directory is named “Default Directory”) as shown in the screenshot below.
Once granted, you will see status of each permission change from Not granted for your directory to Granted for your directory. The final list of permissions should match what is shown below.
Navigate to Certificates & secrets. Select New client secret. For description, use “BalkanID Secret Key”. For expiration, select your preferred expiration. Please note that you will need to reissue and update the client secret once this secret expires.
Copy the Value of the newly created BalkanID Secret Key. You will need this value to configure Azure within BalkanID. CAUTION: Please note that the entire Value may not be visible. You should use the copy to clipboard action next to the Value field to copy the entire value.
Login to the BalkanID application and switch to the tenant you would like to add your integration to.
Head to Integrations > Add Integration, select Azure.
Set up the Primary Application owner (mandatory) and the Description, if any. Set up Secondary Application Owner(s), if any.
Select the Extraction Type. From here, you can configure your application using one of the following methods:
Direct integration - Provide your Application (Client) ID, Client Secret and Azure Directory ID obtained above to set up a direct connection with BalkanID.
SCIM integration - Provide SCIM server credentials to set up a SCIM connection with BalkanID.
Manual file upload - Upload Entity and Entity Relations through a .CSV file upload. Contact the team for assistance with this.
Automated upload using API -
Click on next to move onto Optional Configuration.
Fill Optional configuration, if required.
Once you filled in the information, click Save. Your integration is now configured and you will see the status of the integration displayed alongside other integrations on the Integrations page. When data is available, the integration Status will read Connected and the integration Message will read Data available.
Read Only (Access Review) Scopes
Lifecycle Management Scopes
RoleManagement.Read.All
RoleManagement.ReadWrite.Directory
AuditLog.Read.All
AuditLog.Read.All
AdministrativeUnit.Read.All
AdministrativeUnit.ReadWrite.All
Application.Read.All
Application.ReadWrite.All and AppRoleAssignment.ReadWrite.All
Directory.Read.All
Directory.ReadWrite.All
Group.Read.All
Group.ReadWrite.All
The Home tab of the BalkanID Slackbot is your starting point for all access requests. It displays your basic user information from BalkanID and features the primary action button.
To begin, navigate to the BalkanID app in Slack and click on its Home tab.
Click the Request Access button to open the access request form.
You can request access in three flexible ways, depending on your needs.
Option 1: Request Access Like Another Person
This is the easiest way to request access if you need the same permissions as a colleague.
Select a Team Member: In the access request form, under the "Access Like" section, ensure Person is selected. From the dropdown menu, choose the team member whose access you wish to mirror.
Choose Access Grants: The "Access Grants" field will now list all the connections that your selected colleague has, but you do not. You can either:
Check the boxes for a few specific access grants.
Check the Select all access grants box to request all of them.
Identity Selection Choose which identities to provision access to based on the access selections from various integrations. If no identities are available for the selected access from certain integrations, the modal will prompt you to create the request in the BalkanID App, as identity creation through the user access request flow is currently not supported via the Slackbot.
Set the Duration: Choose how long you need the access:
Permanent Access: The access will not expire and has to be manually revoked.
Temporary Access: Temporary access is now supported through , and the Slackbot redirects users to create a .
Provide a Reason and Submit: Select a justification from the "Reason" dropdown menu and click Submit.
What Happens Next?
You will receive a confirmation notification in the Slackbot's "Messages" tab, letting you know that your request has been successfully created and sent for approval.
Option 2: Request Access Based on a Job Title
Use this option to request a standard set of permissions associated with a specific role in your organization.
Select a Job Title: In the "Access Like" section, select Job Title. From the dropdown menu, choose the job title whose standard access you need.
Choose Access Grants: The "Access Grants" field will now list all the connections that your selected job title has, but you do not. You can either:
Check the boxes for a few specific access grants.
Check the Select all access grants box to request all of them.
Identity Selection Choose which identities to provision access to based on the access selections from various integrations. If no identities are available for the selected access from certain integrations, the modal will prompt you to create the request in the BalkanID App, as identity creation through the user access request flow is currently not supported via the Slackbot.
Set the Duration: Choose how long you need the access:
Permanent Access: The access will not expire and has to be manually revoked.
Temporary Access: Temporary access is now supported through , and the Slackbot redirects users to create a
Provide a Reason and Submit: Select a justification from the "Reason" dropdown menu and click Submit.
What Happens Next?
You will receive a confirmation notification in the Slackbot's "Messages" tab, letting you know that your request has been successfully created and sent for approval.
Option 3: Request Custom Access
If your needs don't align with a person or job title, you can browse a full list of available permissions and build a custom request.
Select Custom In the "Access Like" section, select the Custom option.
Choose Access Grants The "Access Grants" field will display all available access options that you do not currently have. You can browse and select one or more specific permissions.
Identity Selection Choose which identities to provision access to based on the access selections from various integrations. If no identities are available for the selected access from certain integrations, the modal will prompt you to create the request in the BalkanID App, as identity creation through the user access request flow is currently not supported via the Slackbot.
Set the Duration: Choose how long you need the access: a. Permanent Access: The access will not expire and has to be manually revoked. b. Temporary Access: Temporary access is now supported through , and the Slackbot redirects users to create a .
Provide a Reason and Submit: Select a relevant reason from the dropdown and click the Submit button.
What Happens Next?
A confirmation notification will be sent to you via the Slackbot, confirming that your custom request has been submitted for approval.


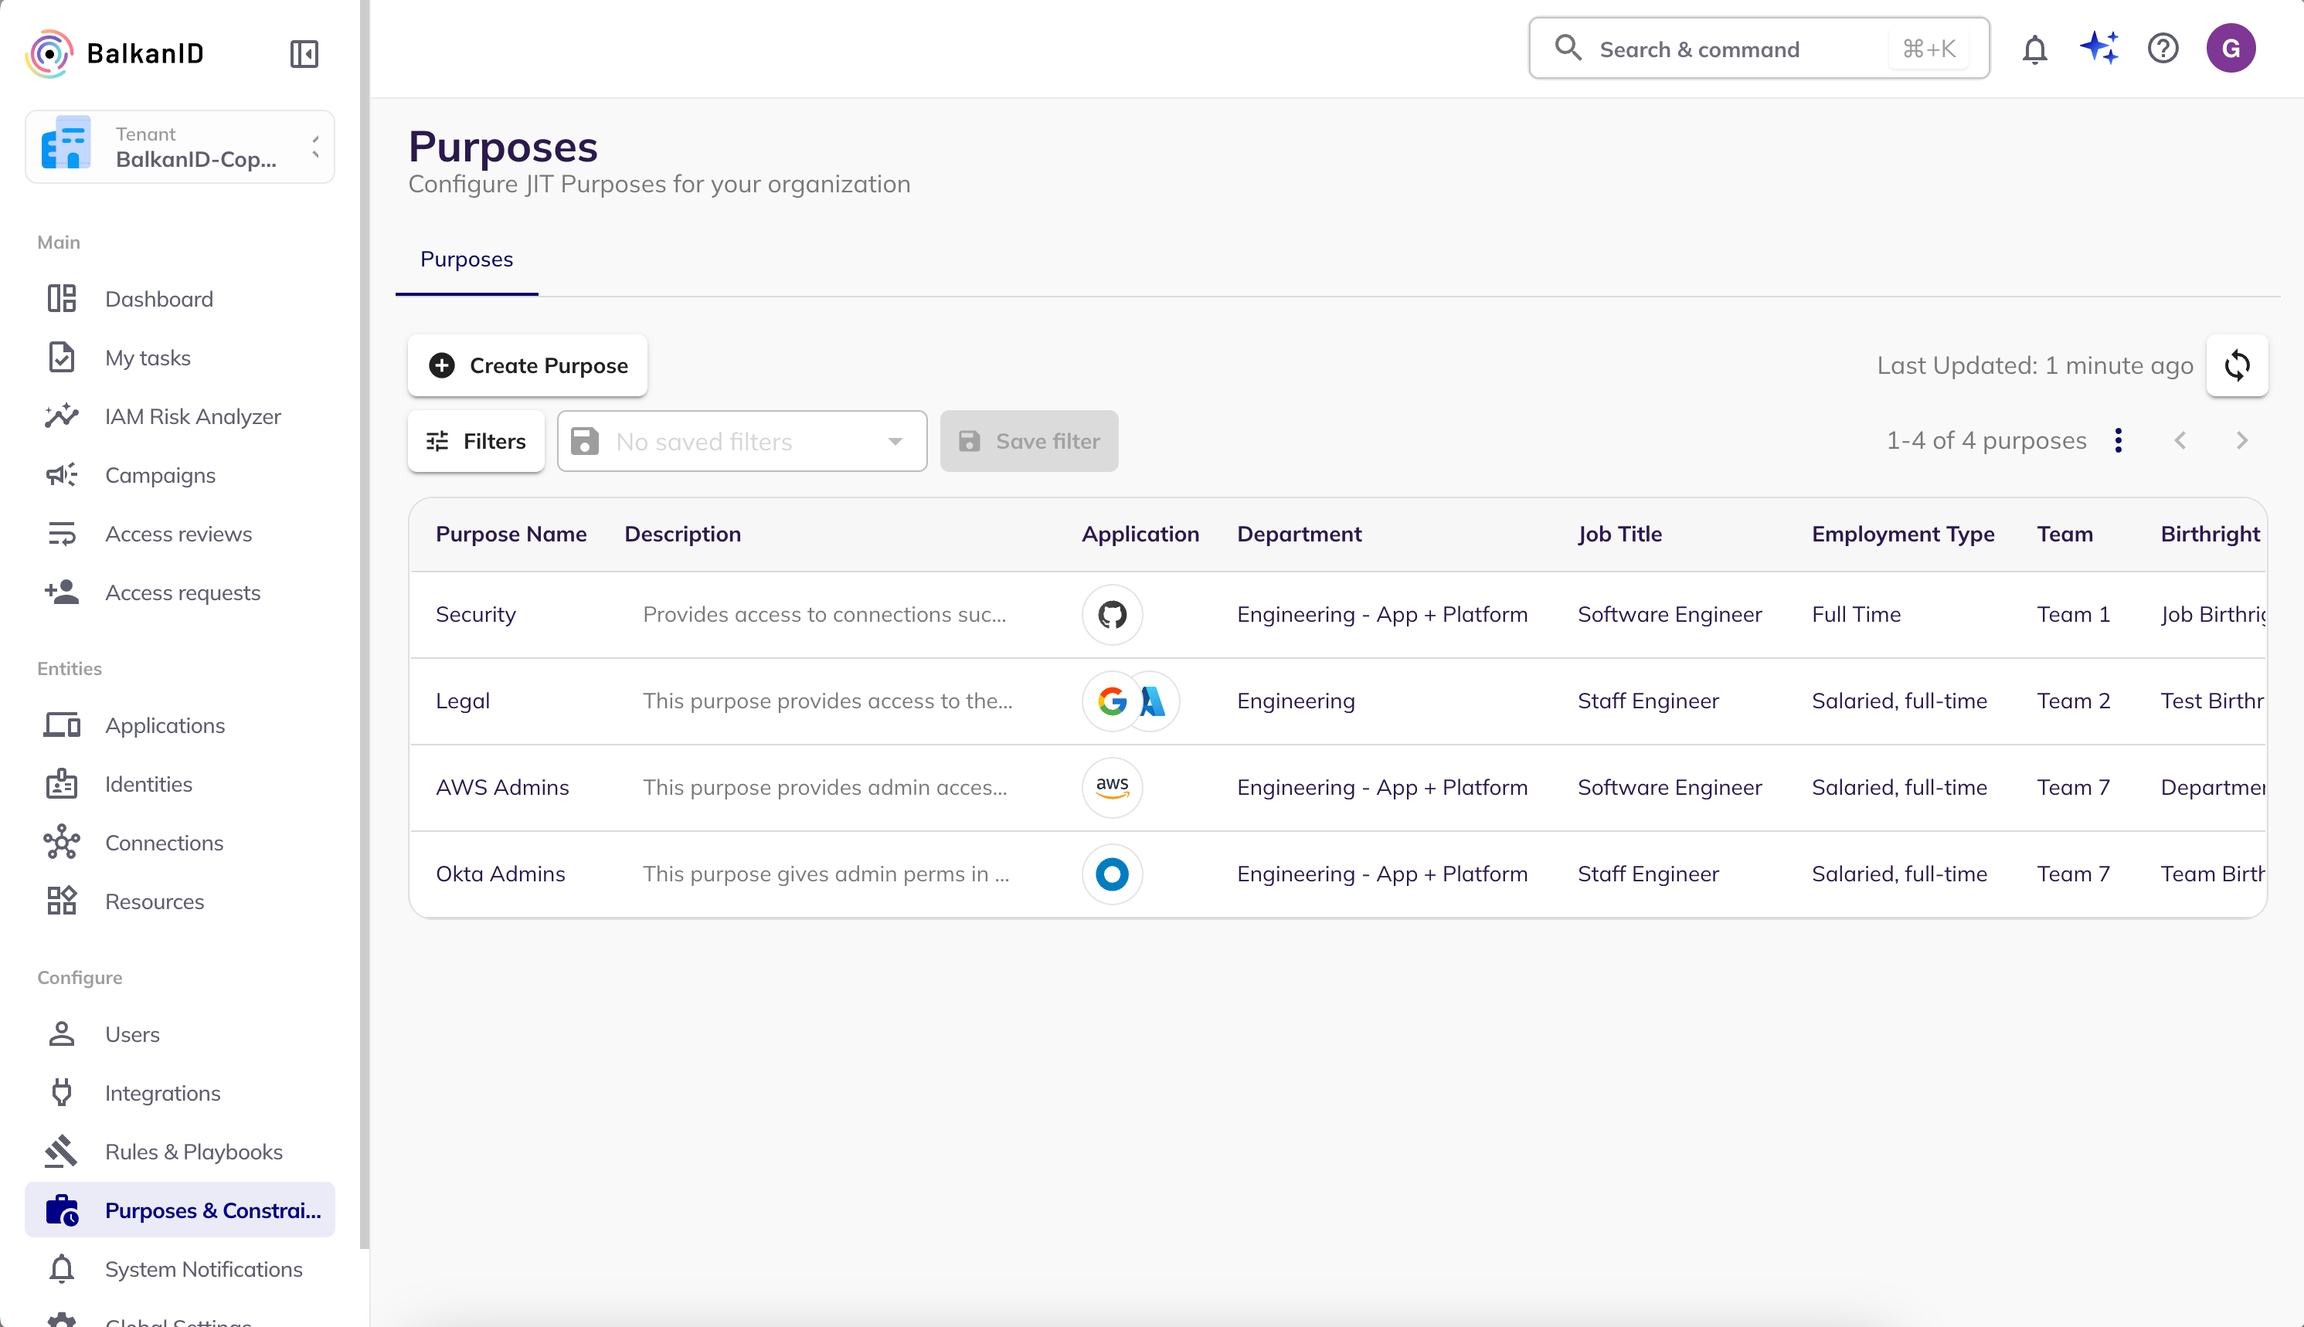
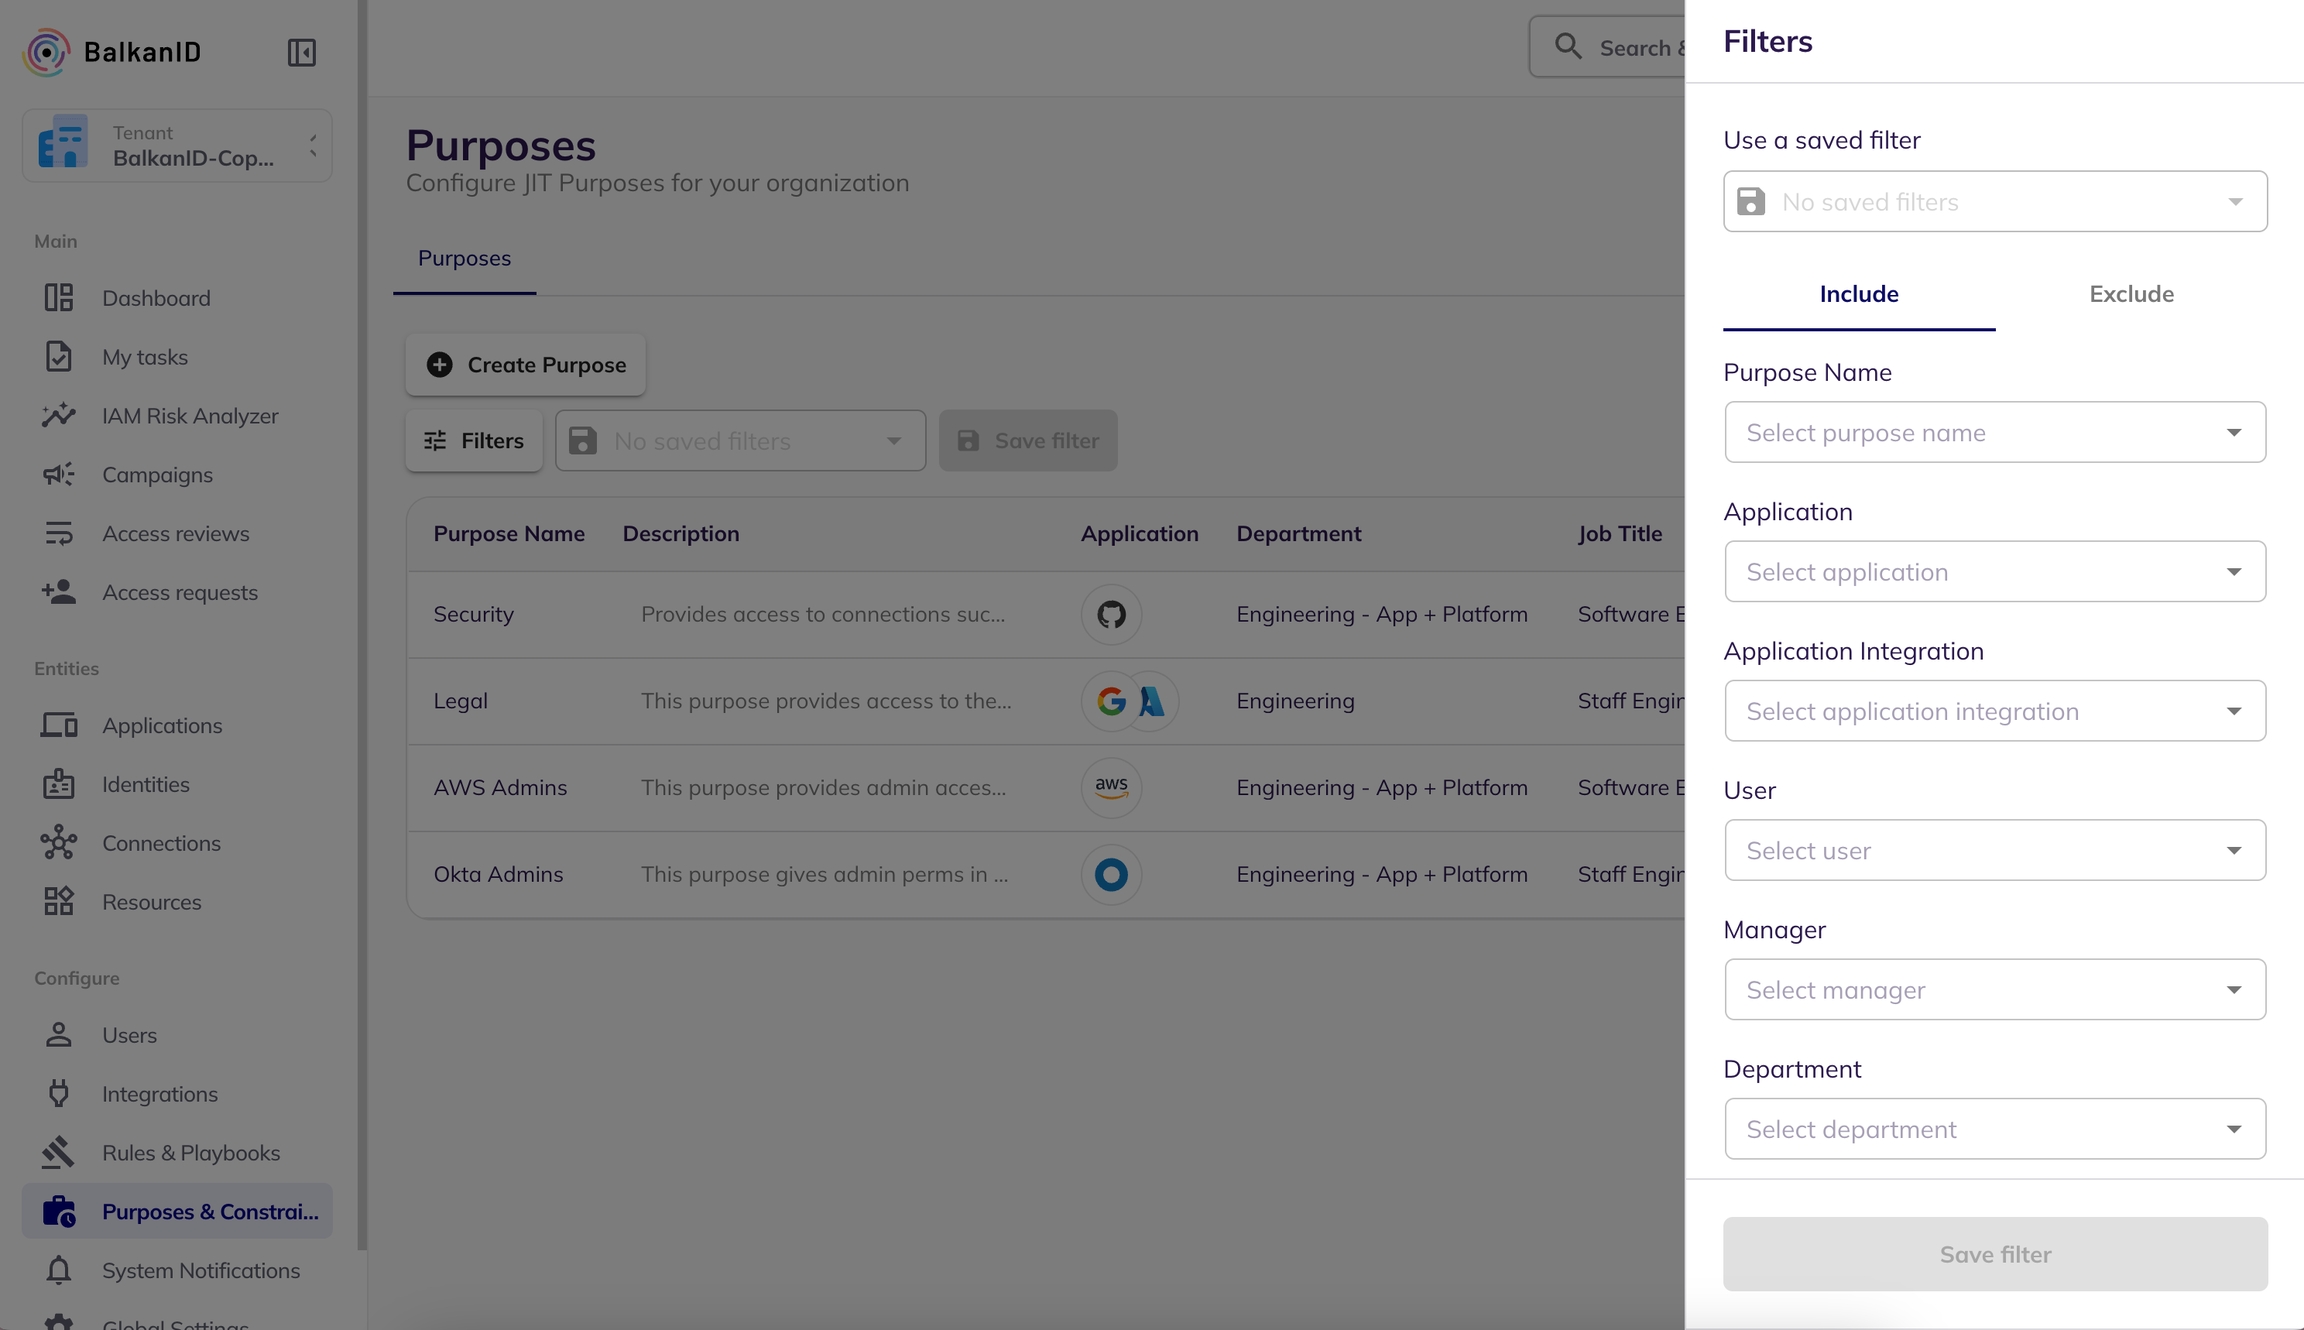
The New Resource Access Request System offers three primary functions:
Resource Creation
Resource Assignment
Resource Deletion
Each function can be easily accessed through a simple selection process using radio buttons on our interface. Detailed steps on how to perform each action are provided below.
Creating a new Resource is a straightforward process that allows you to create new identities in the existing applications.
Select Creation: Choose the "Creation" radio button to initiate the resource creation process. Choose a Provisioning Option: Select a provisioning option. Choose an Application: Select the application where you want to create a new resource. Choose a Resource Type: Select a resource type from the existing resource types. Select a name: Select a name for the new access request.
Fill the Payload: Upon selecting an application, a visual/json (payload) will appear on the page with pre-filled values. Complete this form with the necessary information to create the new resource.
Preview Your Request: After filling out the form, proceed to the next page to preview your request. This ensures that all provided information is correct.
Create Request: Click the "Create Request" button. Your request will be submitted for approval. The request will be visible in the my task page of the reviewer.
Approval and Verification: Once approved(from the my task page of the reviewer), the resource will be added to the selected application. You can verify the addition by checking within the respective application.
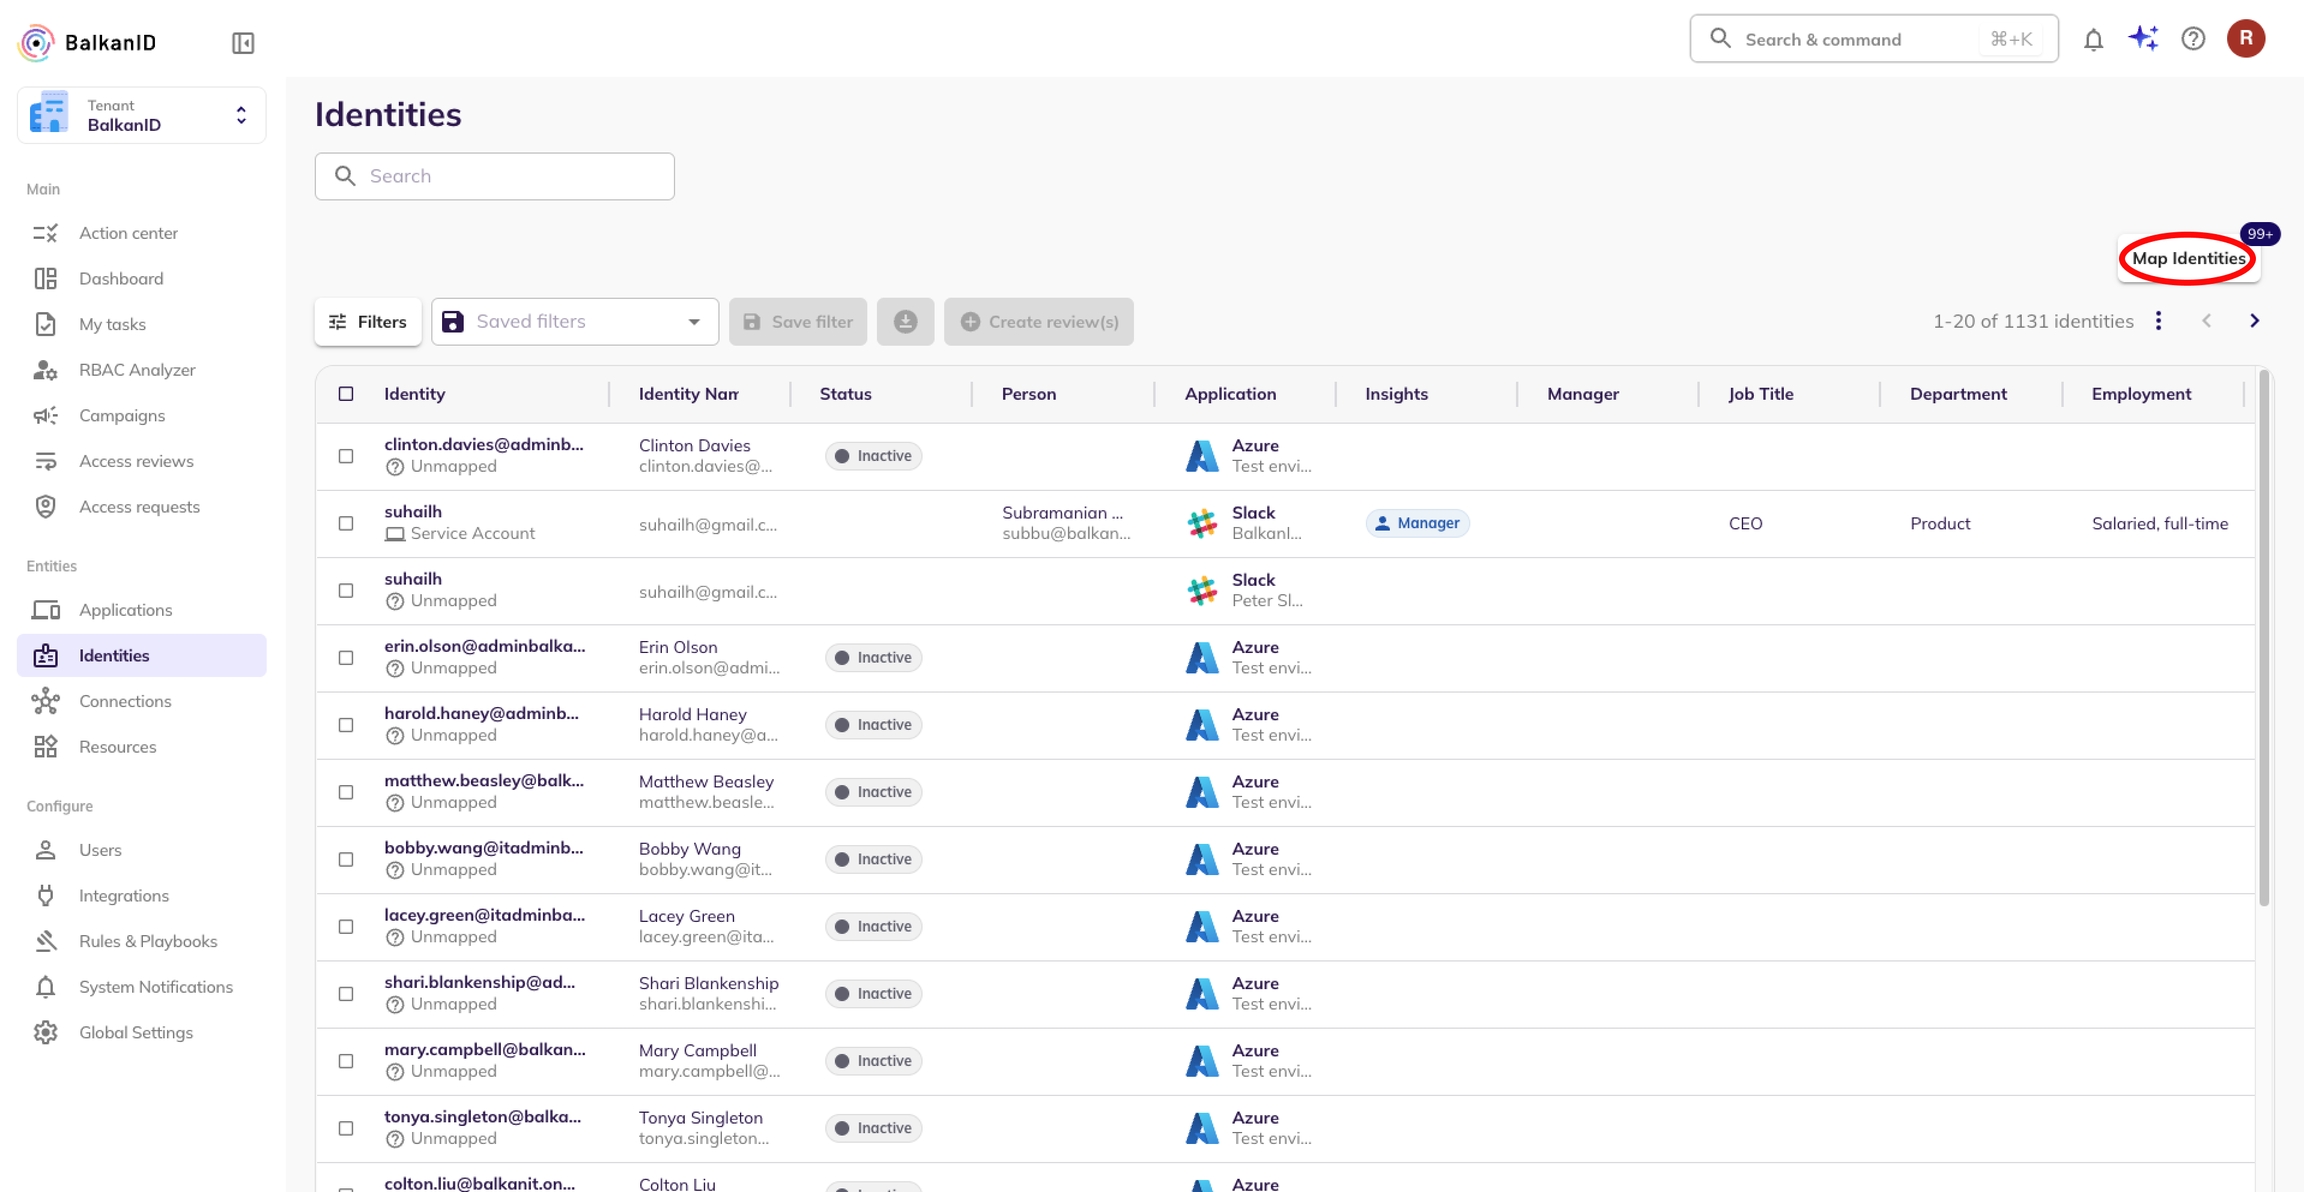

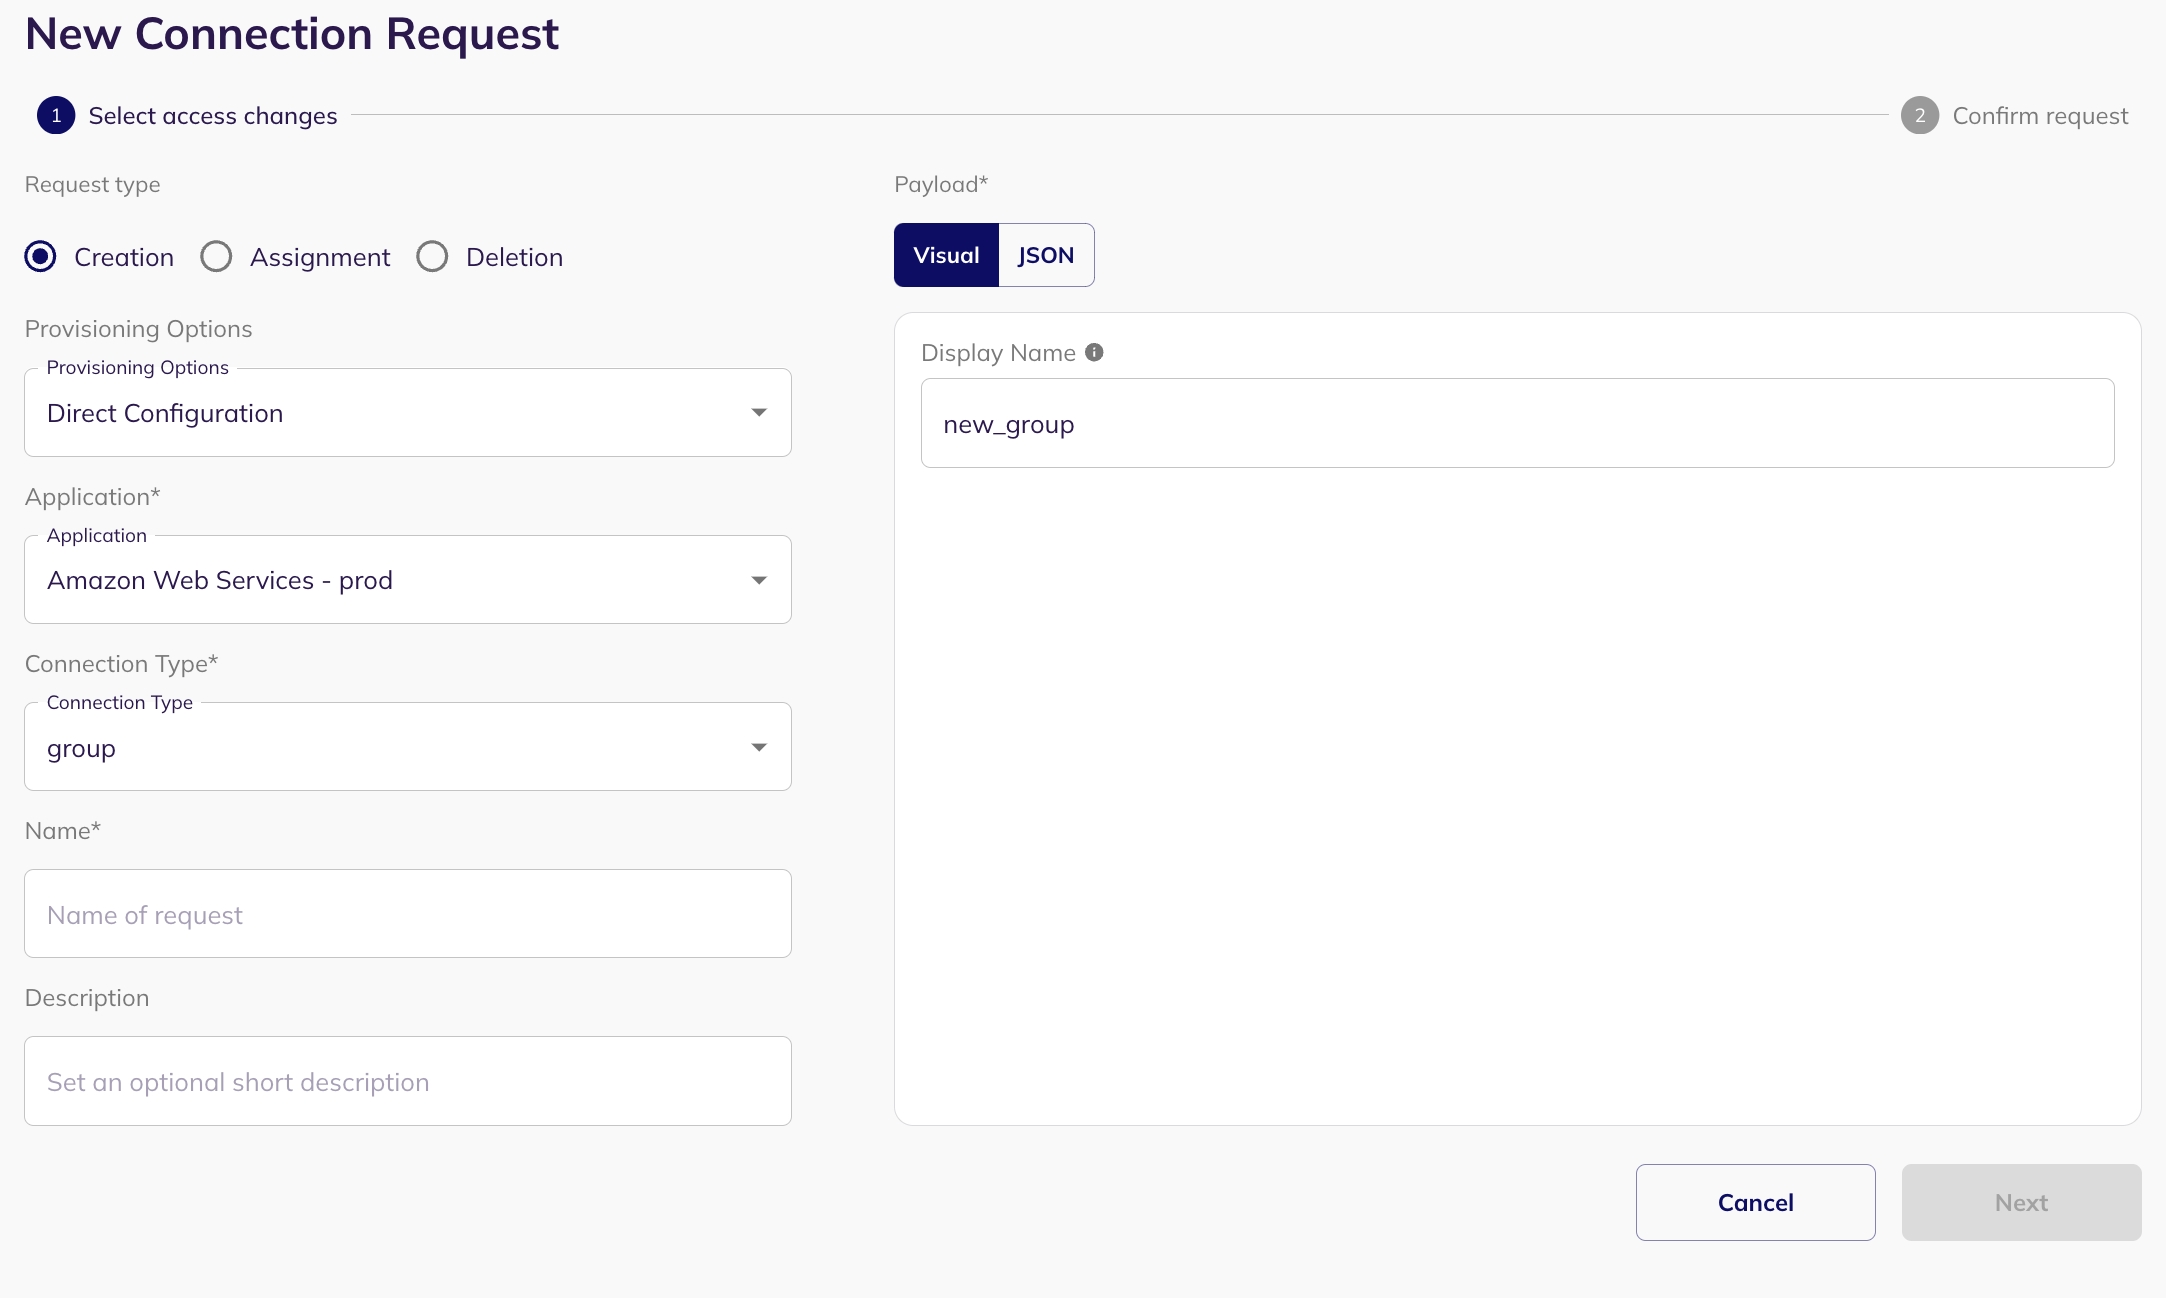
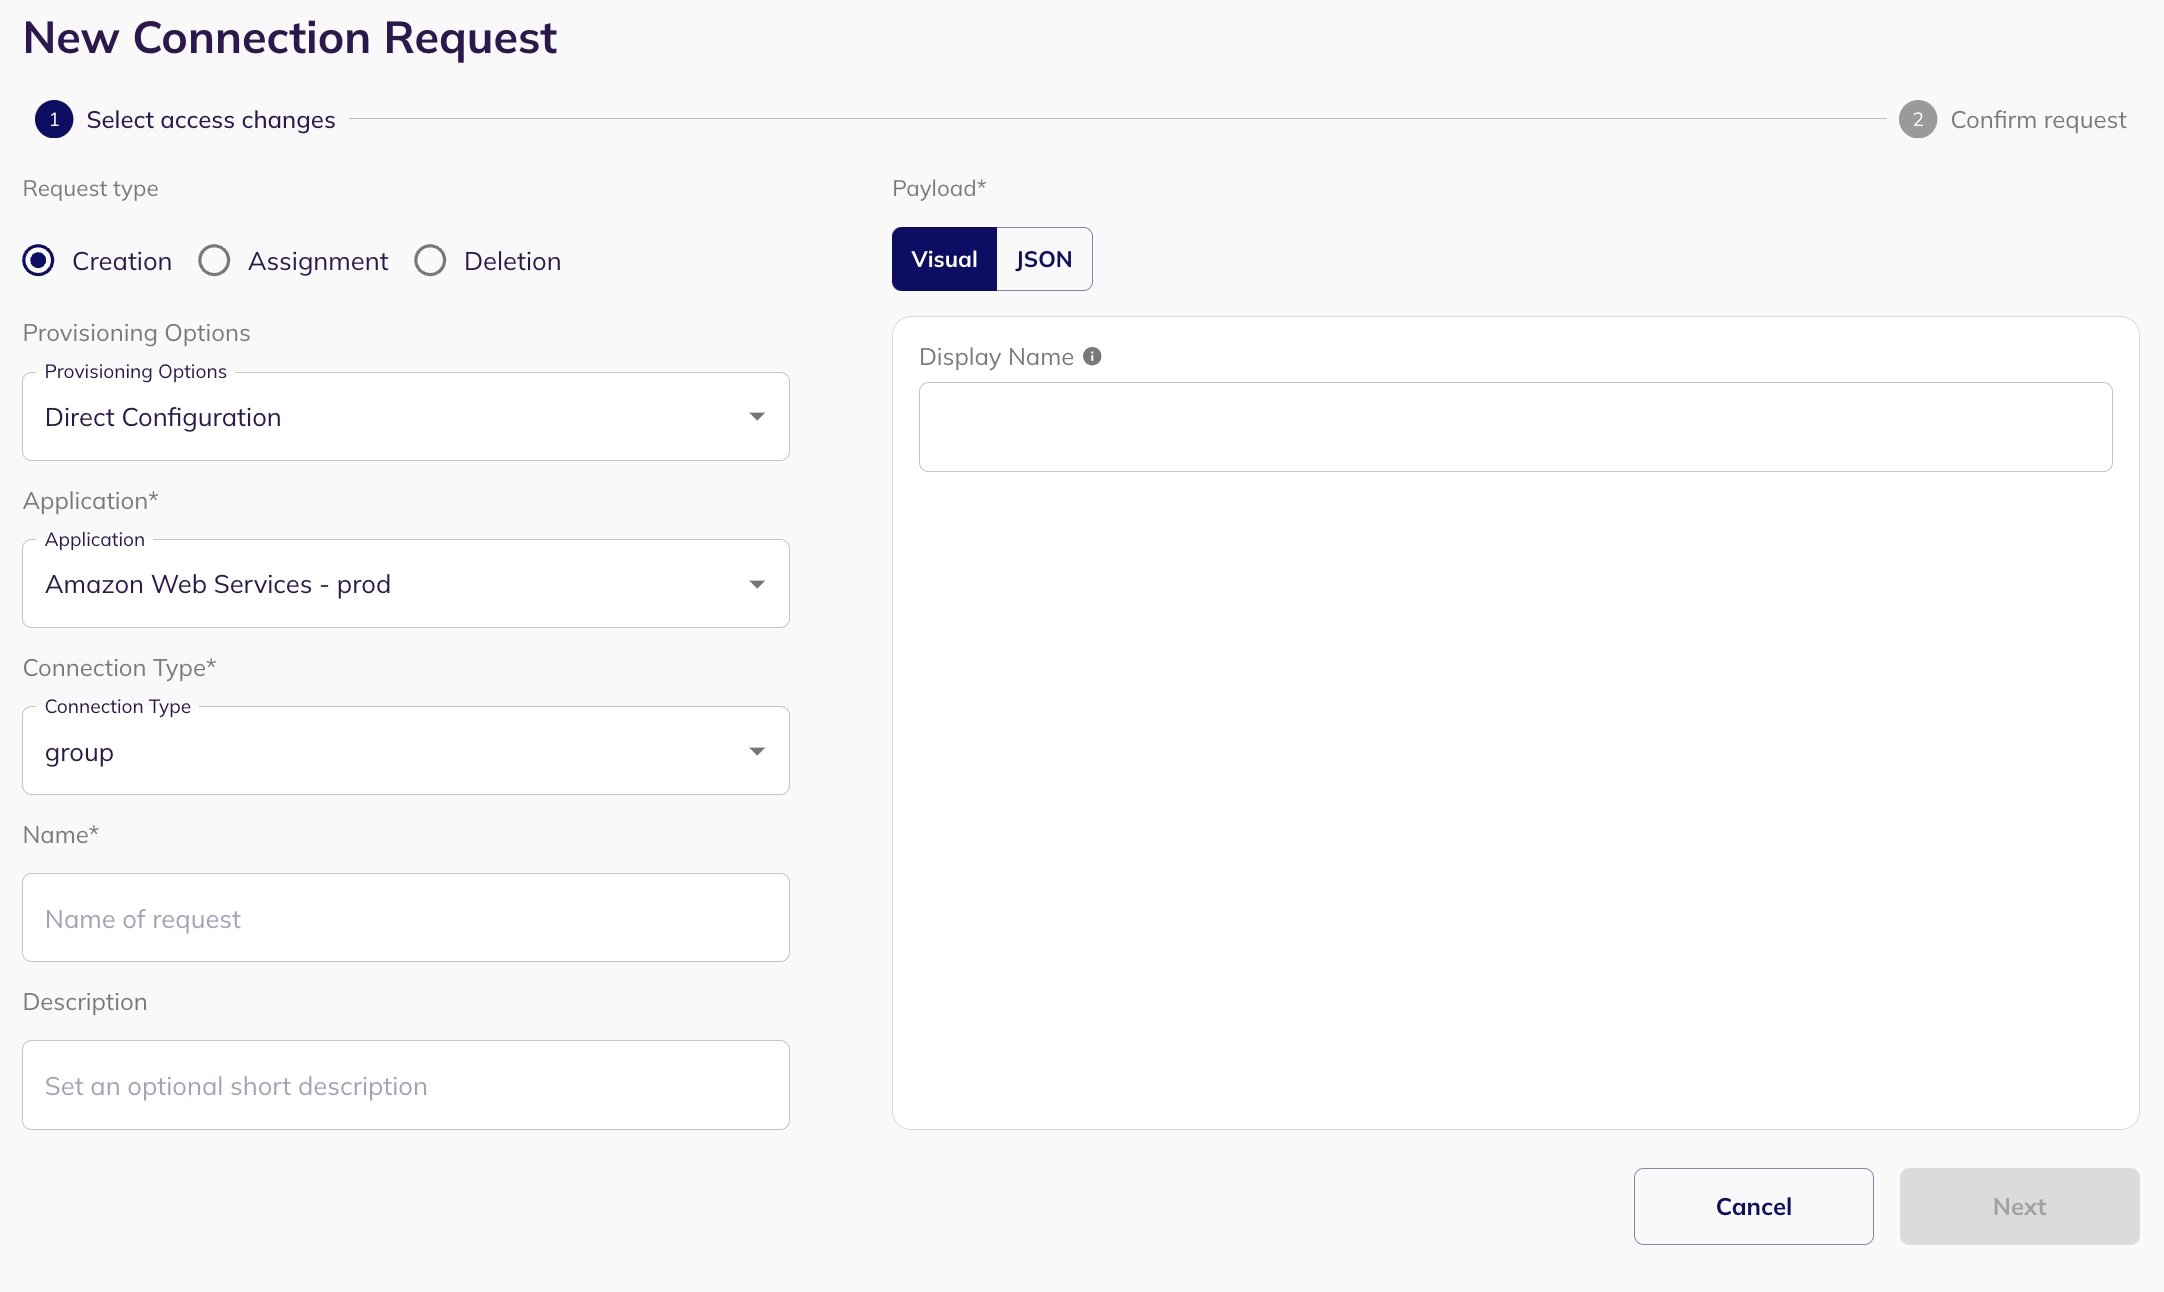
Cloud Identity APIhttps://www.googleapis.com/auth/admin.directory.user.readonly,
https://www.googleapis.com/auth/admin.directory.orgunit.readonly,
https://www.googleapis.com/auth/admin.directory.group.readonly,
https://www.googleapis.com/auth/admin.directory.user.security,
https://www.googleapis.com/auth/admin.directory.rolemanagement.readonly{
"Version": "2012-10-17",
"Statement": [
{
"Sid": "AllowingBalkanIDServiceUser",
"Effect": "Allow",
"Principal": {
"AWS": "arn:aws:iam::015482169847:user/balkan-service-user"
},
"Action": "sts:AssumeRole"
}
]
}


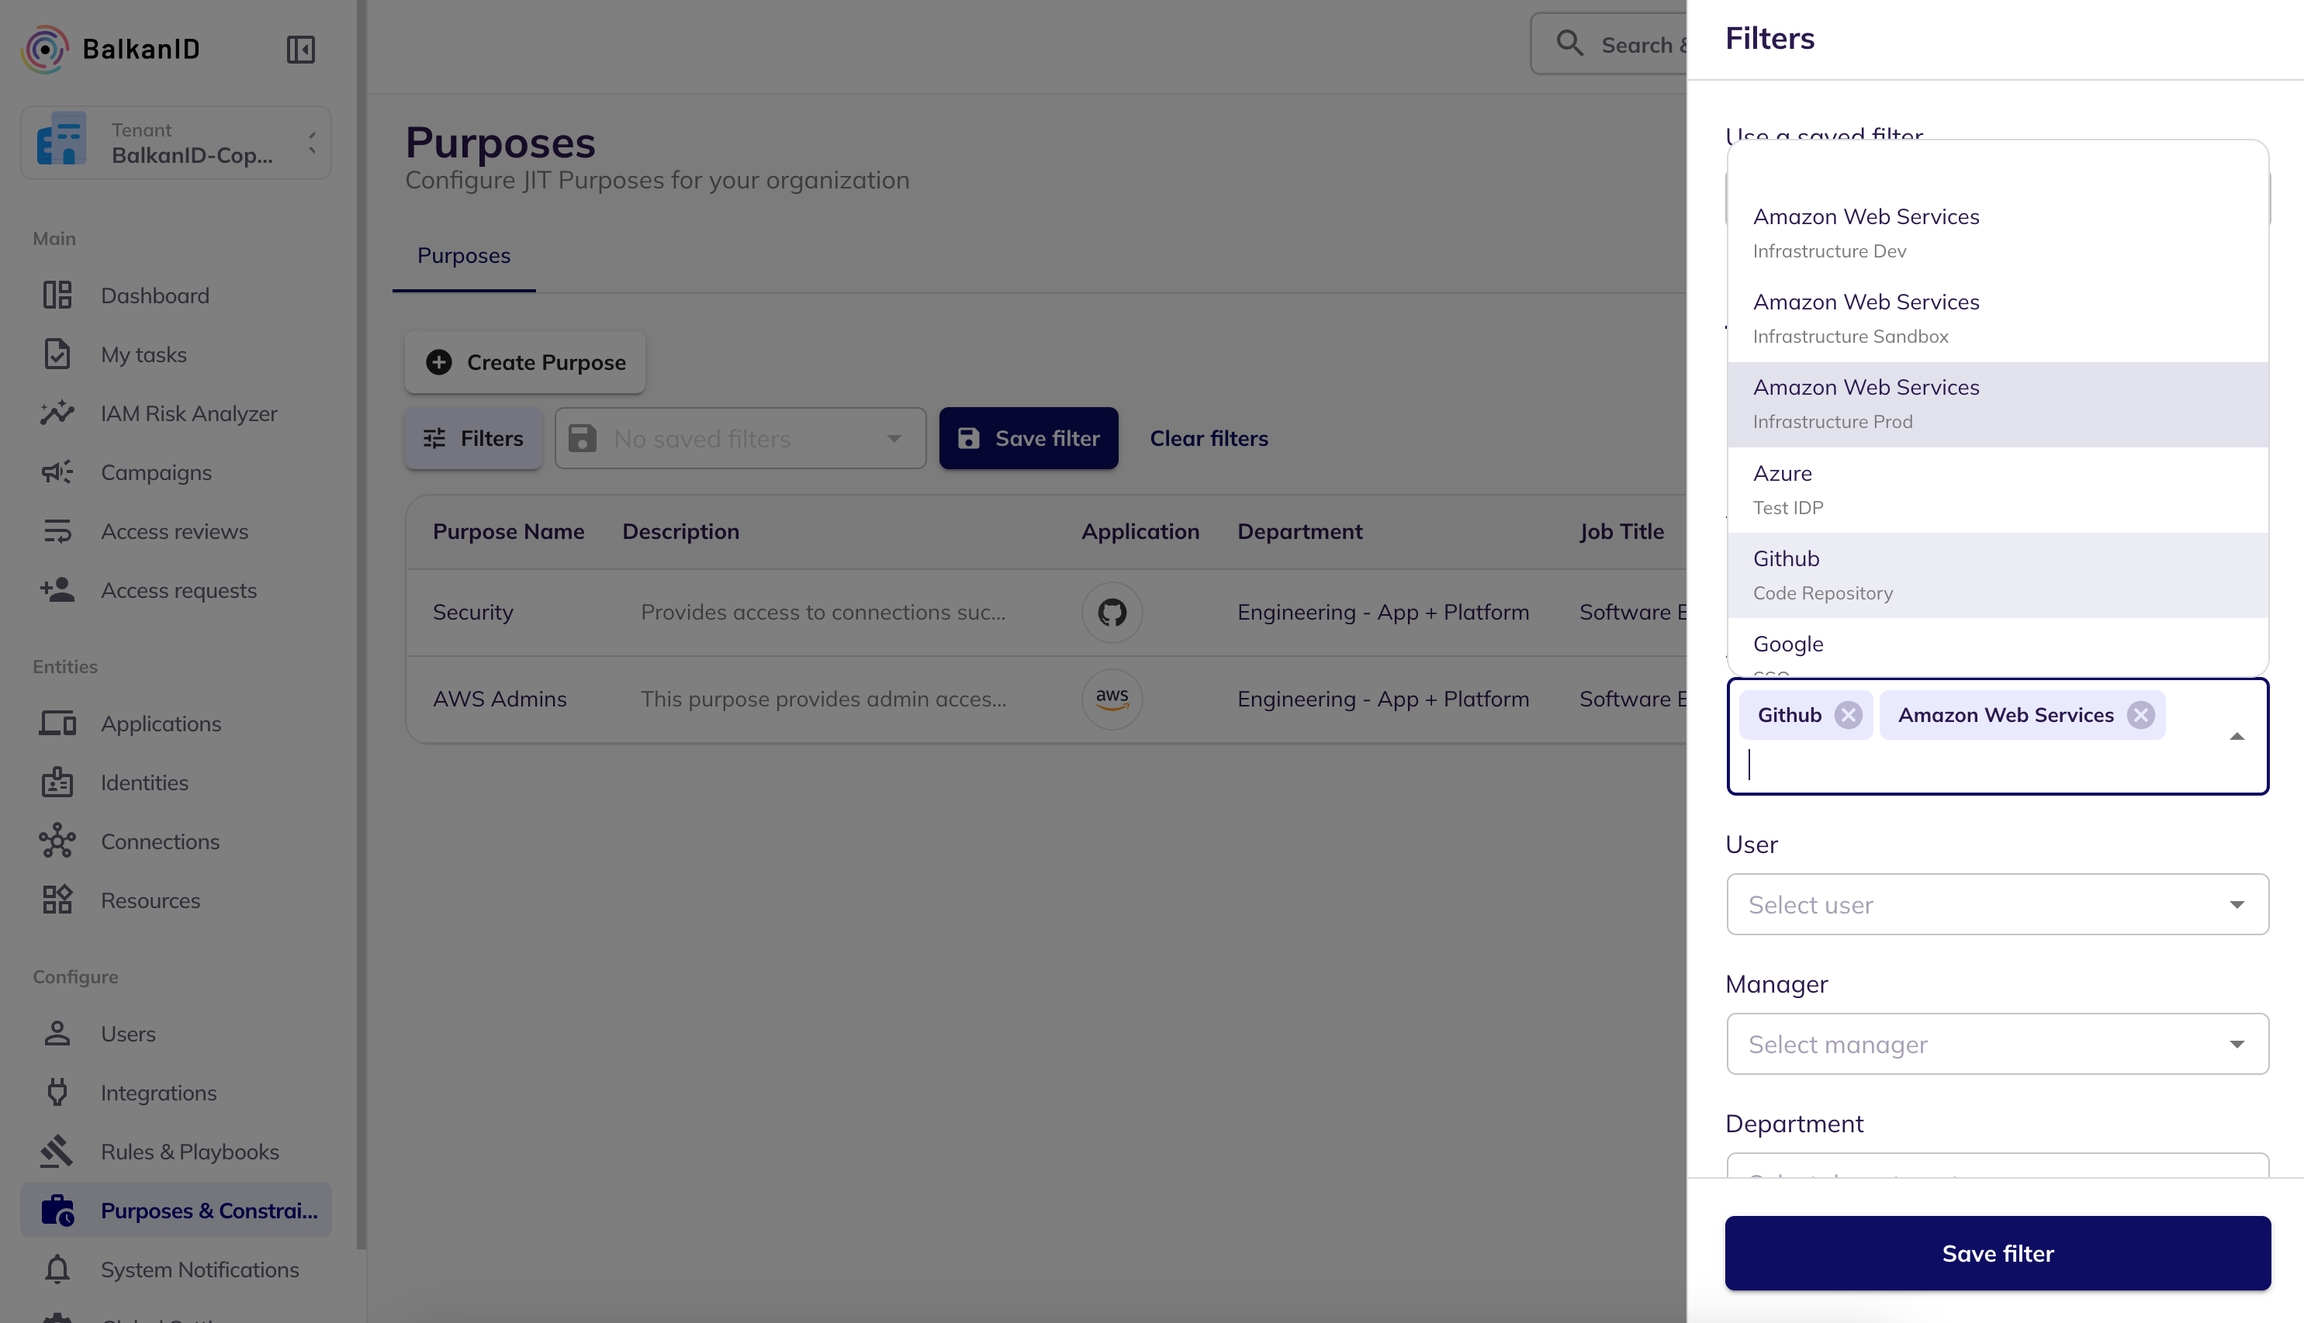
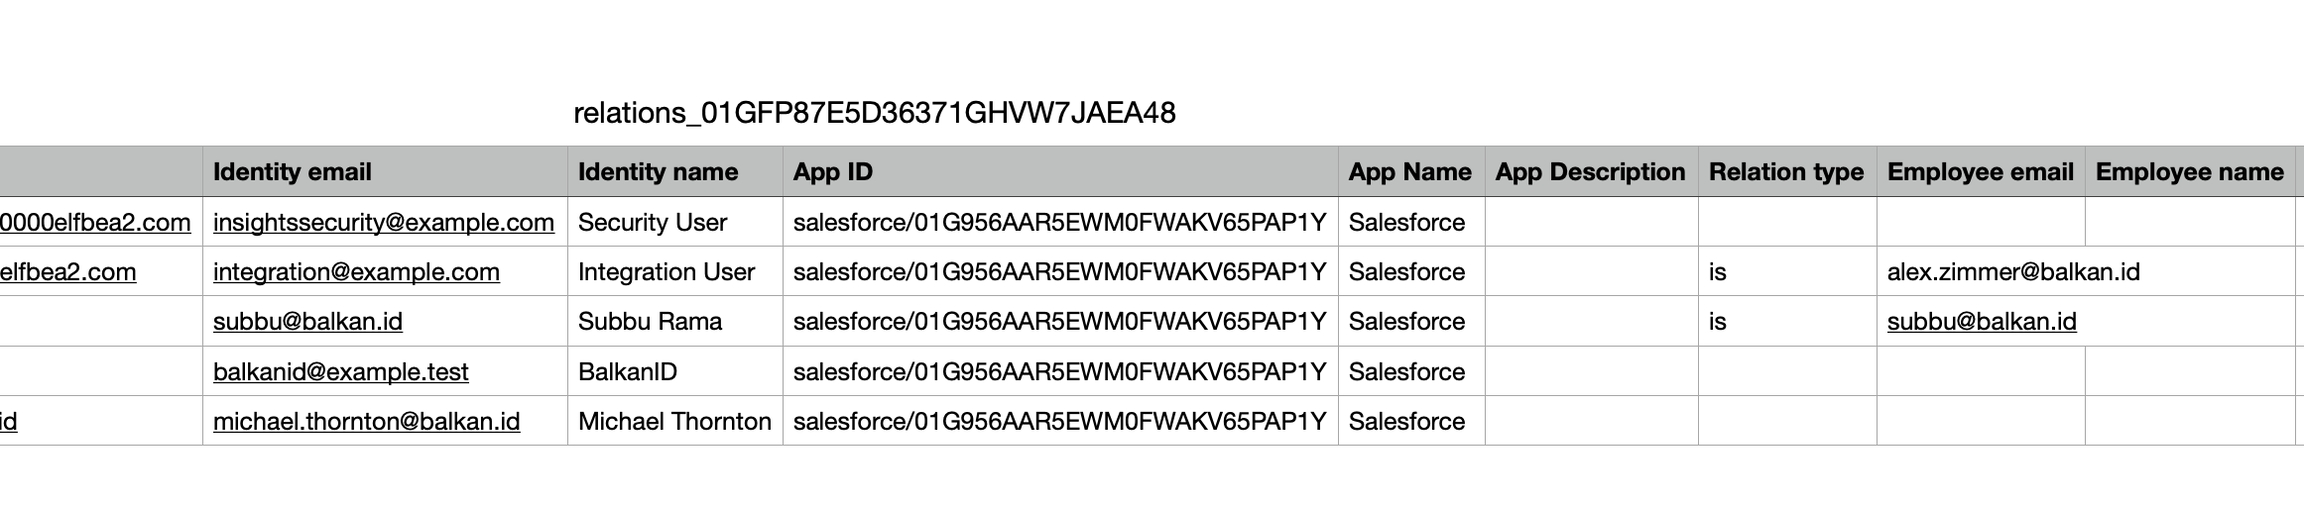
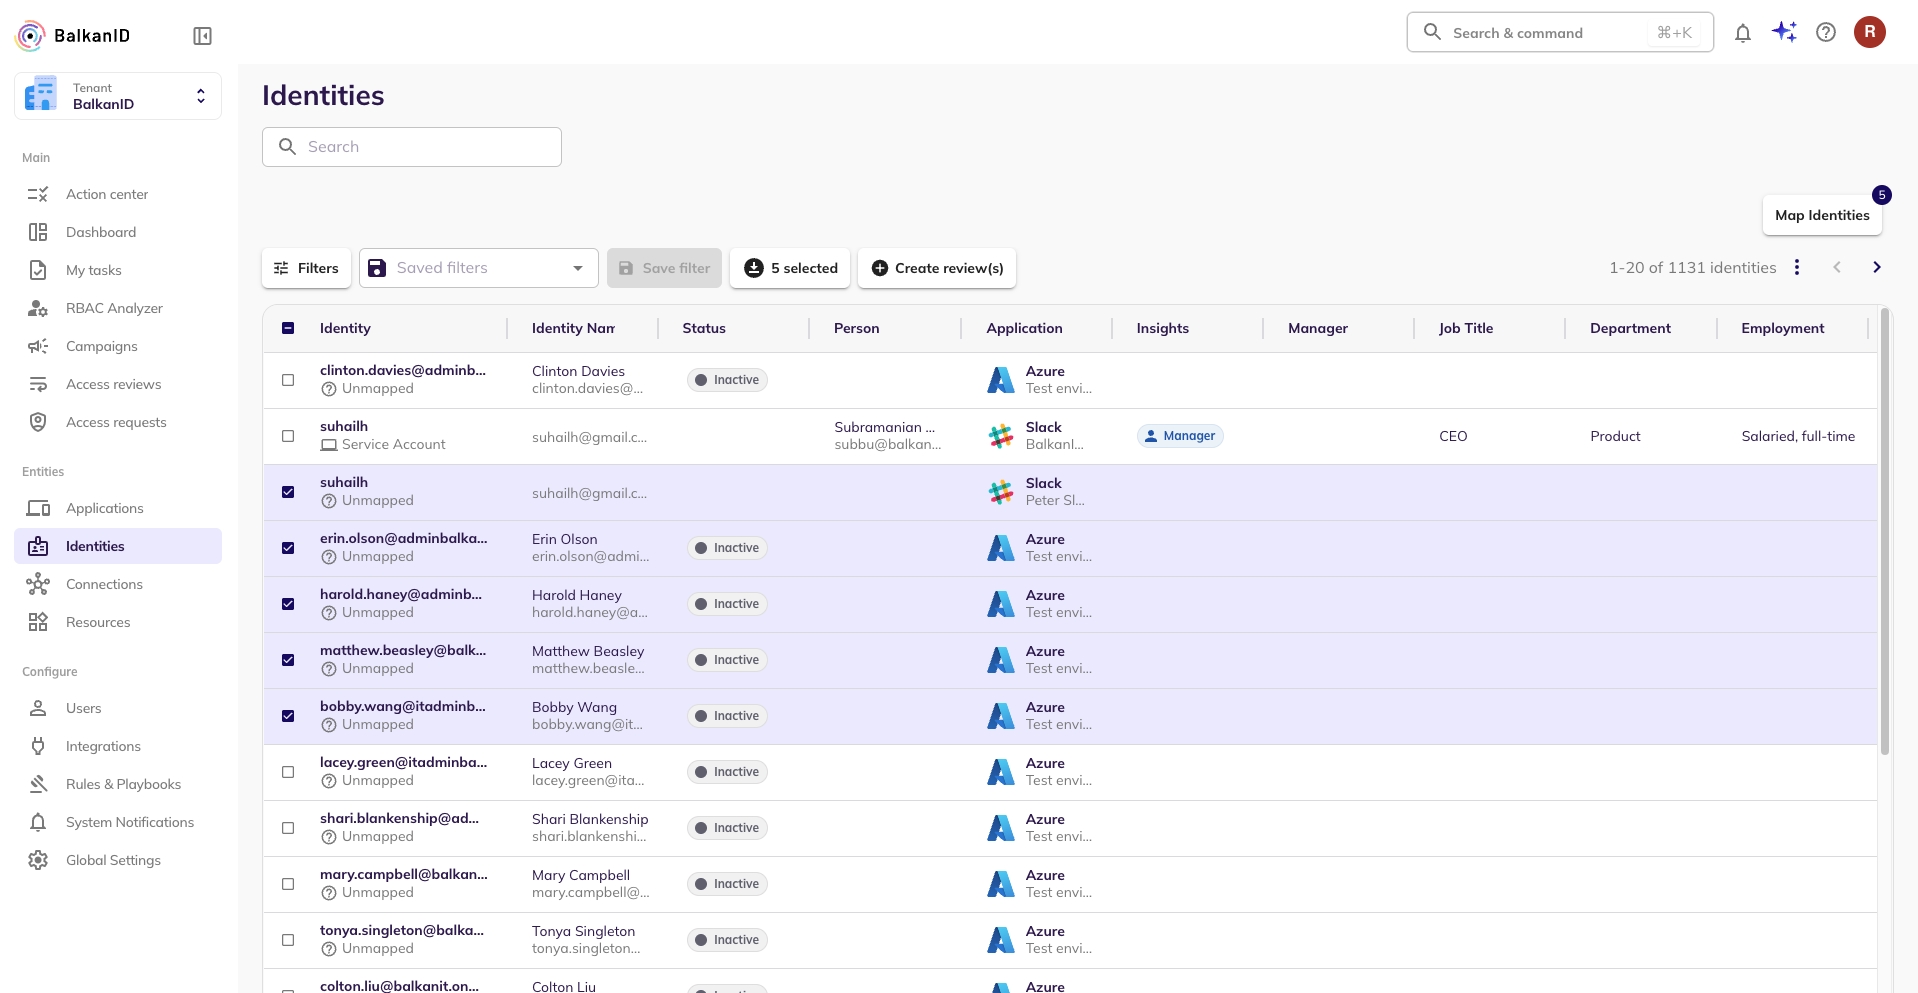
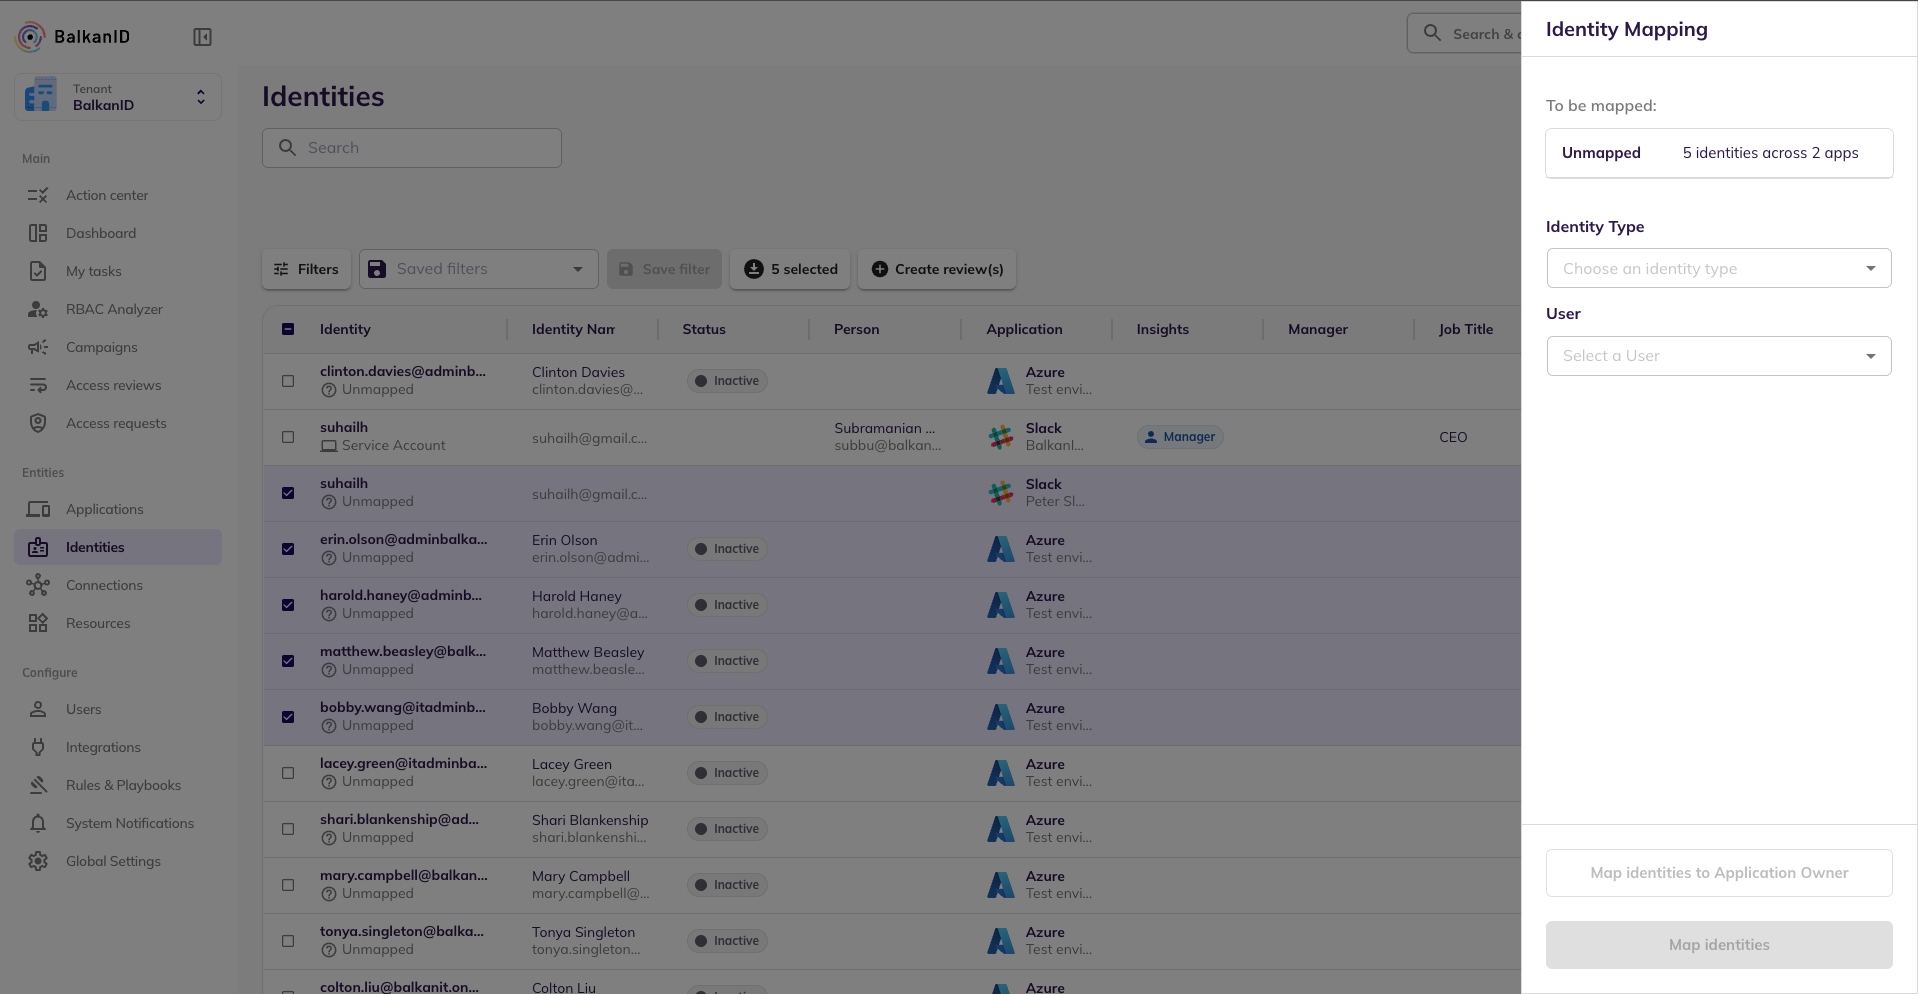
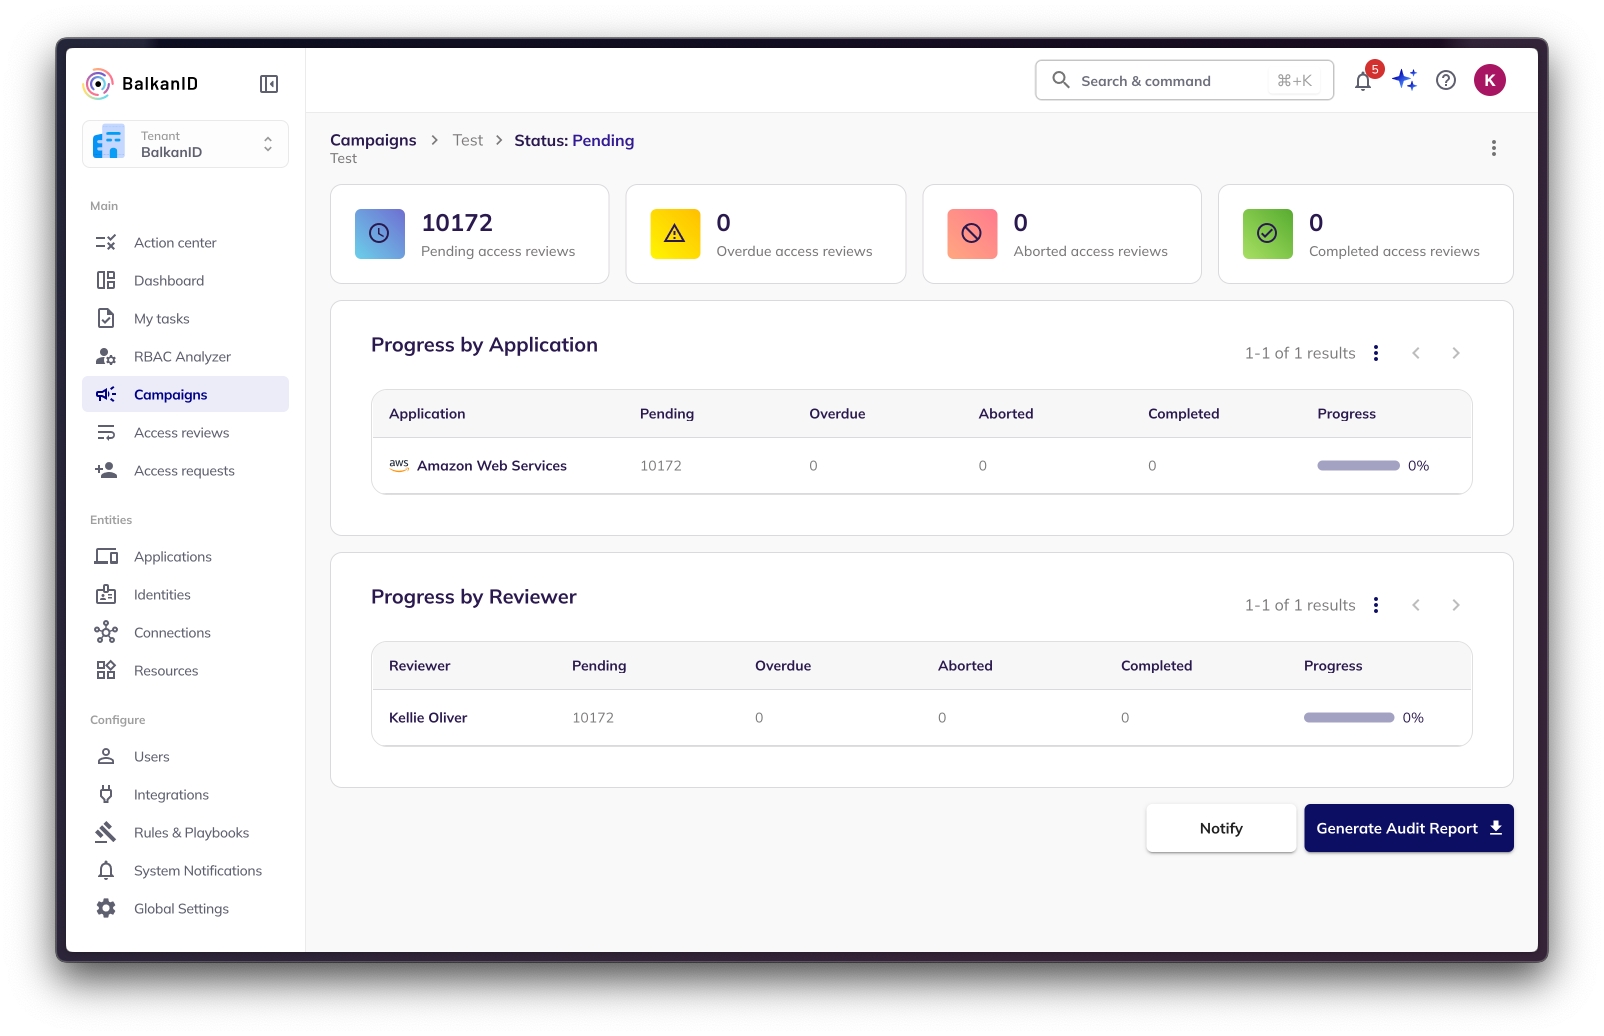

GroupMember.Read.All
GroupMember.ReadWrite.All
User.Read
User.ReadWrite.All
User.Read.All
Additionally, the Privileged Authentication Administrator Role must be assigned to the BalkanID Application's Service Principal to allow the following - 1. Deletion of Users and Groups with Privileged Roles (like User Administrator Role). 2. Creation of Role assignable Groups. This needs to be done from the "Roles and administrators" menu in Entra ID.
IdentityRiskEvent.Read.All
User-LifeCycleInfo.ReadWrite.All Note: This scope is required only for pulling HRIS data from Azure, specifically to retrieve the termination date of an employee.


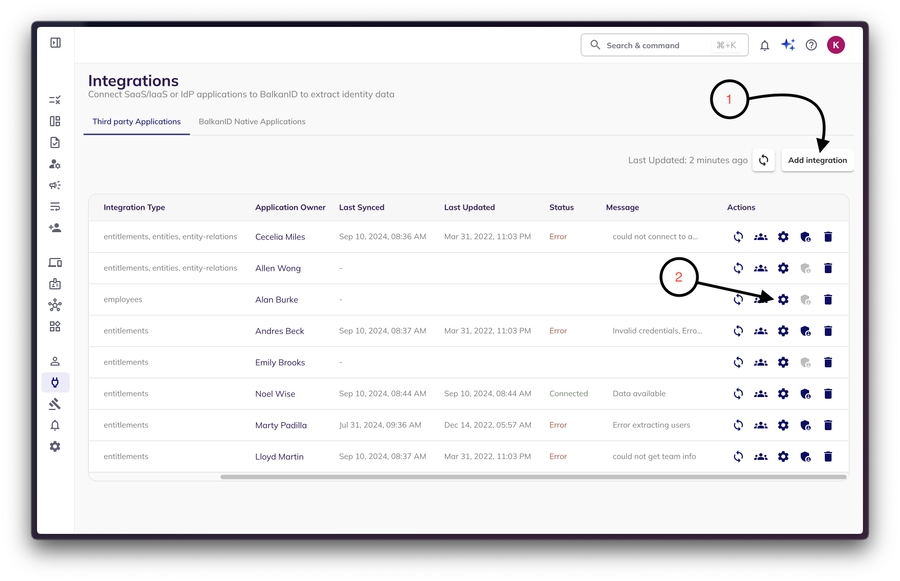
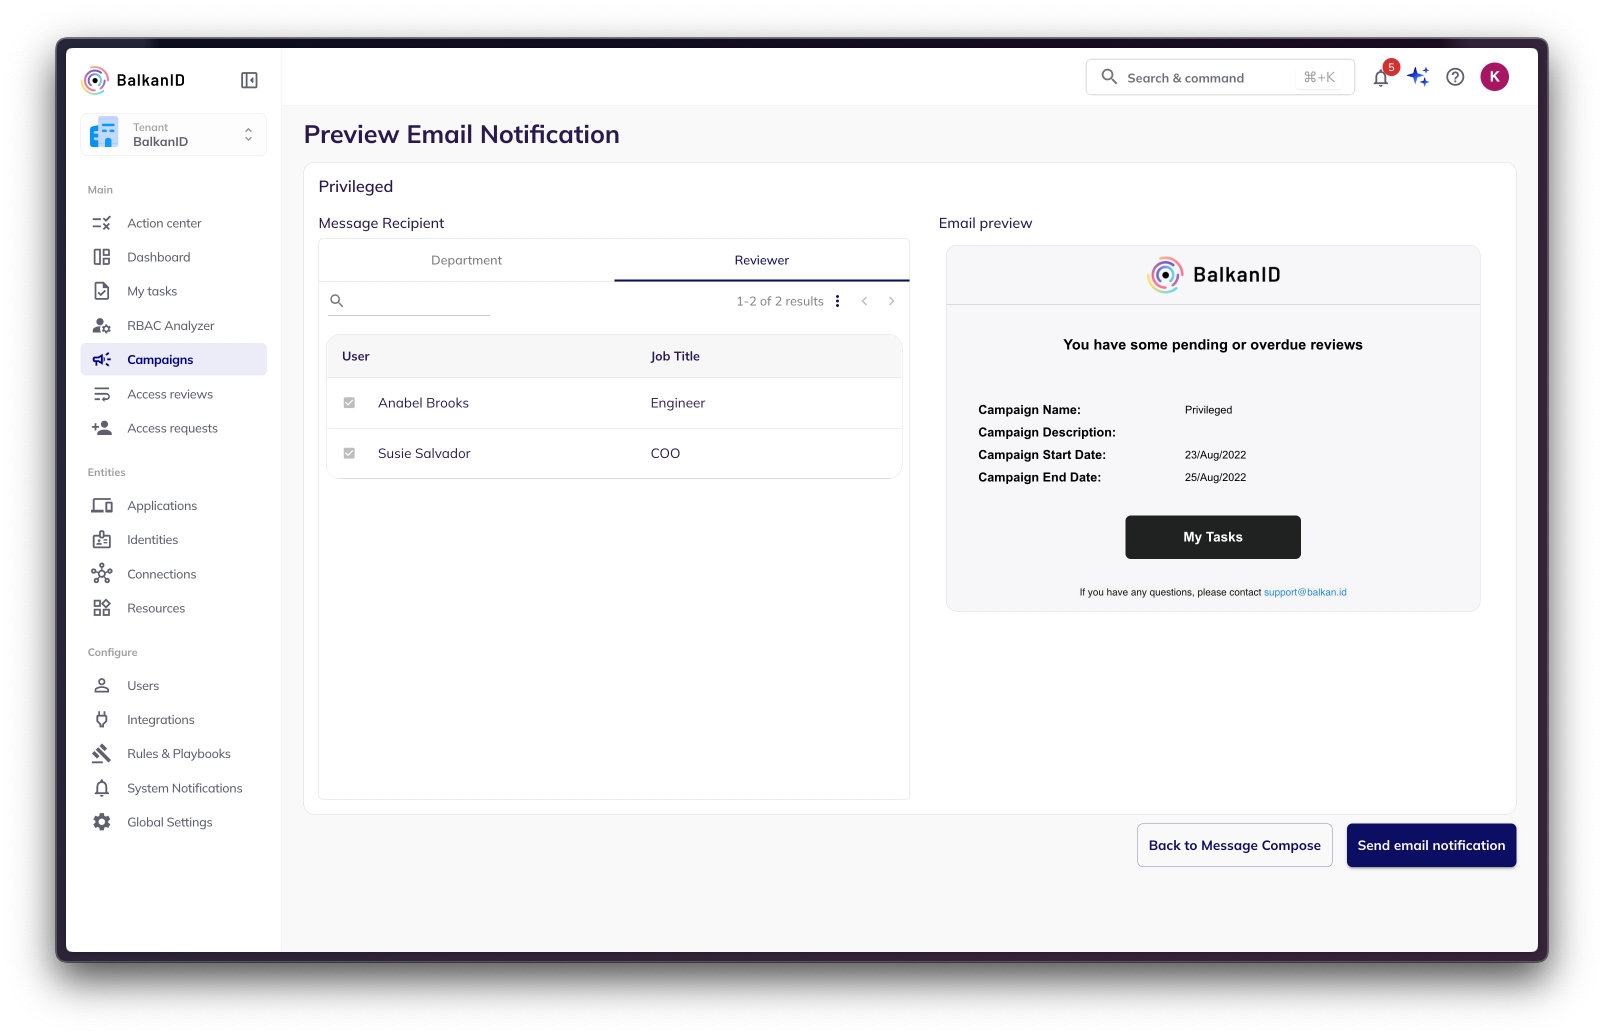
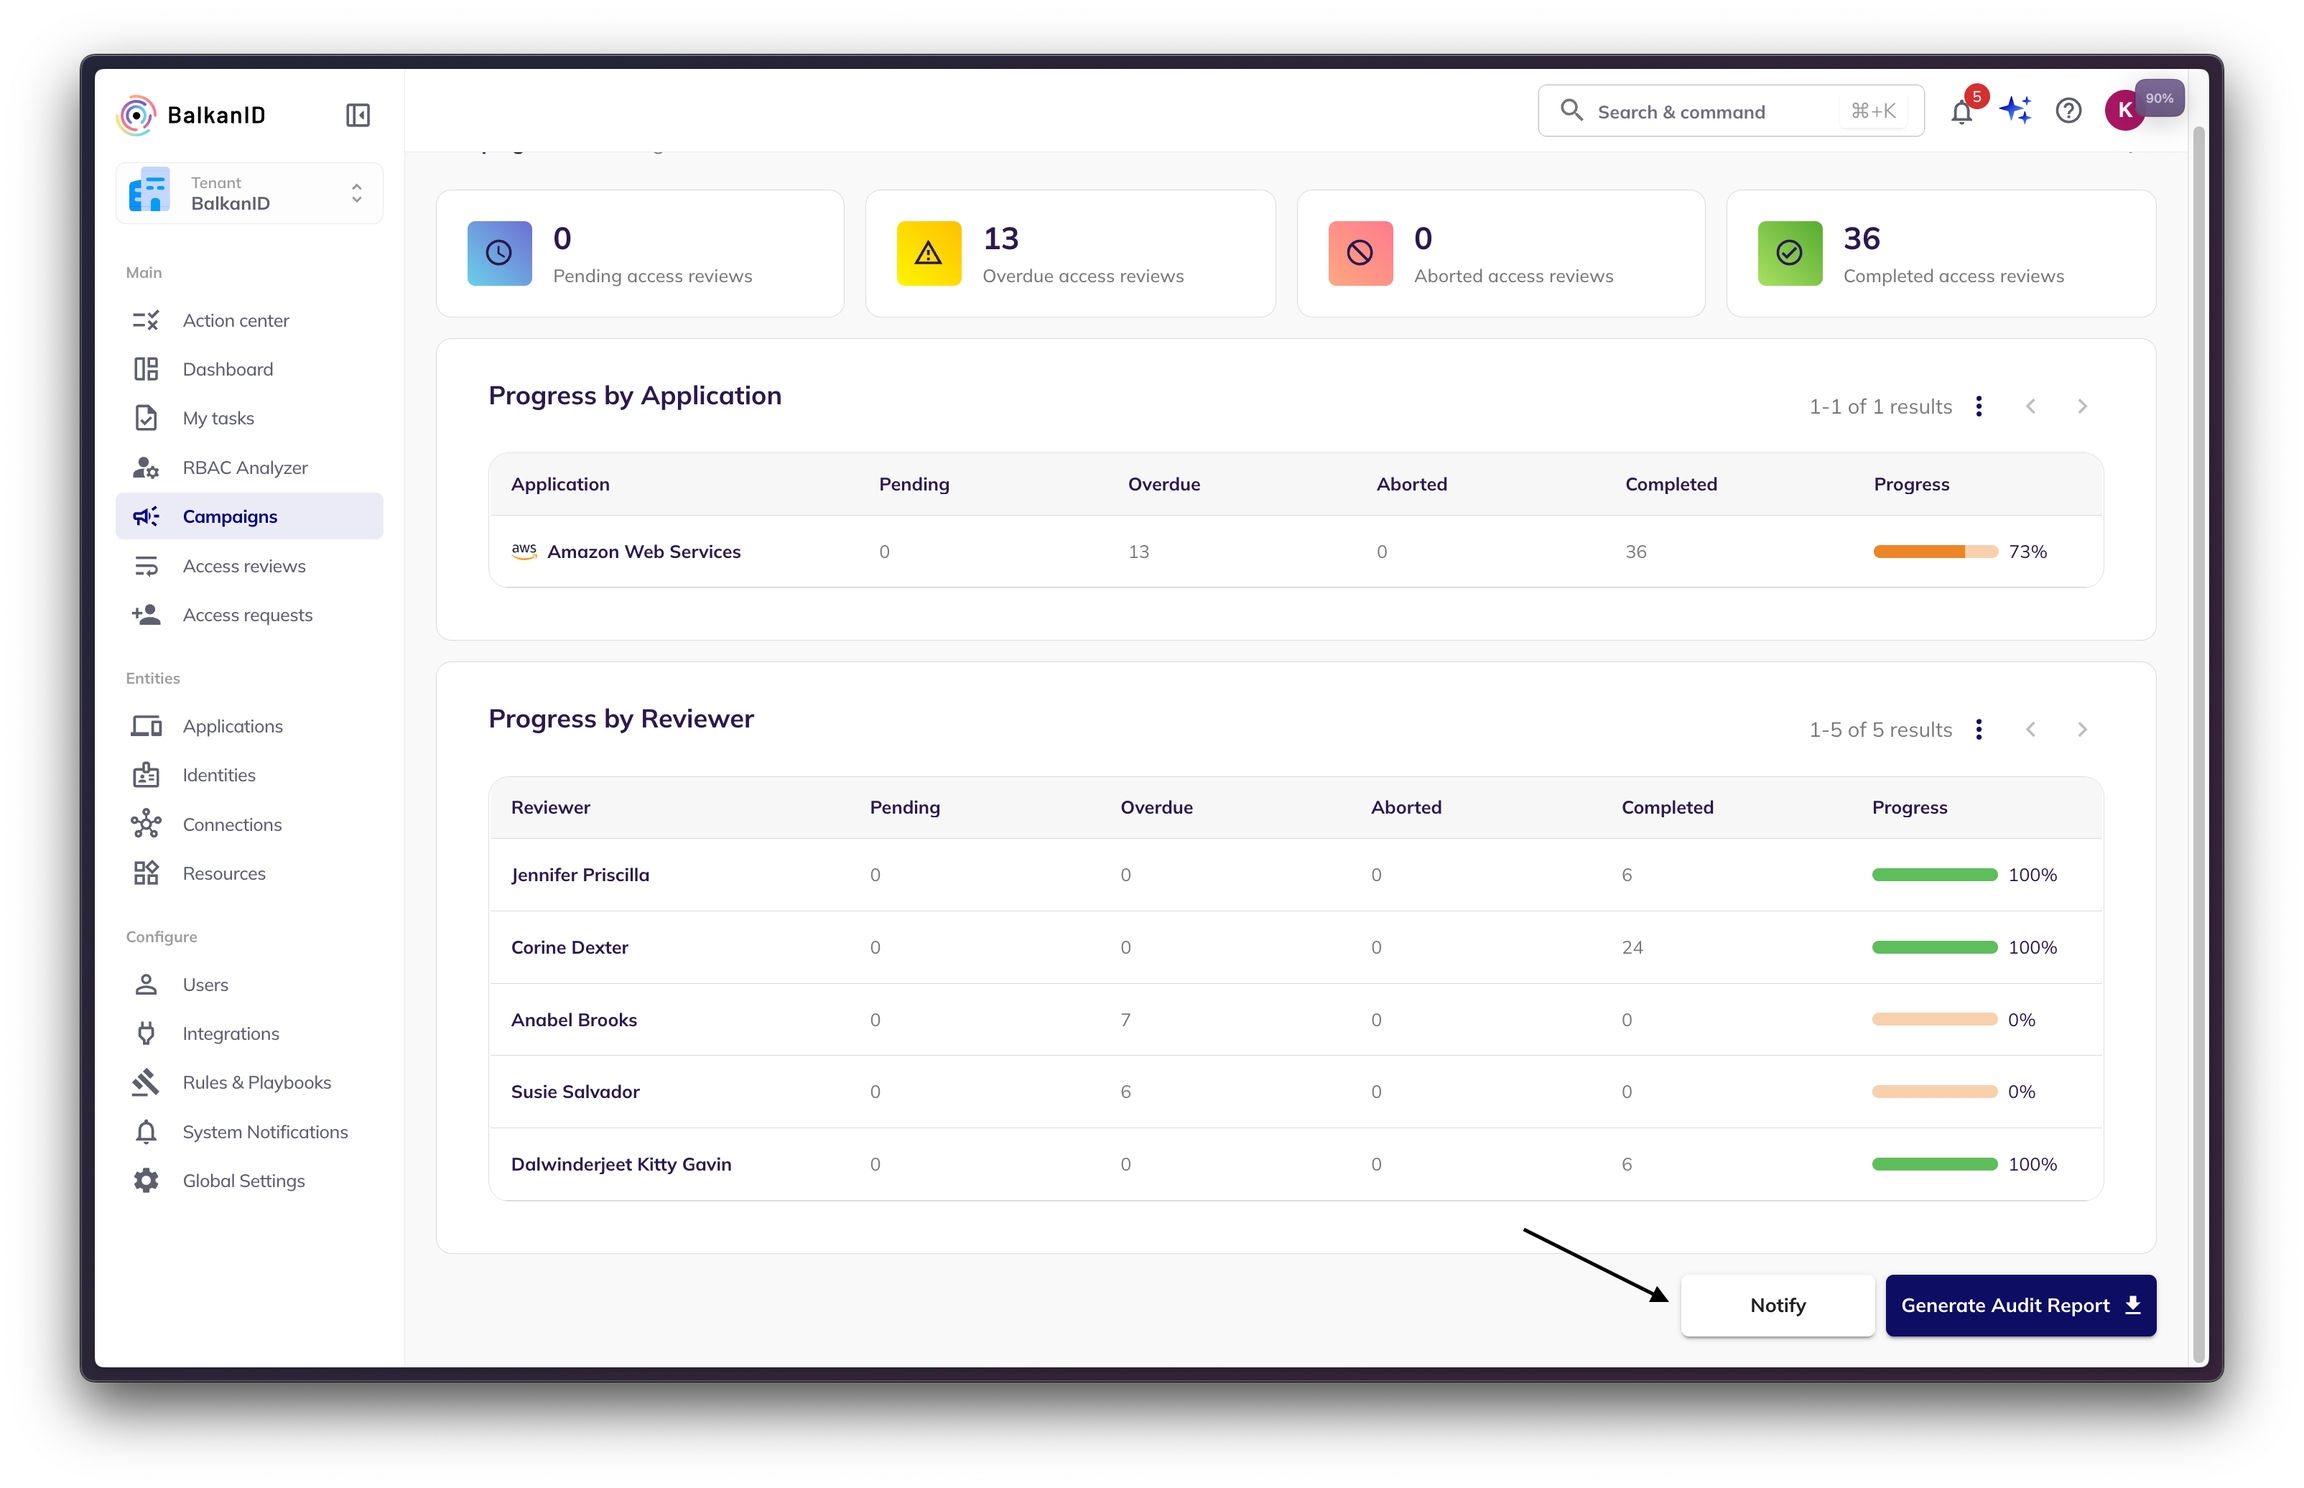
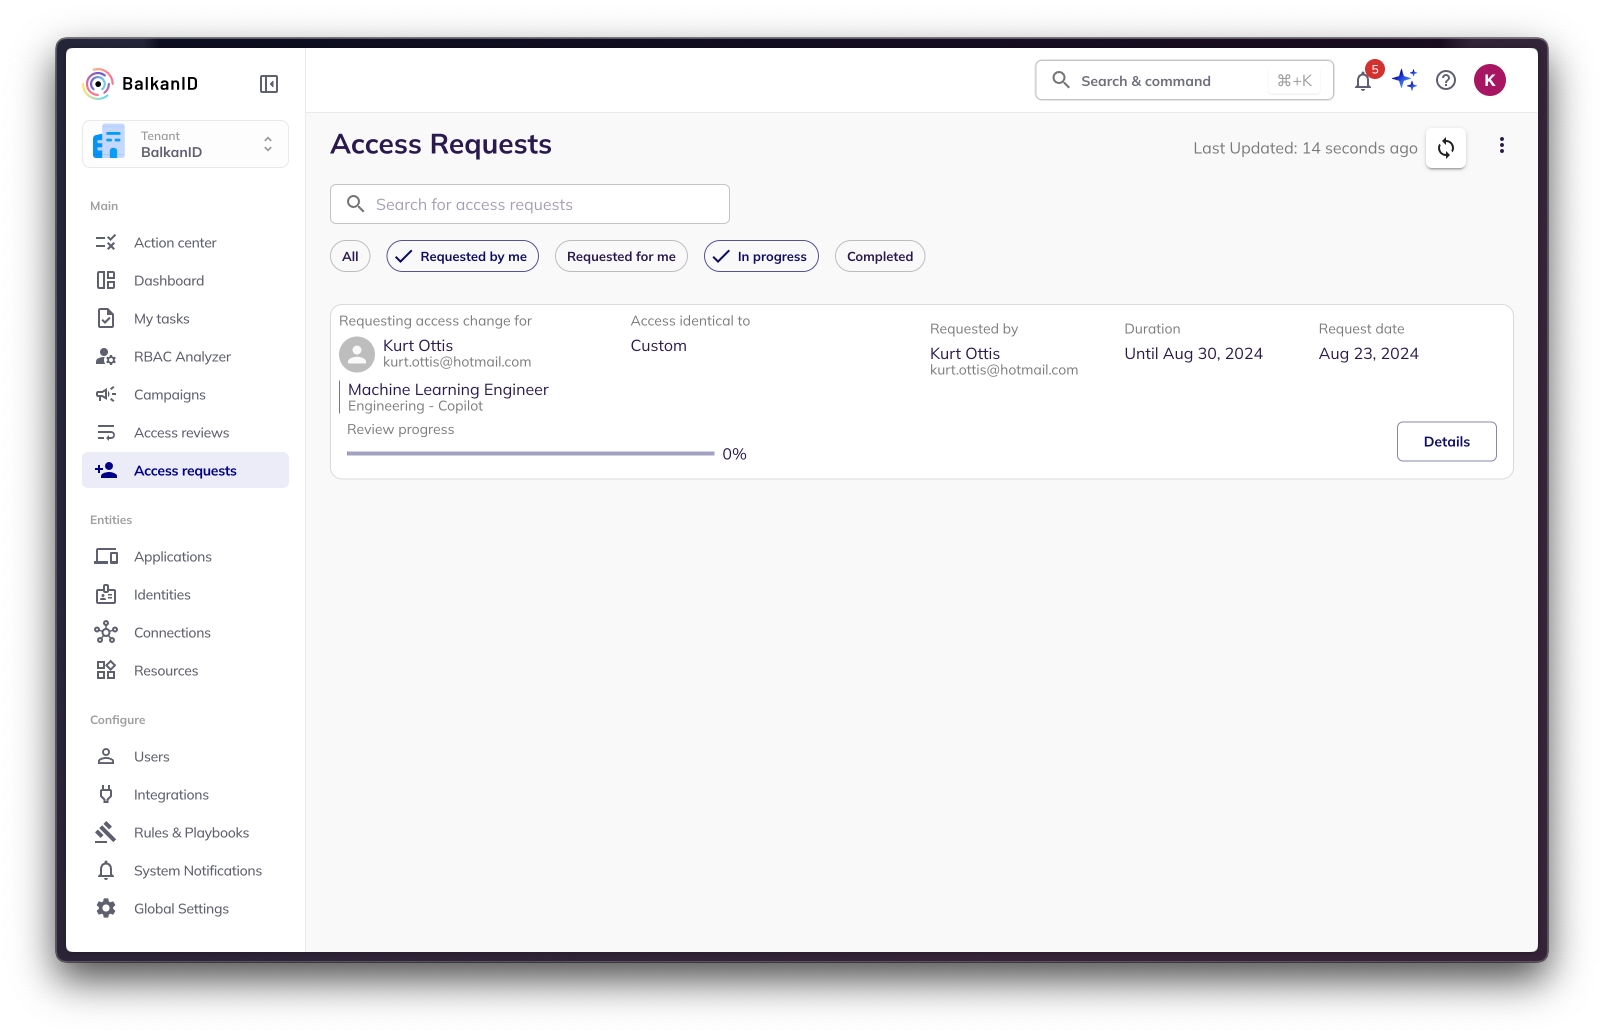
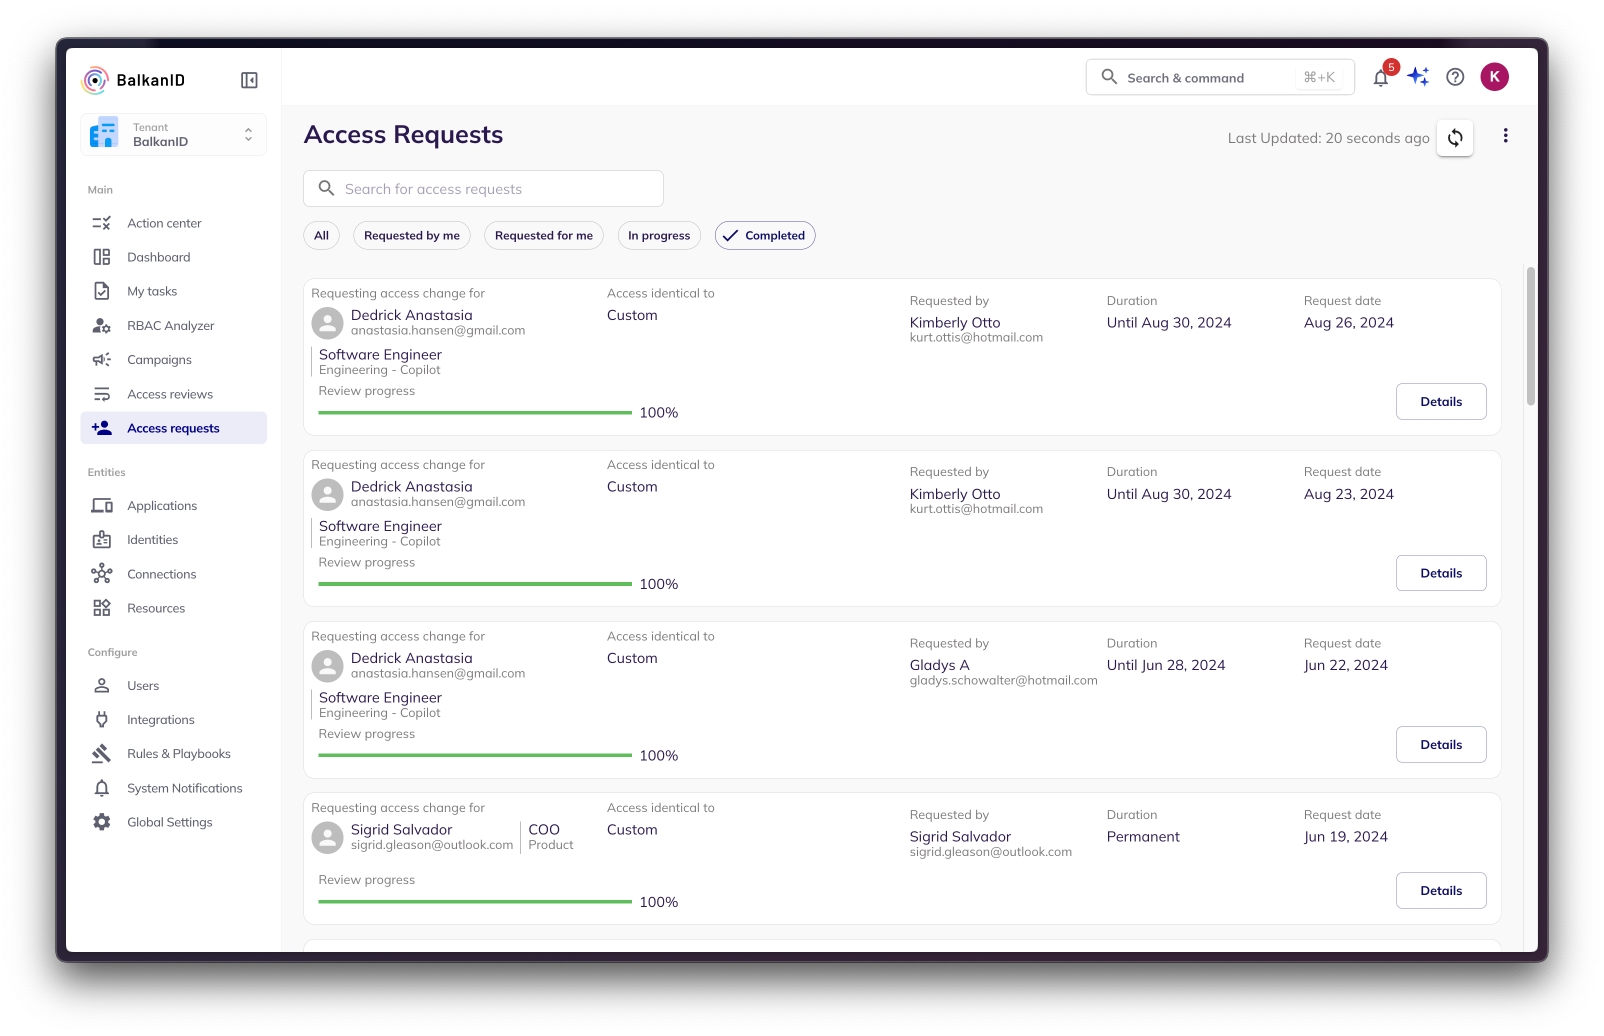

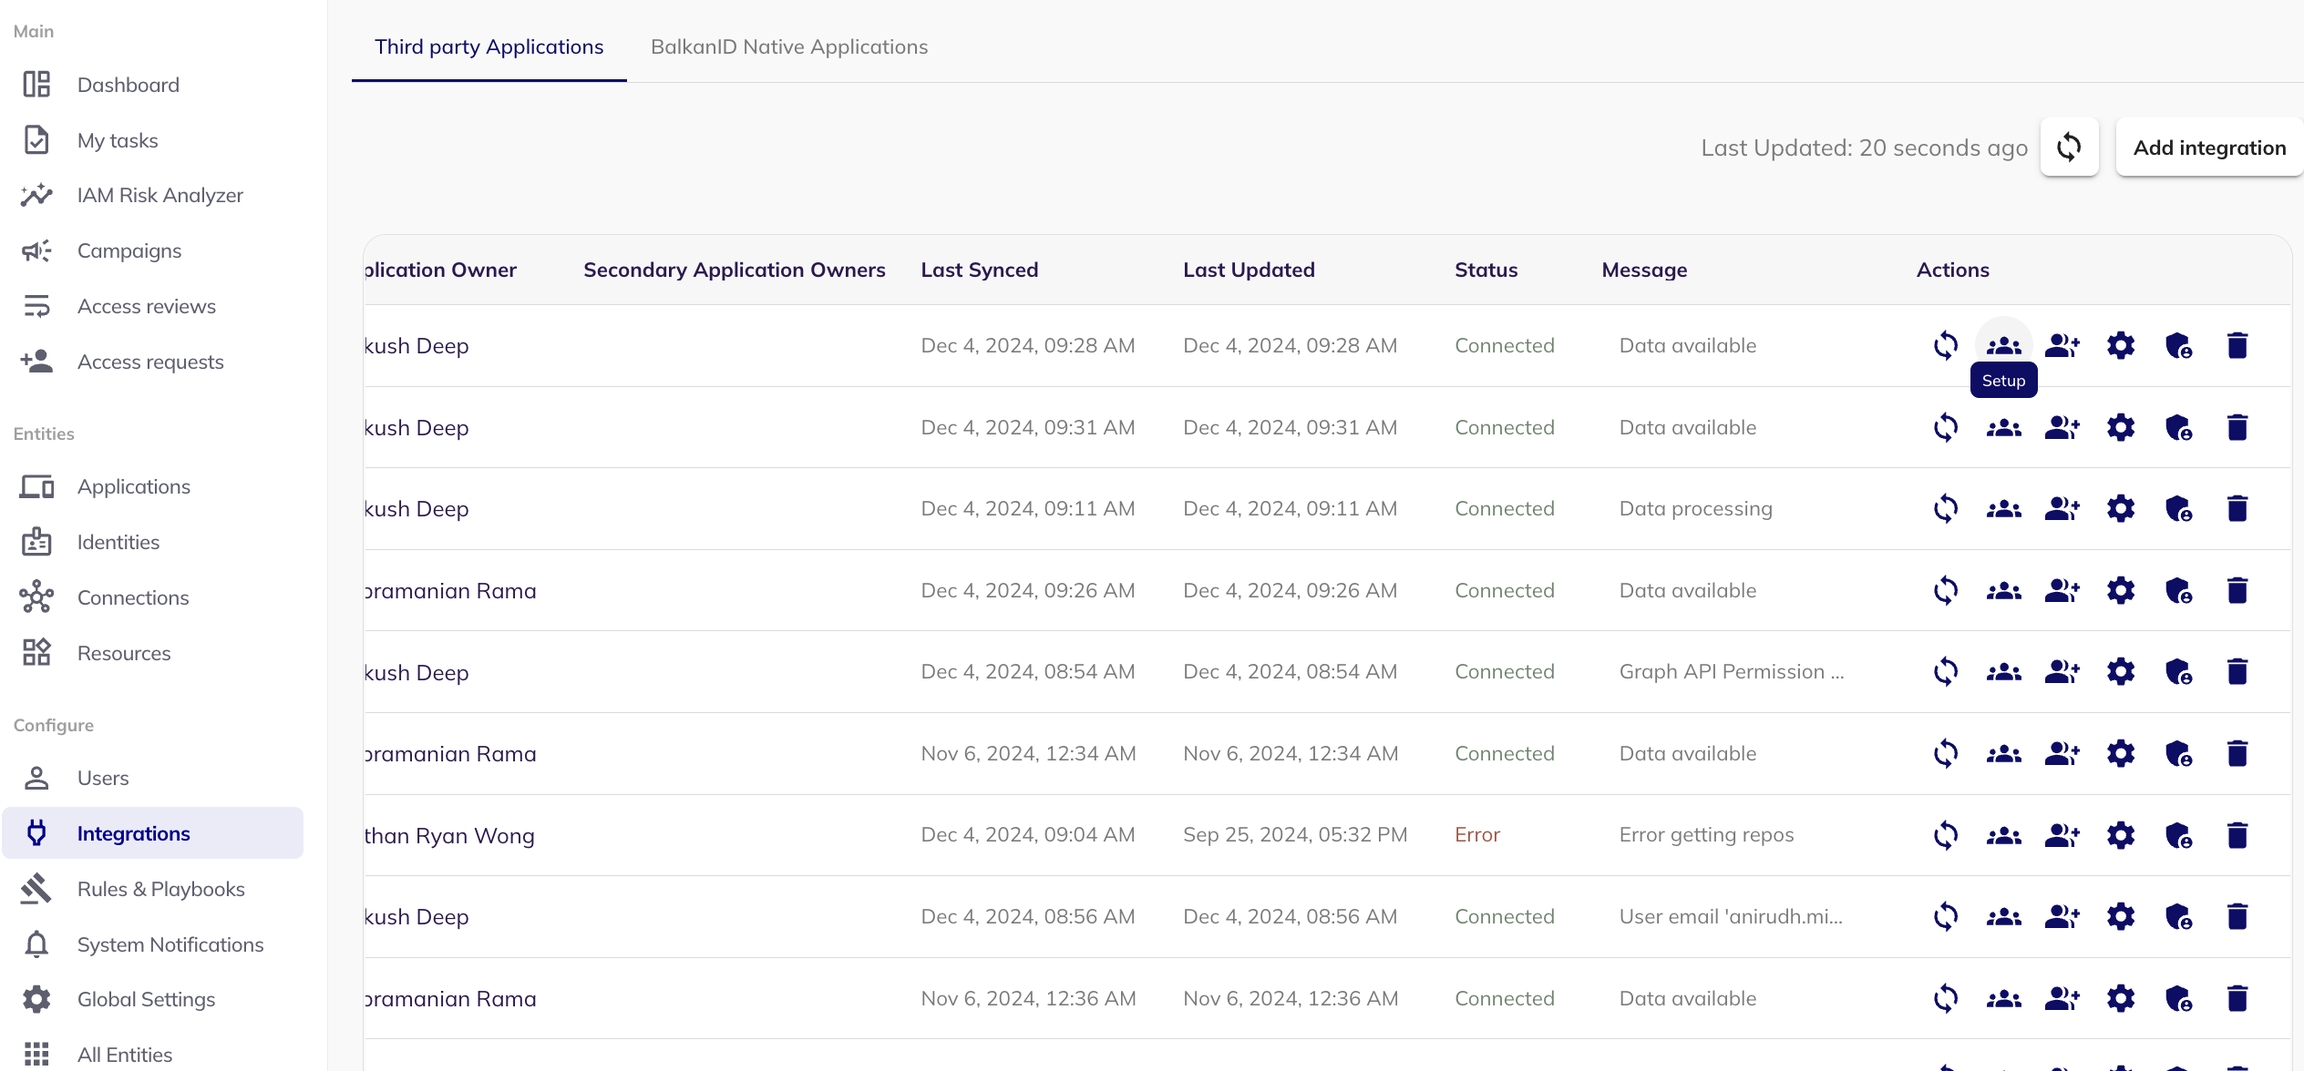
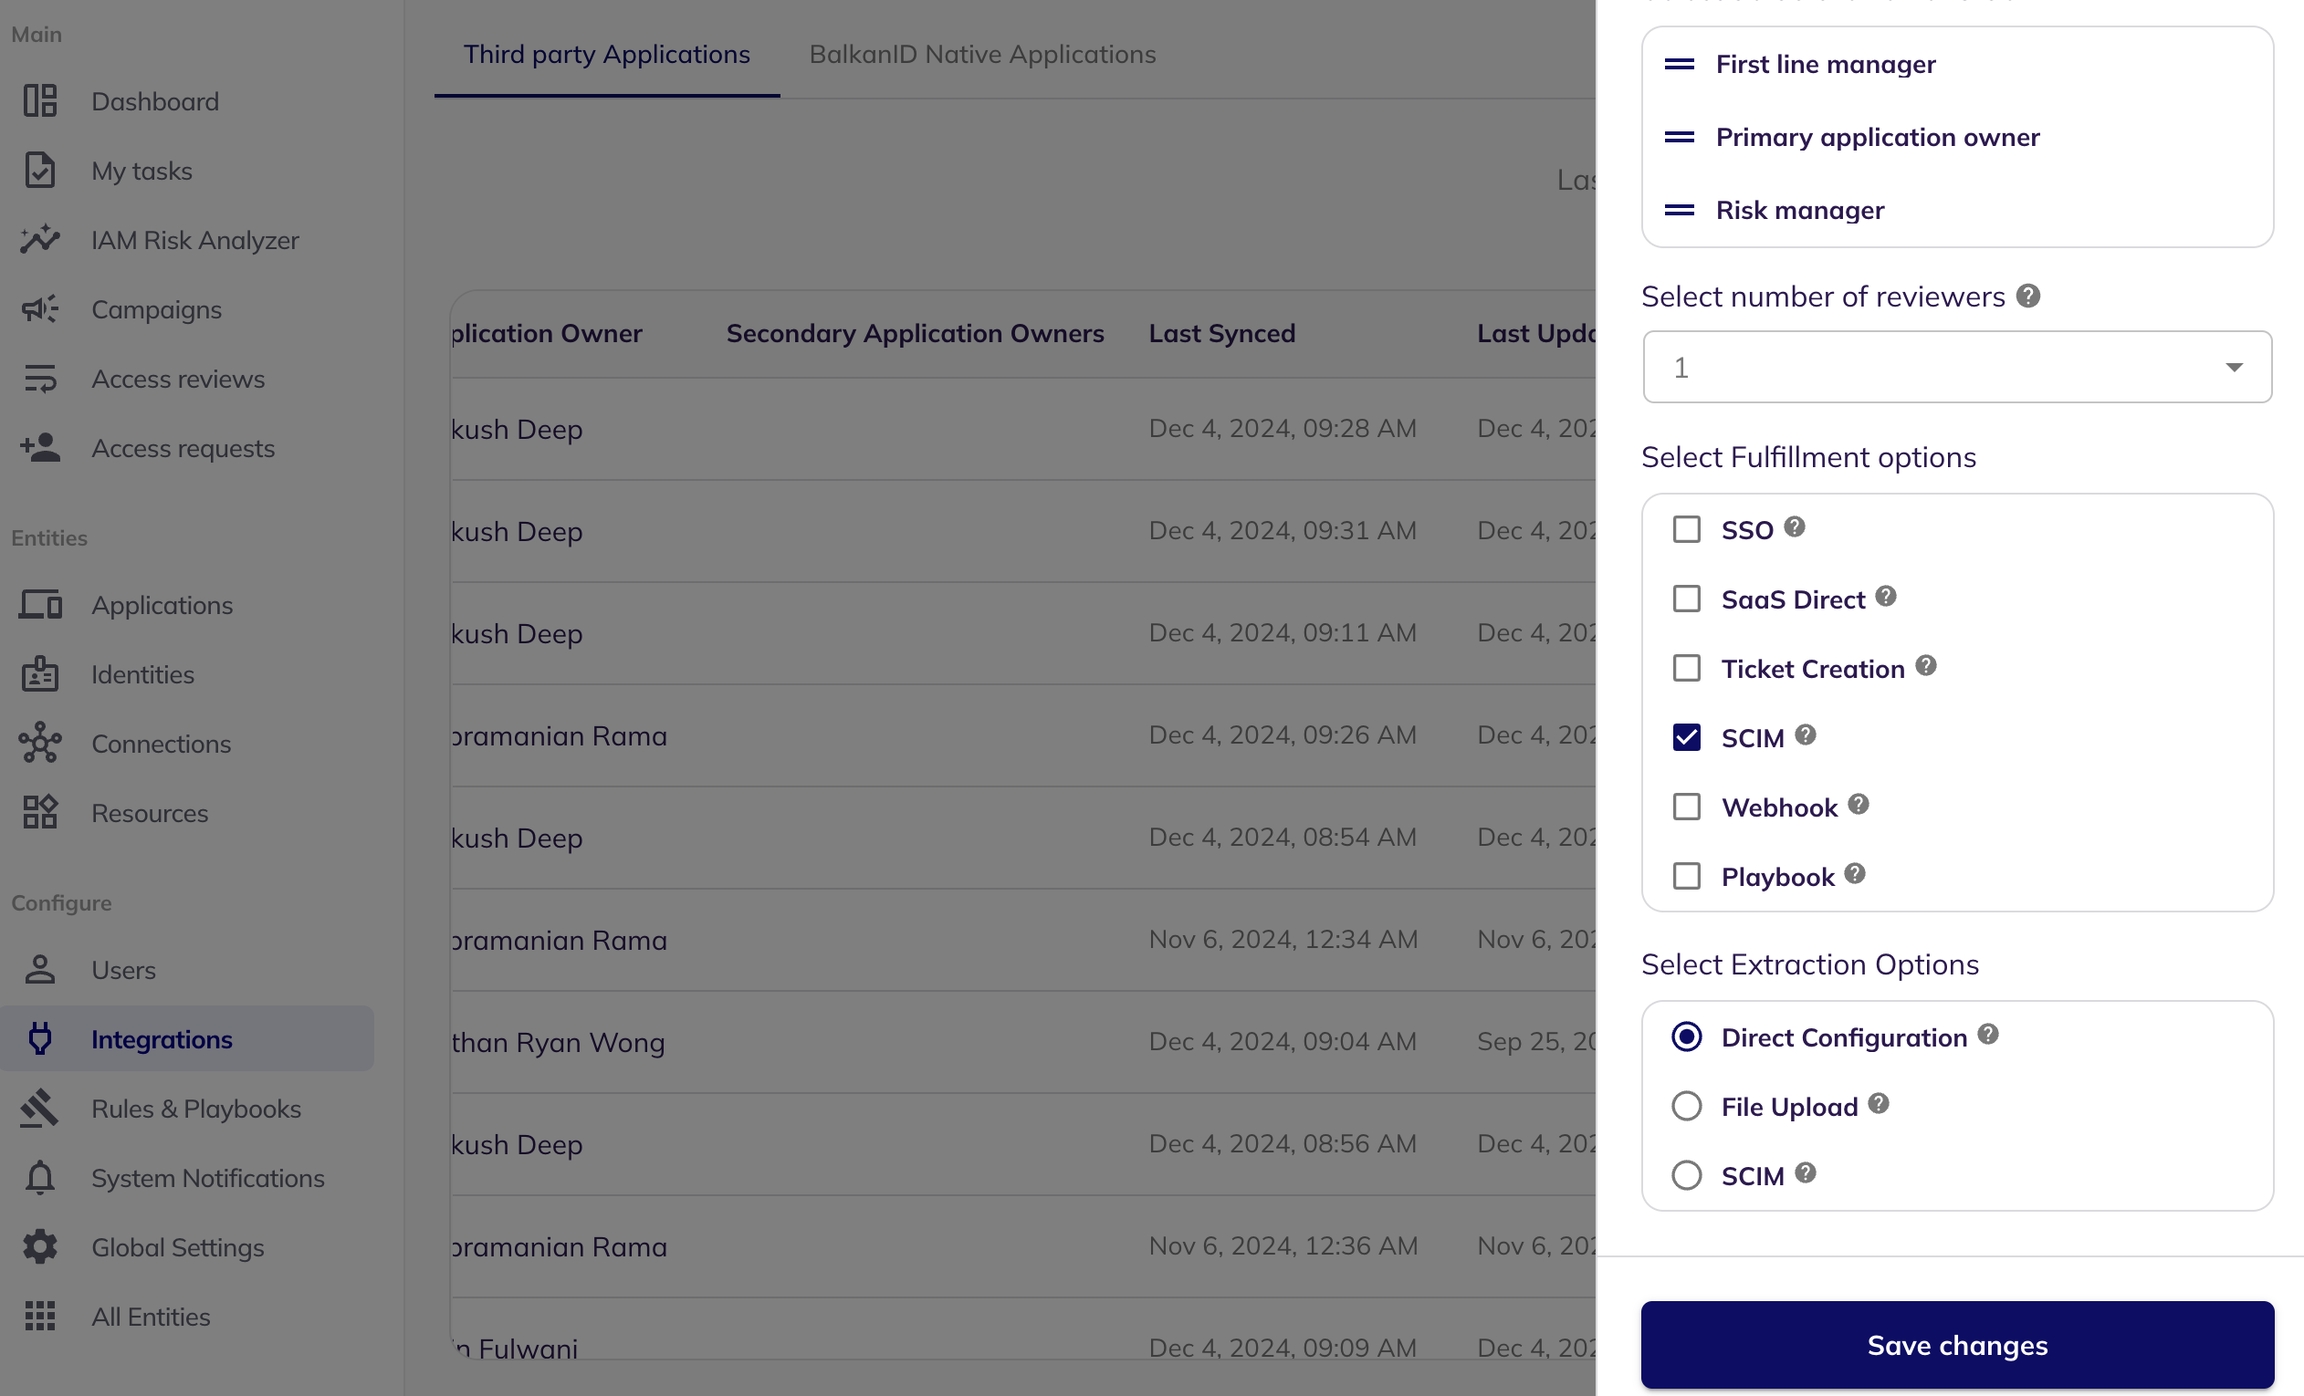
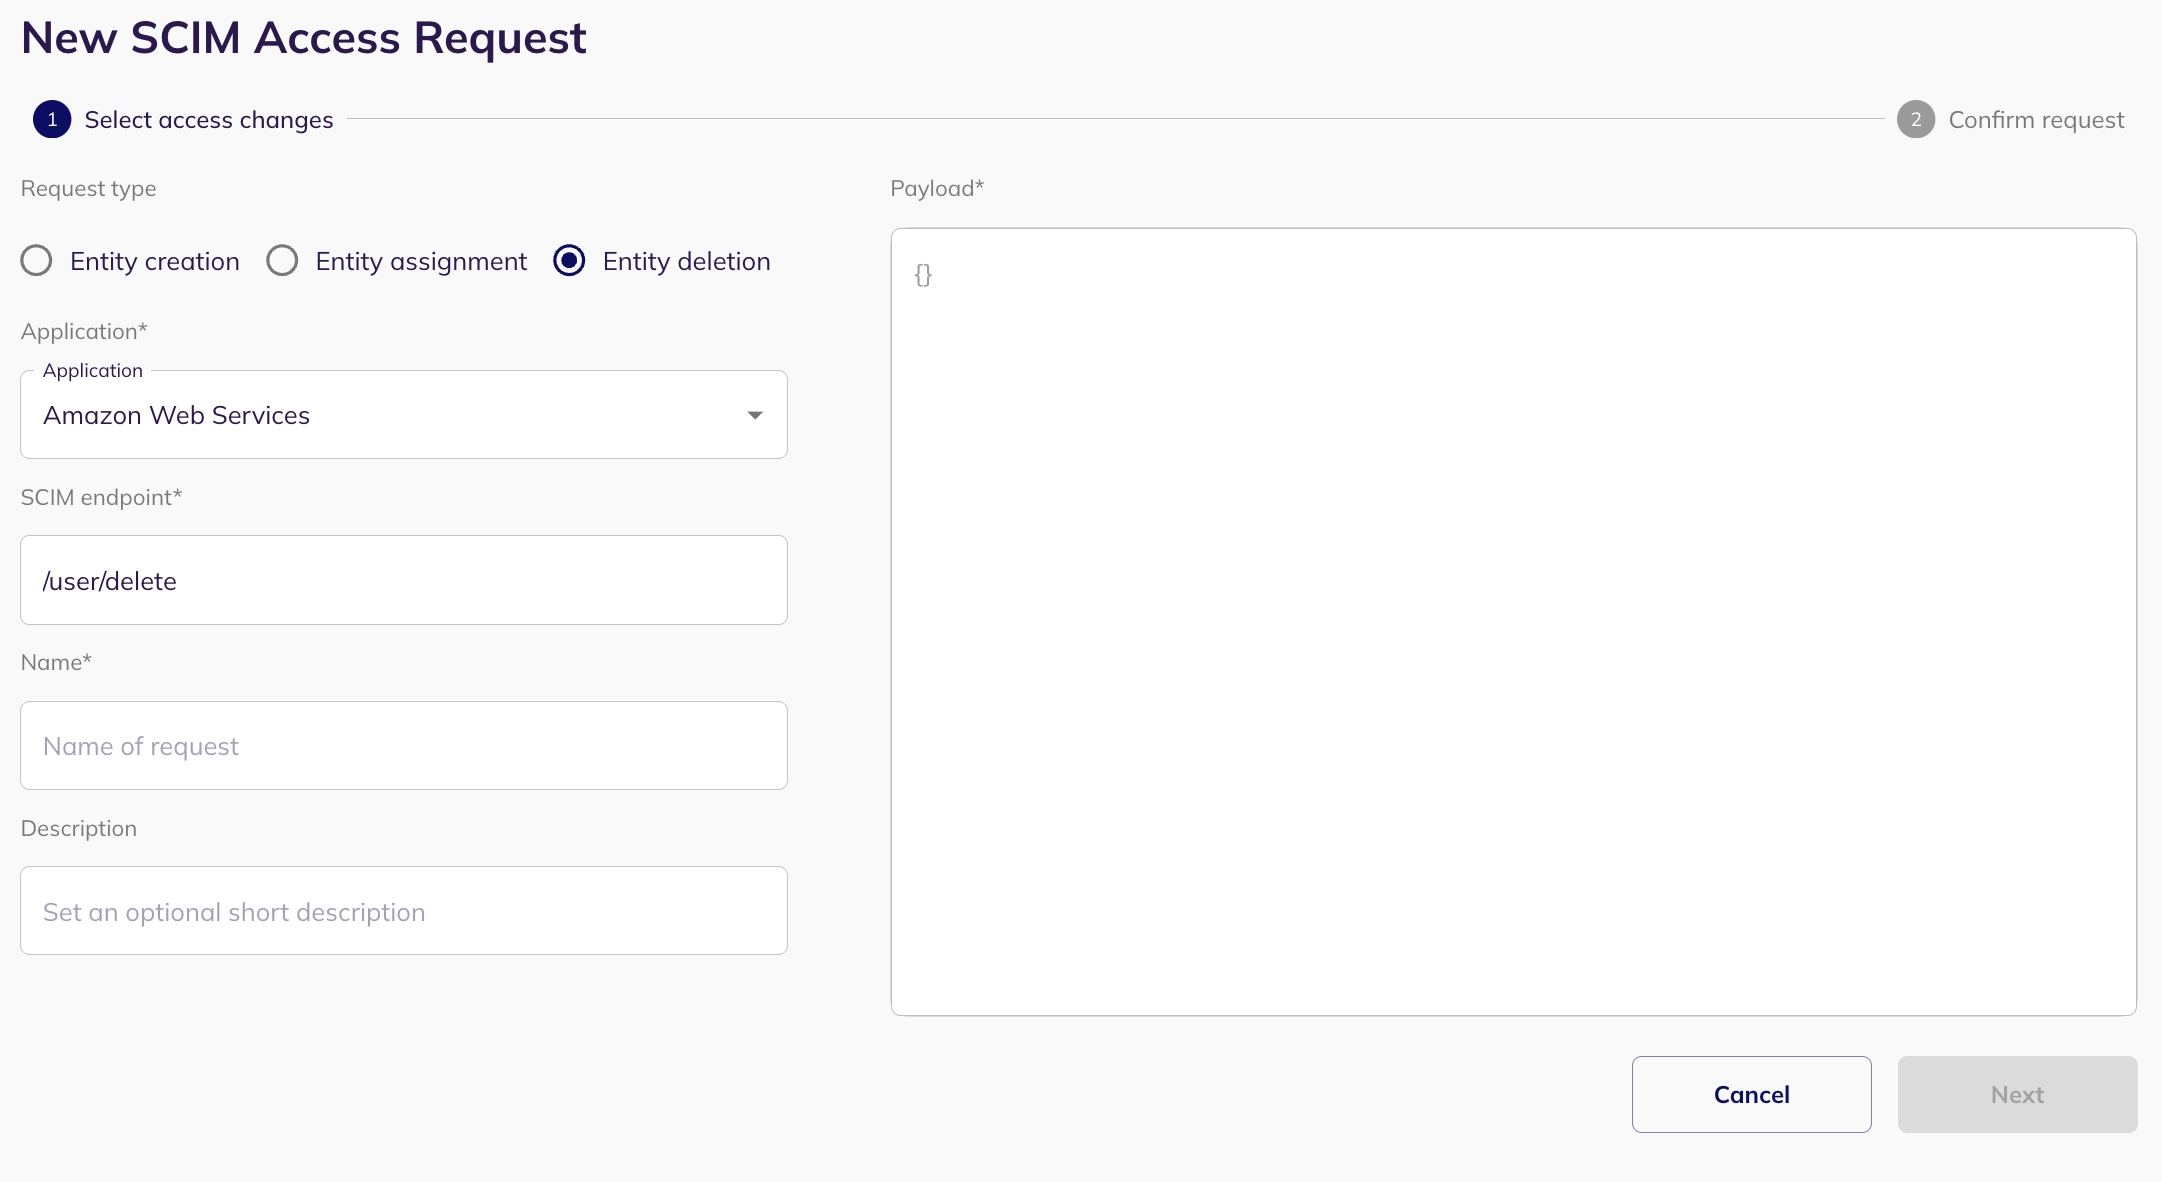
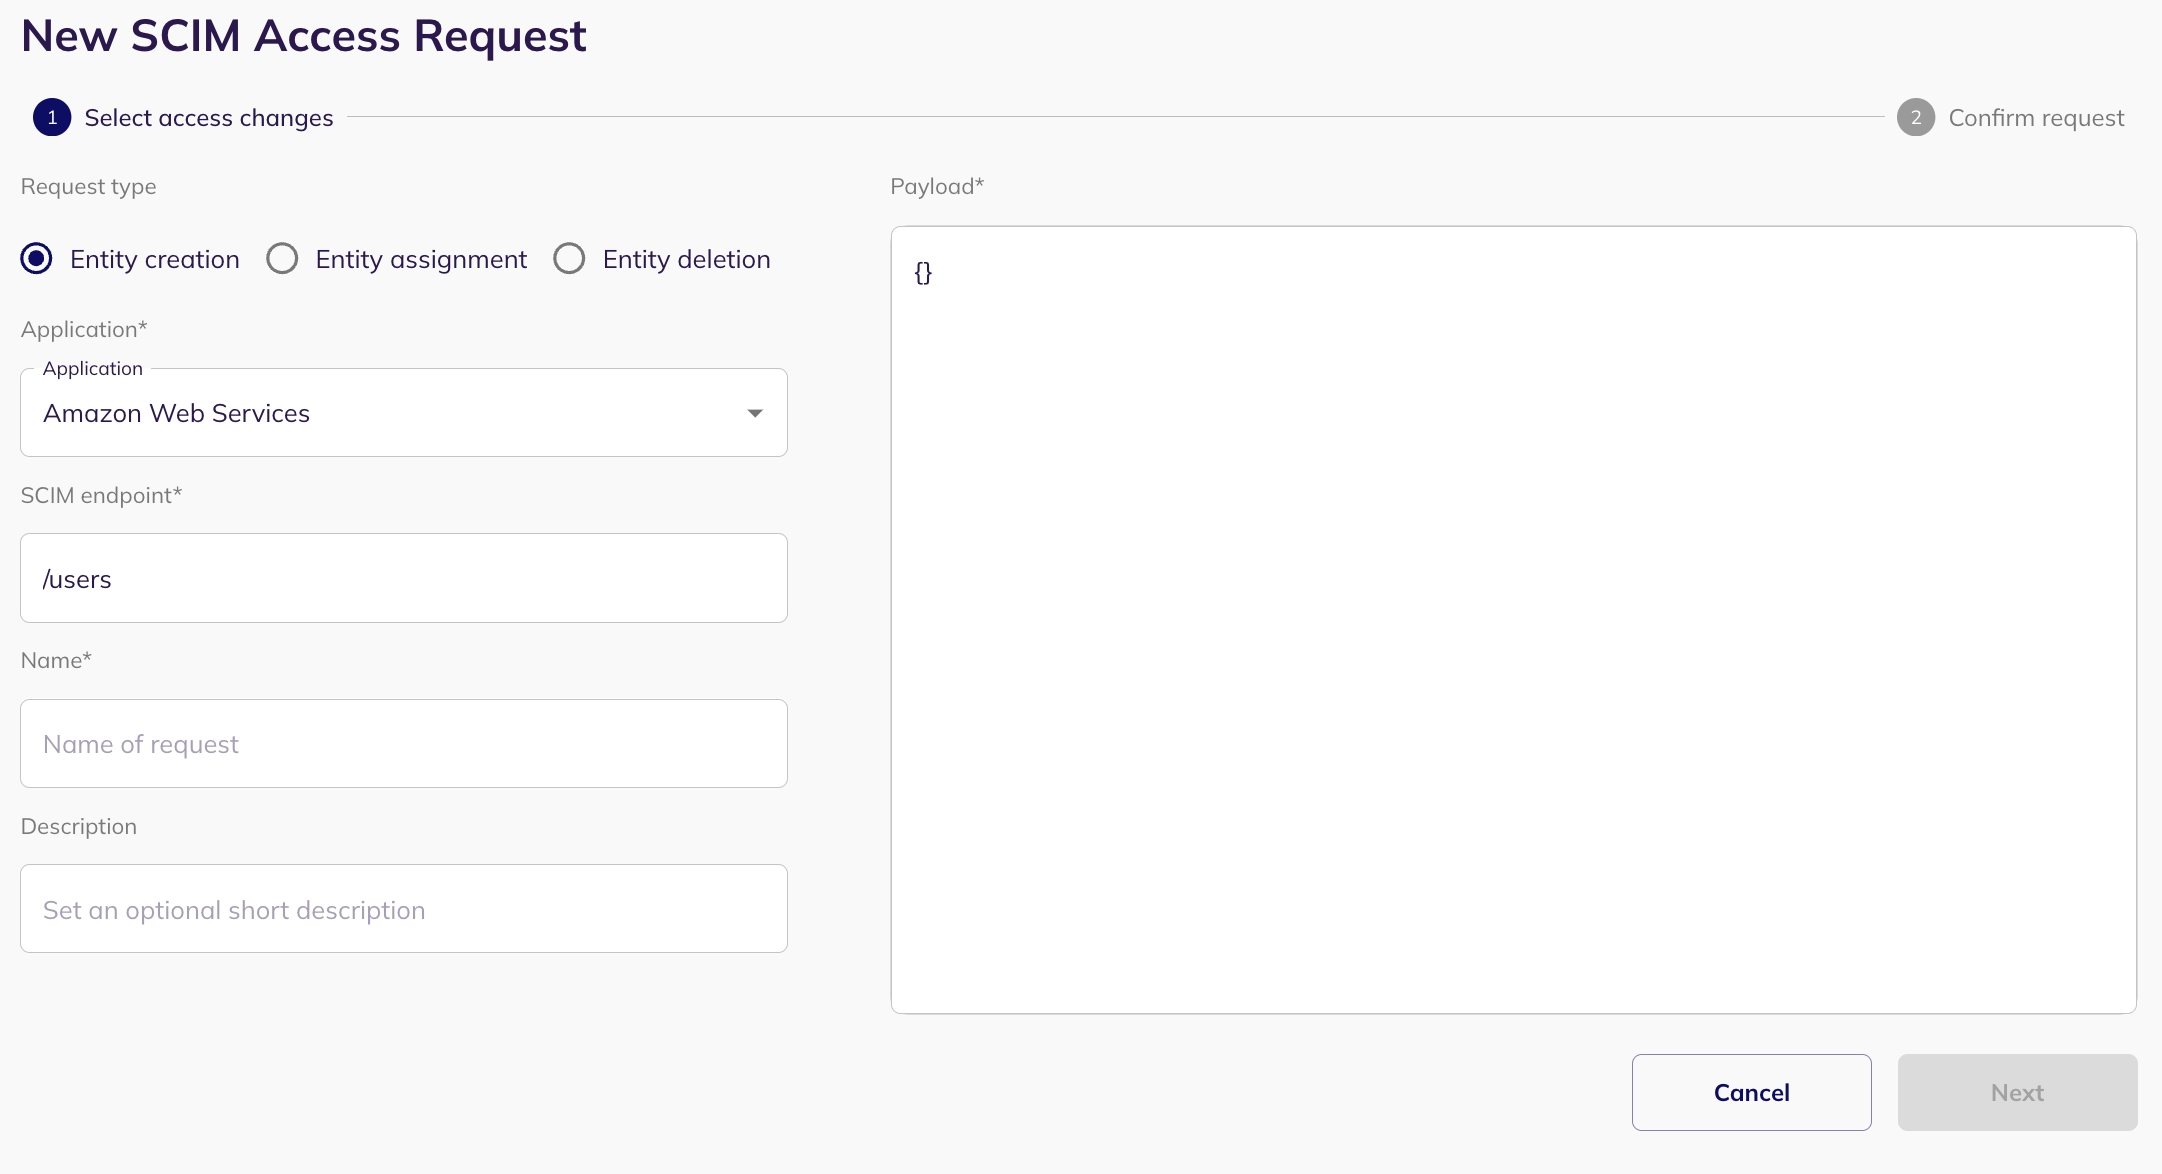
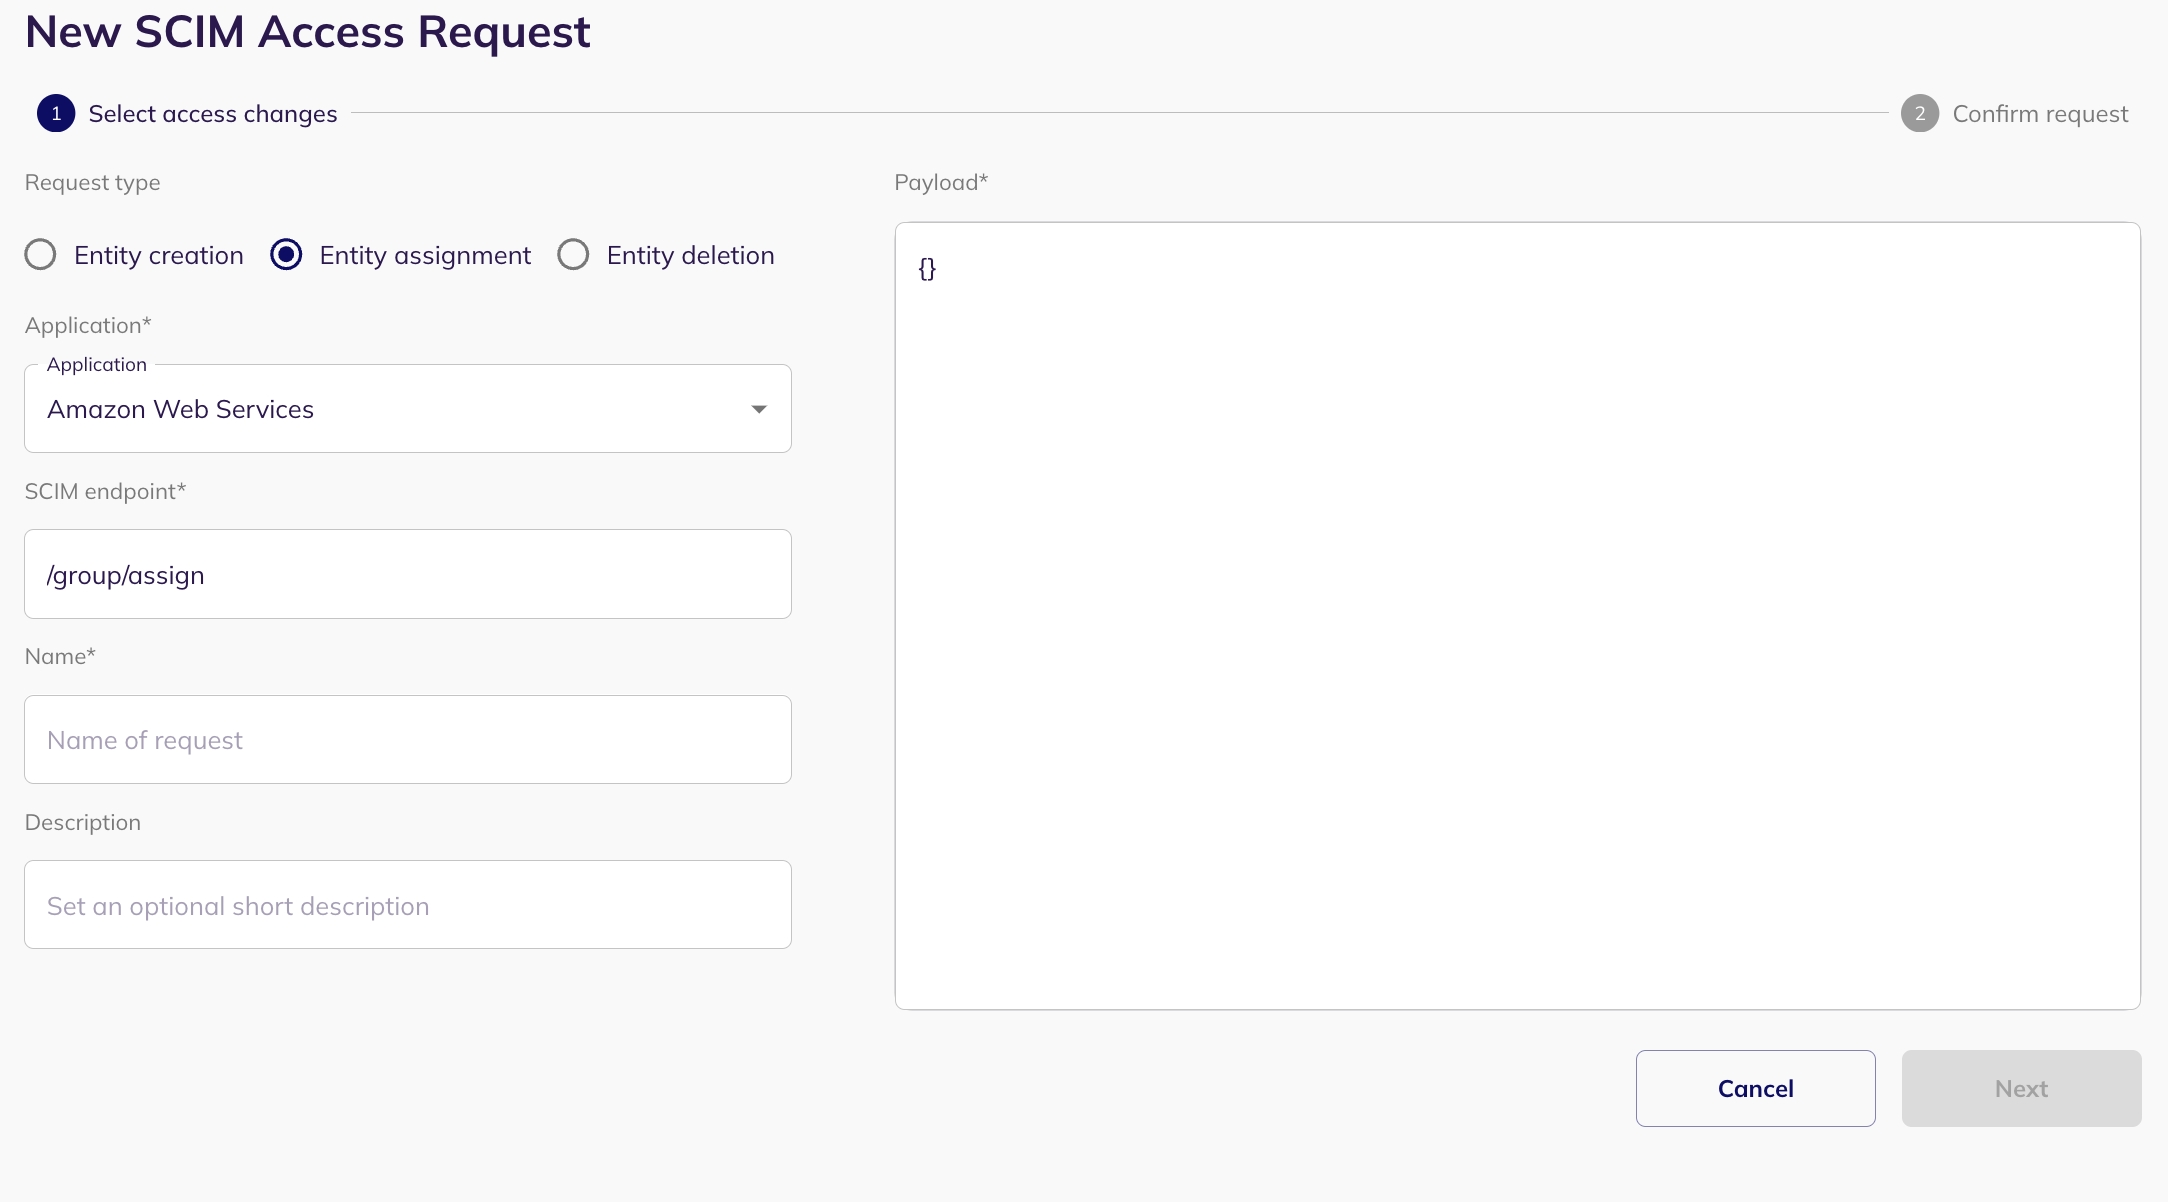


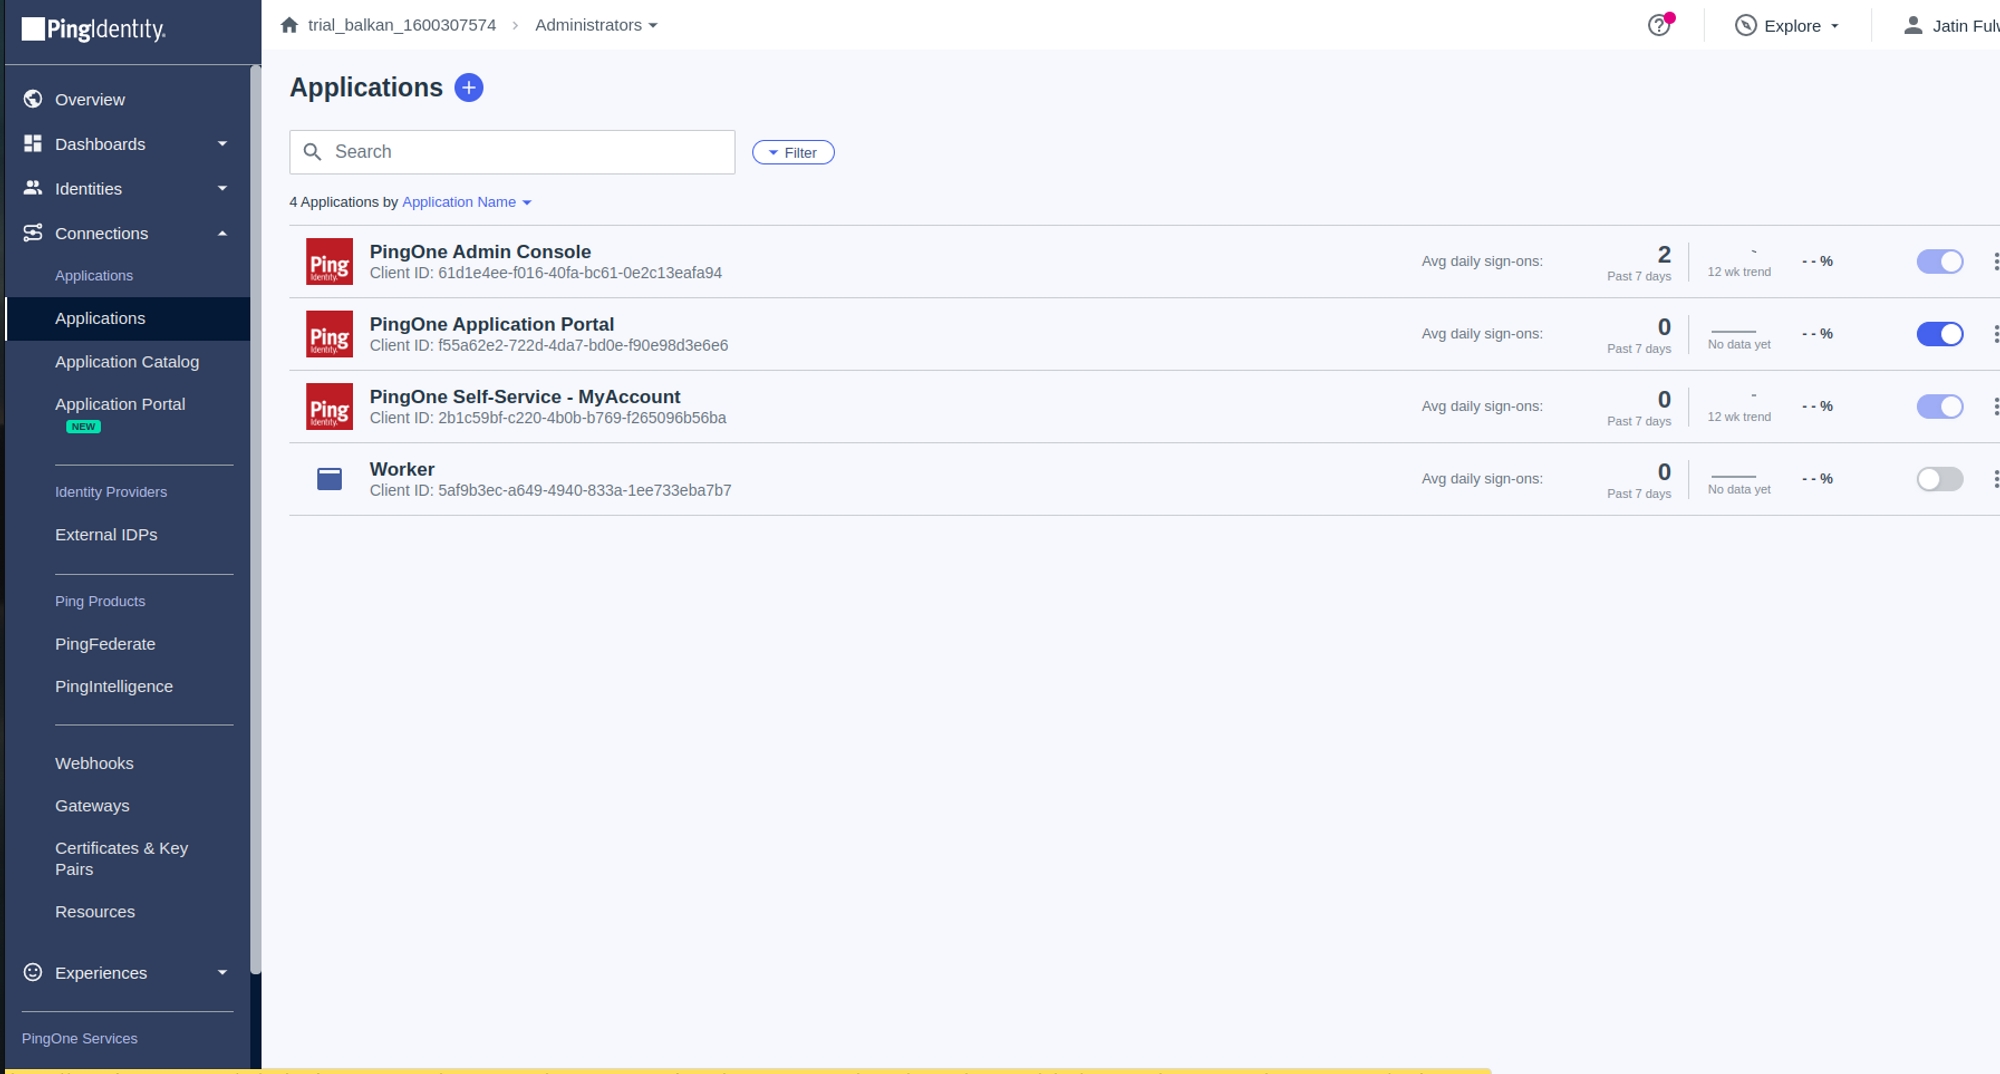

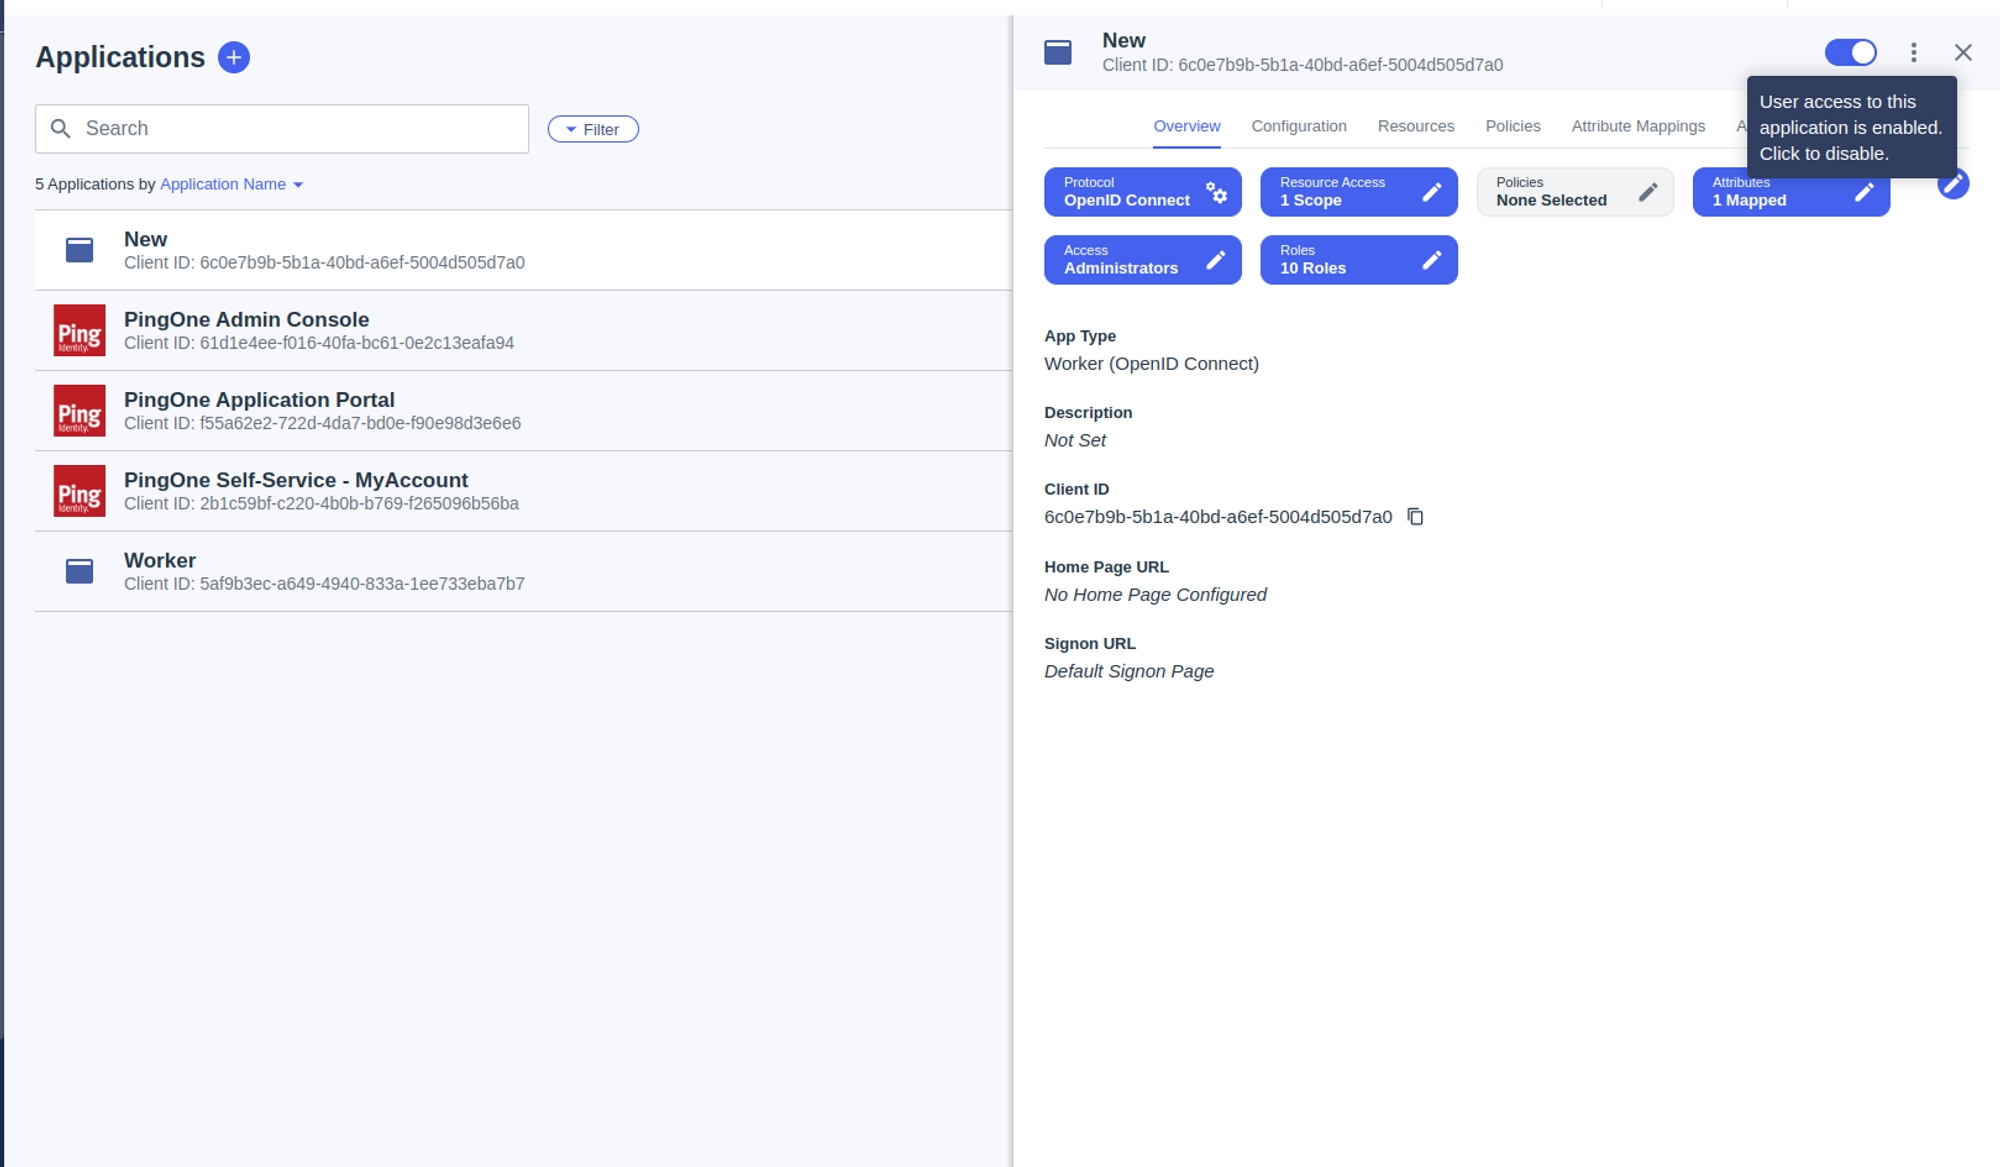
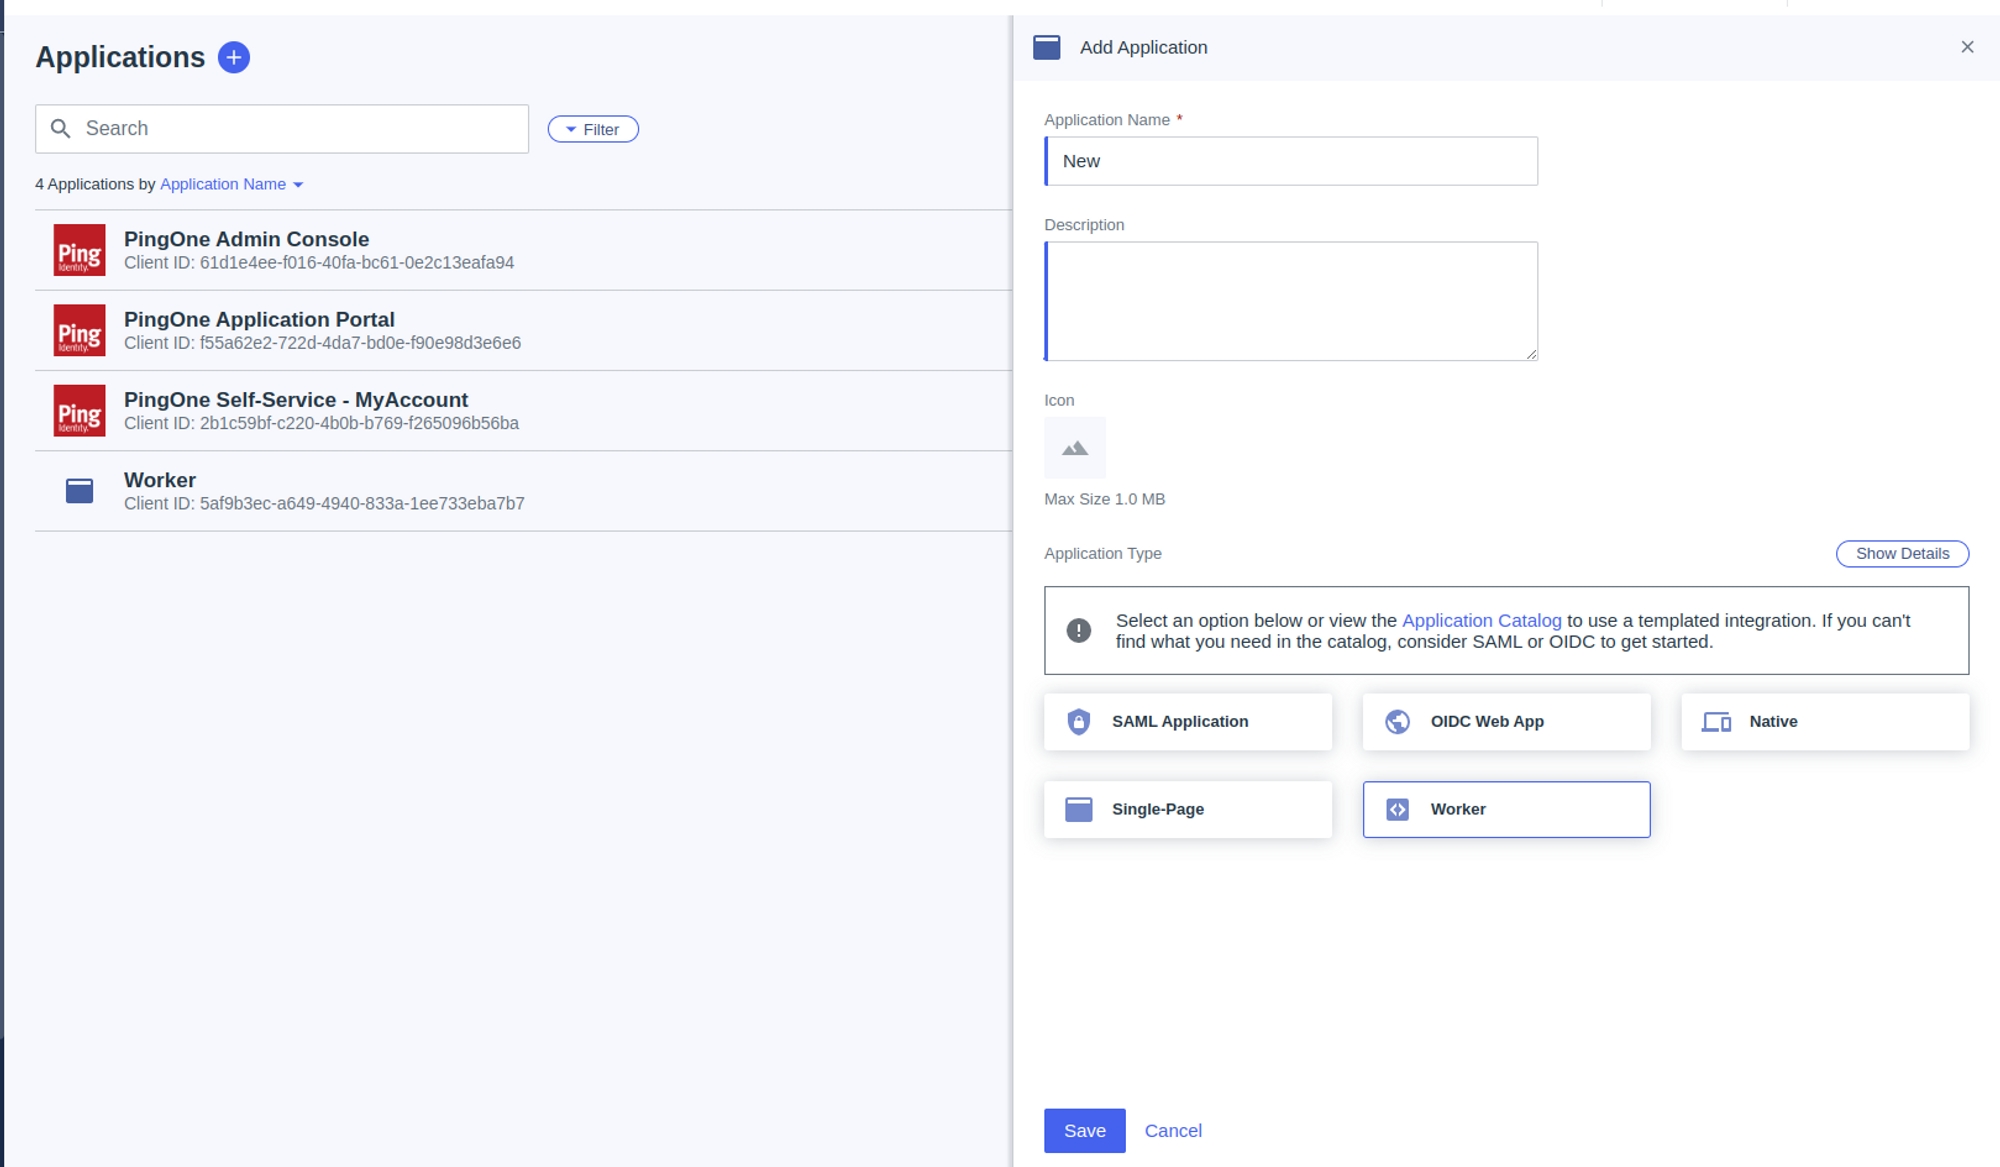

BalkanID recommends creating a separate service account for the purposes of this integration, instead of using personal or employee named accounts.
Key: This refers to the Service Account Key (in JSON format) that you will generate for the dedicated GCP service account. This key is used by BalkanID to securely authenticate and access your GCP resources programmatically.
Delegated: The email address of a user in your Google Workspace domain that has been granted domain-wide delegation. BalkanID, through the service account, will impersonate this delegated user to access Google Workspace directory data (users, groups, and admin roles).
Domain: This is the primary domain name associated with your Google Workspace organization (e.g., yourcompany.com). It's crucial for identifying the correct Google Workspace directory from which BalkanID will retrieve user identities, email addresses, and group access information.
Who performs this task
An identity administrator responsible for assigning role-based access to individuals or groups within your organisation. This individual needs to be a Super Administrator for Cloud Identity or Workspace.
A domain administrator with access to the company's domain host, to see and edit domain settings such as DNS configurations.
You will be required to perform the below steps:
Enable required APIs
Create a custom role (at organization level)
Create a service account
Add domain delegation scopes to the service account
Go to Google Cloud → APIs and service → Enabled APIs and services, search for the required APIs and enable it.
Search and enable the following APIs
Important: The custom role must be created at the organization level (not project level). This is required because BalkanID needs to pull inherited IAM information from both folders and the organization. Without org-level scope, inherited roles and access relationships would not be visible.
Creating a custom role and assigning permissions
Go to IAM and Admin → Roles.
Click on + CREATE ROLE to proceed with creating a custom role.
Fill in the required fields for creating the role.
Go to IAM and Admin → Service Accounts.
Click on Create service account button on the top to proceed.
When you are in the second step, select the necessary permissions for its operation, in this case the new Custom Role. For more information -
The delegated user that service account impersonates needs permission to read directory information (users, groups, and customer details) through the Admin SDK API. This role does not need Super Admin privileges only the specific read permissions required for API access. Creating a custom “Read-Only Role” helps you follow the principle of least privilege.
Steps to Create a Custom Admin Role
Go to
Log in using an account with Super Admin privileges.
Navigate to Admin Roles
Please ensure the same delegated email exists in both GCP and GWS:
In GCP:
Assign the custom org-level role to the delegated email at the organization level (not at the project level).
This is required because the integration needs to pull inherited IAM information from folders and the organization project-level roles only allow access within a single project and won’t include inherited permissions.
In
You need to add domain delegation scopes to the service account, first get the OAuth2 client ID from the Service account.
Go to IAM and Admin → Service Accounts and copy the OAuth 2 Client ID of the service account you just created.
Go to of your .
Login to the BalkanID application and switch to the tenant you would like to add your integration to.
Head to Integrations > Add Integration, select Google Cloud Platform.
Set up the Primary Application owner (mandatory) and the Description, if any. Set up Secondary Application Owner(s), if any.
Navigate to the Campaigns page from the navigation sidebar.
Click on the "Create new campaign" button.
You will see a screen as shown in the below image. Configure your campaign according to your requirements on the right sidebar. Remember to enter the necessary components - Campaign name, start date and end date. Refer to the sub-section to understand the filtering criterias for creating a campaign.
Additionally, you can setup and as well while creating a campaign.
Once you have configured your campaign, you can either Save campaign as a draft to publish later OR you can Publish campaign. The description for both the operations are given below:
Saving Campaign as a draft BalkanID allows risk managers to create a campaign and save it to be published later. Select “Save as a draft” and your progress will be saved, and you can access the campaign later.
Publishing a campaign When a campaign is ready to be kicked off, you can "publish" the campaign. This will create access reviews and assign them to the appropriate reviewers in your organization along with sending the appropriate notifications (new reviews, overdue reviews, etc.)
Once your campaign is set up and ready, the Publish action makes it active and initiates the access review process. This means reviewers will begin receiving notifications and can start working on their assigned reviews. You can easily track the publishing status through a notification that appears (often called a "snackbar").
How to Publish:
From the Campaign Dashboard: Click the three dots on the top right to open the action's menu on the campaign card and select "Publish."
From the Edit Page: While editing a draft campaign, you'll find a "Publish" option to activate it directly.
Once you hit publish using either of the ways shown above, a dialog box will appear as shown in the below image, asking you to confirm publishing the campaign. This dialog box will also warn you if any integrations used in the campaign are out-of-sync, indicating that the data you are basing the campaign on might not be up to date.
If there are no out-of-sync integrations, you will see a plain dialog box.
The campaign details section required the following details about the campaign.
The filter criteria is used to select which identities and entitlements will be reviewed.
The Has Access To fields are particularly useful in filtering based on how different entities are connected. An example of when these fields can be used:
To select resources that an identity has access to through a connection, you can simply choose an identity as the entity type and use the Has Access To field to specify the connection that you want to see which the identity has access to.
The Has Access To field allows you to filter based on these Entity to Entity relationships. You can use it to narrow down data based on whether an identity has access to a resource. The one specified above is just an example for using the having field. You could get innovative and try selecting data you desire accurately if these fields are used efficiently.
Application: Select from the list of applications that have been integrated into your tenant. This helps filter entities based on specific apps. There can be multiple integrations of the same application but with different credentials.
Application Integration: Choose an application integration that has been set up in your tenant. This allows you to filter based on the specific integration you want to focus on.
Entity Name: Select the specific name of the entity you want to filter. For example, you can filter by the name of a resource/identity/connection.
The filter criteria has two tabs: Include and Exclude.
Include filters add (or include) particular entitlements that match the filter conditions. For example, setting the Application: Jira include filter condition will add all identities and entitlements for the Jira application to the campaign to be reviewed.
Exclude filters remove (or exclude) entitlements that match the conditions from the campaign. For example, setting the Department: Operations exclude filter condition will remove all identities and entitlements for those employees whose department is operations from the list to be reviewed.
Here are a couple of simple scenarios to illustrate how "Include" and "Exclude" filters work together:
Scenario 1: Reviewing Non-Intern Engineers
Imagine you want to review access for all engineers in your organization, but you specifically want to exclude any engineers who are interns.
Here's how you would set up your filters:
Include Tab:
Add a filter: Job Title is Engineer
(This brings in all identities and entitlements associated with anyone whose job title is Engineer.)
Your review campaign will now focus only on non-intern engineers, demonstrating how "Include" casts a broad net, and "Exclude" precisely refines the selection.
Scenario 2: Jira Access Excluding Operations Department
Consider a case where you want to review all identities that have access to your Jira application, but you need to exclude any identities belonging to employees in the Operations department.
Here's how you would set up your filters:
Include Tab:
Add a filter: Application is Jira
(This brings in all identities and entitlements related to the Jira application.)
The combined query ensures that your review campaign will now focus only on identities with Jira access, except for those employees in the Operations department.
Campaigns in BalkanID are organized groups of access reviews designed for audit, compliance, or risk remediation purposes. As a Risk Manager or Administrator, you can create, publish, track, and report on these campaigns, gaining crucial oversight into your organization's access posture.
A campaign can progress through several states, providing clear visibility into its lifecycle:
Draft: The campaign has been created but is not yet active. It's in a preparatory phase, awaiting finalization and publication.
In Progress: The campaign has officially started and is actively awaiting completion before its due date. A campaign remains "In Progress" even if all individual reviews within it are completed, until a Risk Manager or Administrator manually marks it as "Completed."
{
"name": "bookmark",
"label": "",
"sign_on_mode": "BOOKMARK",
"app_settings": {
"requestIntegration": false,
"url": "https://example.com/bookmark.htm"
}
}{
"name": "template_basic_auth",
"label": "",
"sign_on_mode": "BASIC_AUTH",
"app_settings": {
"url": "https://example.com/login.html",
"authURL": "https://example.com/auth.html"
}
}{
"name": "okta_org2org",
"label": "",
"sign_on_mode": "SAML_2_0",
"app_settings": {
"acsUrl": "https://example.okta.com/sso/saml2/exampleid",
"audRestriction": "https://www.okta.com/saml2/service-provider/exampleid",
"baseUrl": "https://example.okta.com"
}
}{
"name": "cornerstone",
"label": "",
"sign_on_mode": "SAML_2_0",
"app_settings": {
"orgName": "${yourOktaDomain}",
"url": "https://example.com/login.html"
}
}{
"name": "template_swa",
"label": "",
"sign_on_mode": "BROWSER_PLUGIN",
"app_settings": {
"buttonField": "btn-login",
"passwordField": "txtbox-password",
"usernameField": "txtbox-username",
"url": "https://example.com/login.html",
"loginUrlRegex": "REGEX_EXPRESSION"
}
}{
"name": "template_swa3field",
"label": "",
"sign_on_mode": "BROWSER_PLUGIN",
"app_settings": {
"buttonSelector": "#btn-login",
"passwordSelector": "#txtbox-password",
"userNameSelector": "#txtbox-username",
"targetURL": "https://example.com/login.html",
"extraFieldSelector": ".login",
"extraFieldValue": "SOMEVALUE",
"loginUrlRegex": "REGEX_EXPRESSION"
}
}{
"name": "template_sps",
"label": "",
"sign_on_mode": "SECURE_PASSWORD_STORE",
"app_settings": {
"url": "https://example.com/login.html",
"passwordField": "#txtbox-password",
"usernameField": "#txtbox-username",
"optionalField1": "param1",
"optionalField1Value": "somevalue",
"optionalField2": "param2",
"optionalField2Value": "yetanothervalue",
"optionalField3": "param3",
"optionalField3Value": "finalvalue"
}
}{
"name": "template_wsfed",
"label": "",
"sign_on_mode": "WS_FEDERATION",
"app_settings": {
"audienceRestriction": "urn:example:app",
"groupName": null,
"groupValueFormat": "windowsDomainQualifiedName",
"realm": "urn:example:app",
"wReplyURL": "https://example.com/",
"attributeStatements": null,
"nameIDFormat": "urn:oasis:names:tc:SAML:1.1:nameid-format:unspecified",
"authnContextClassRef": "urn:oasis:names:tc:SAML:2.0:ac:classes:PasswordProtectedTransport",
"siteURL": "https://example.com",
"wReplyOverride": false,
"groupFilter": null,
"usernameAttribute": "username"
}
}

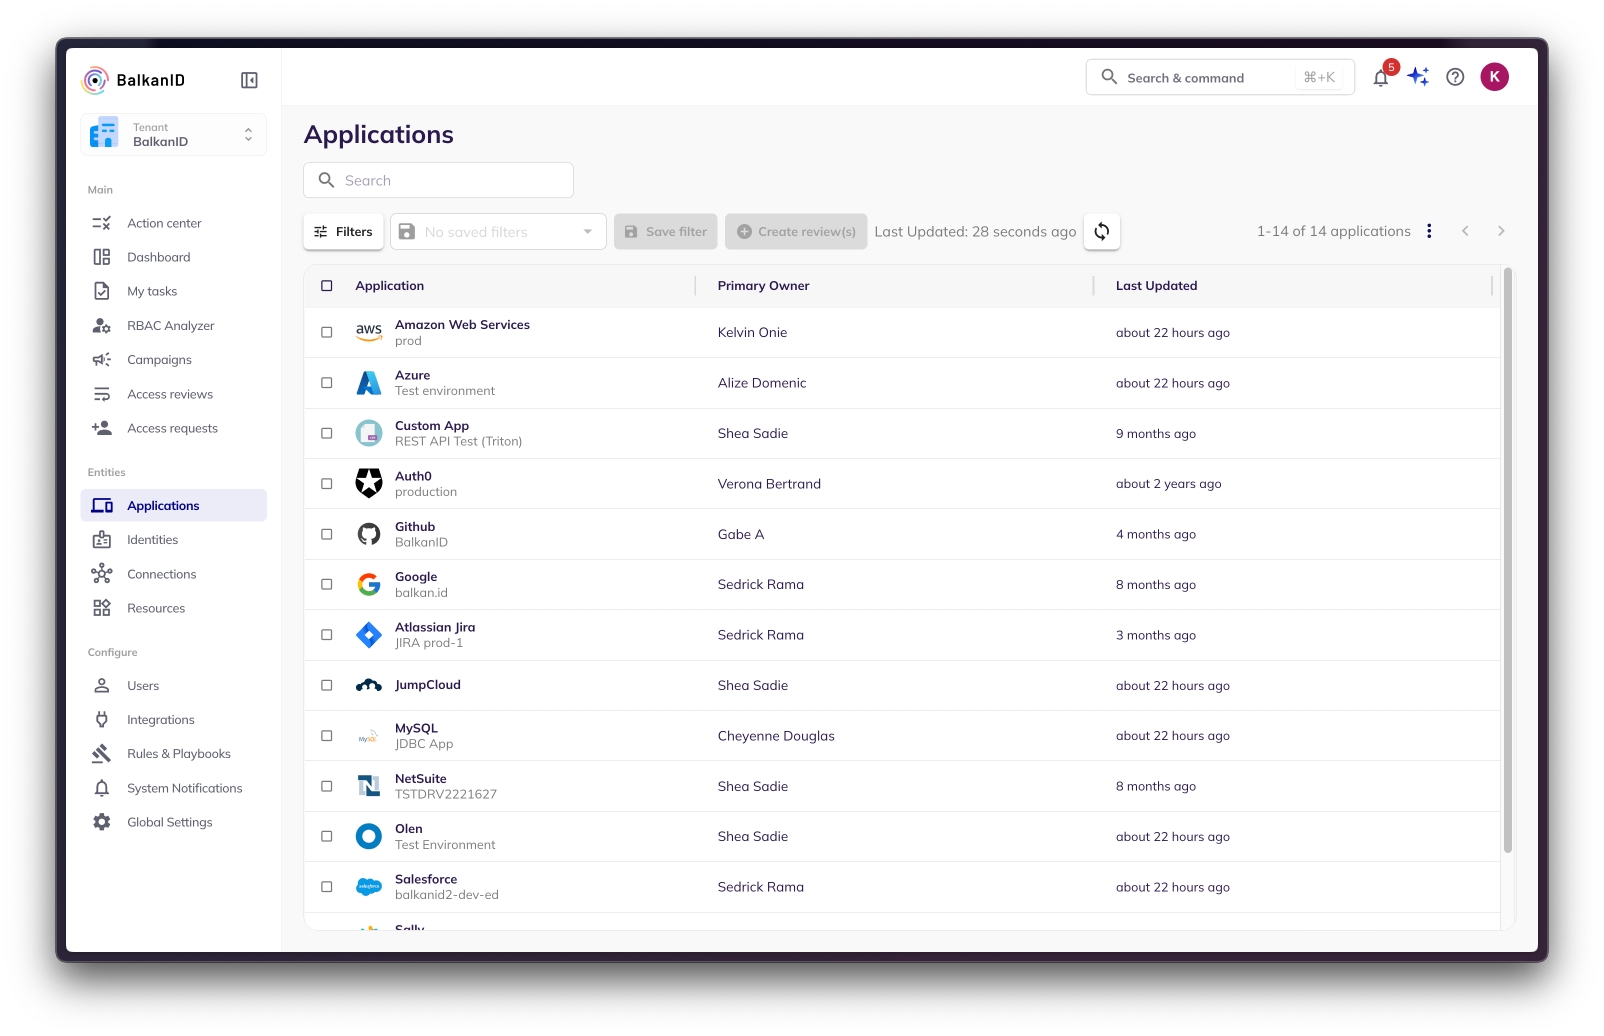

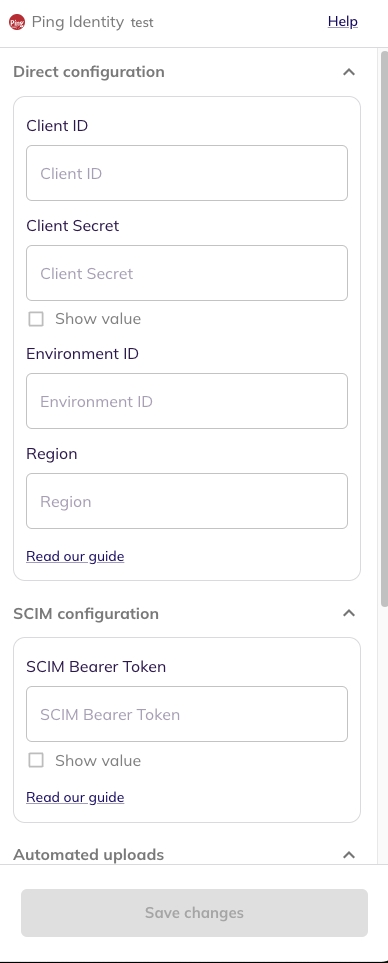
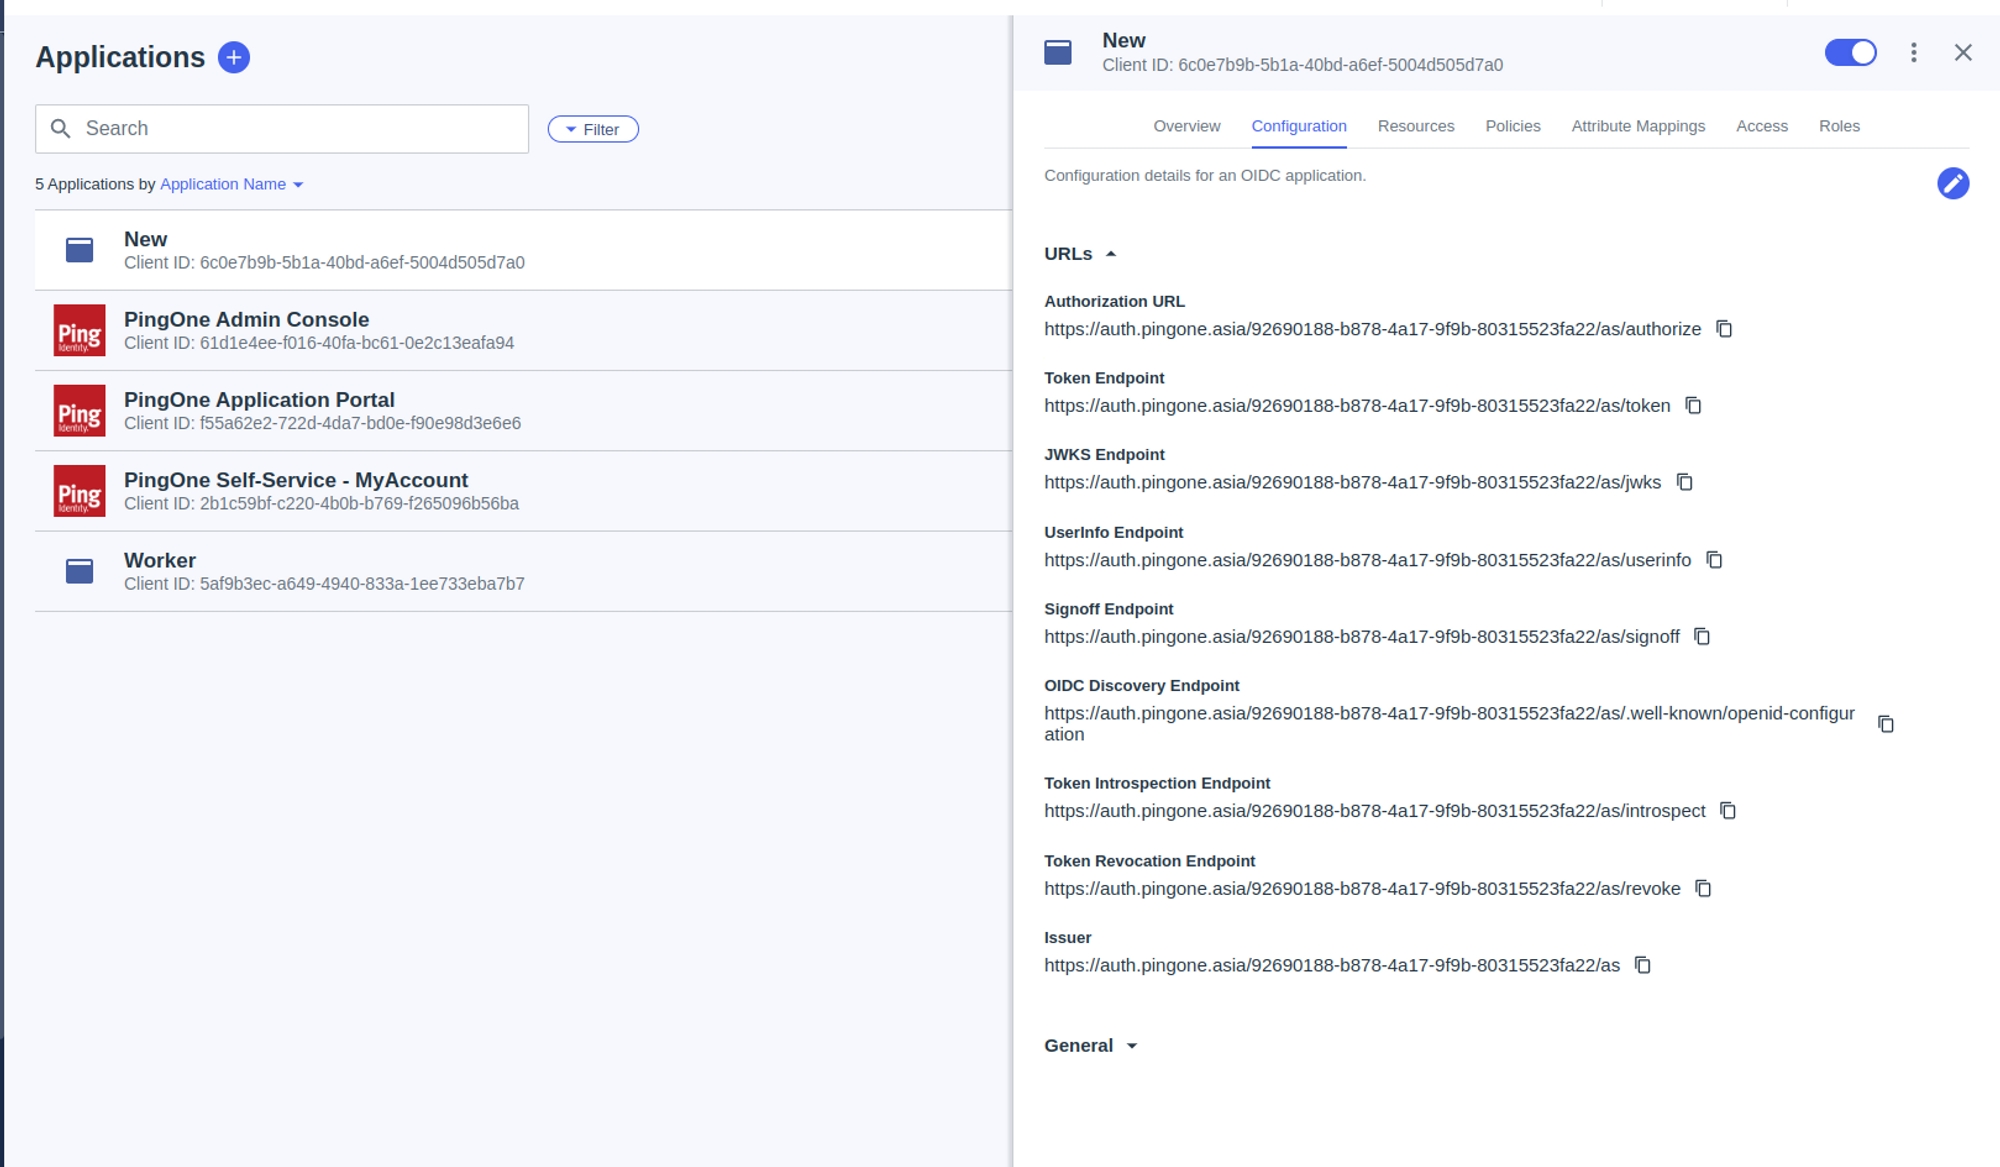
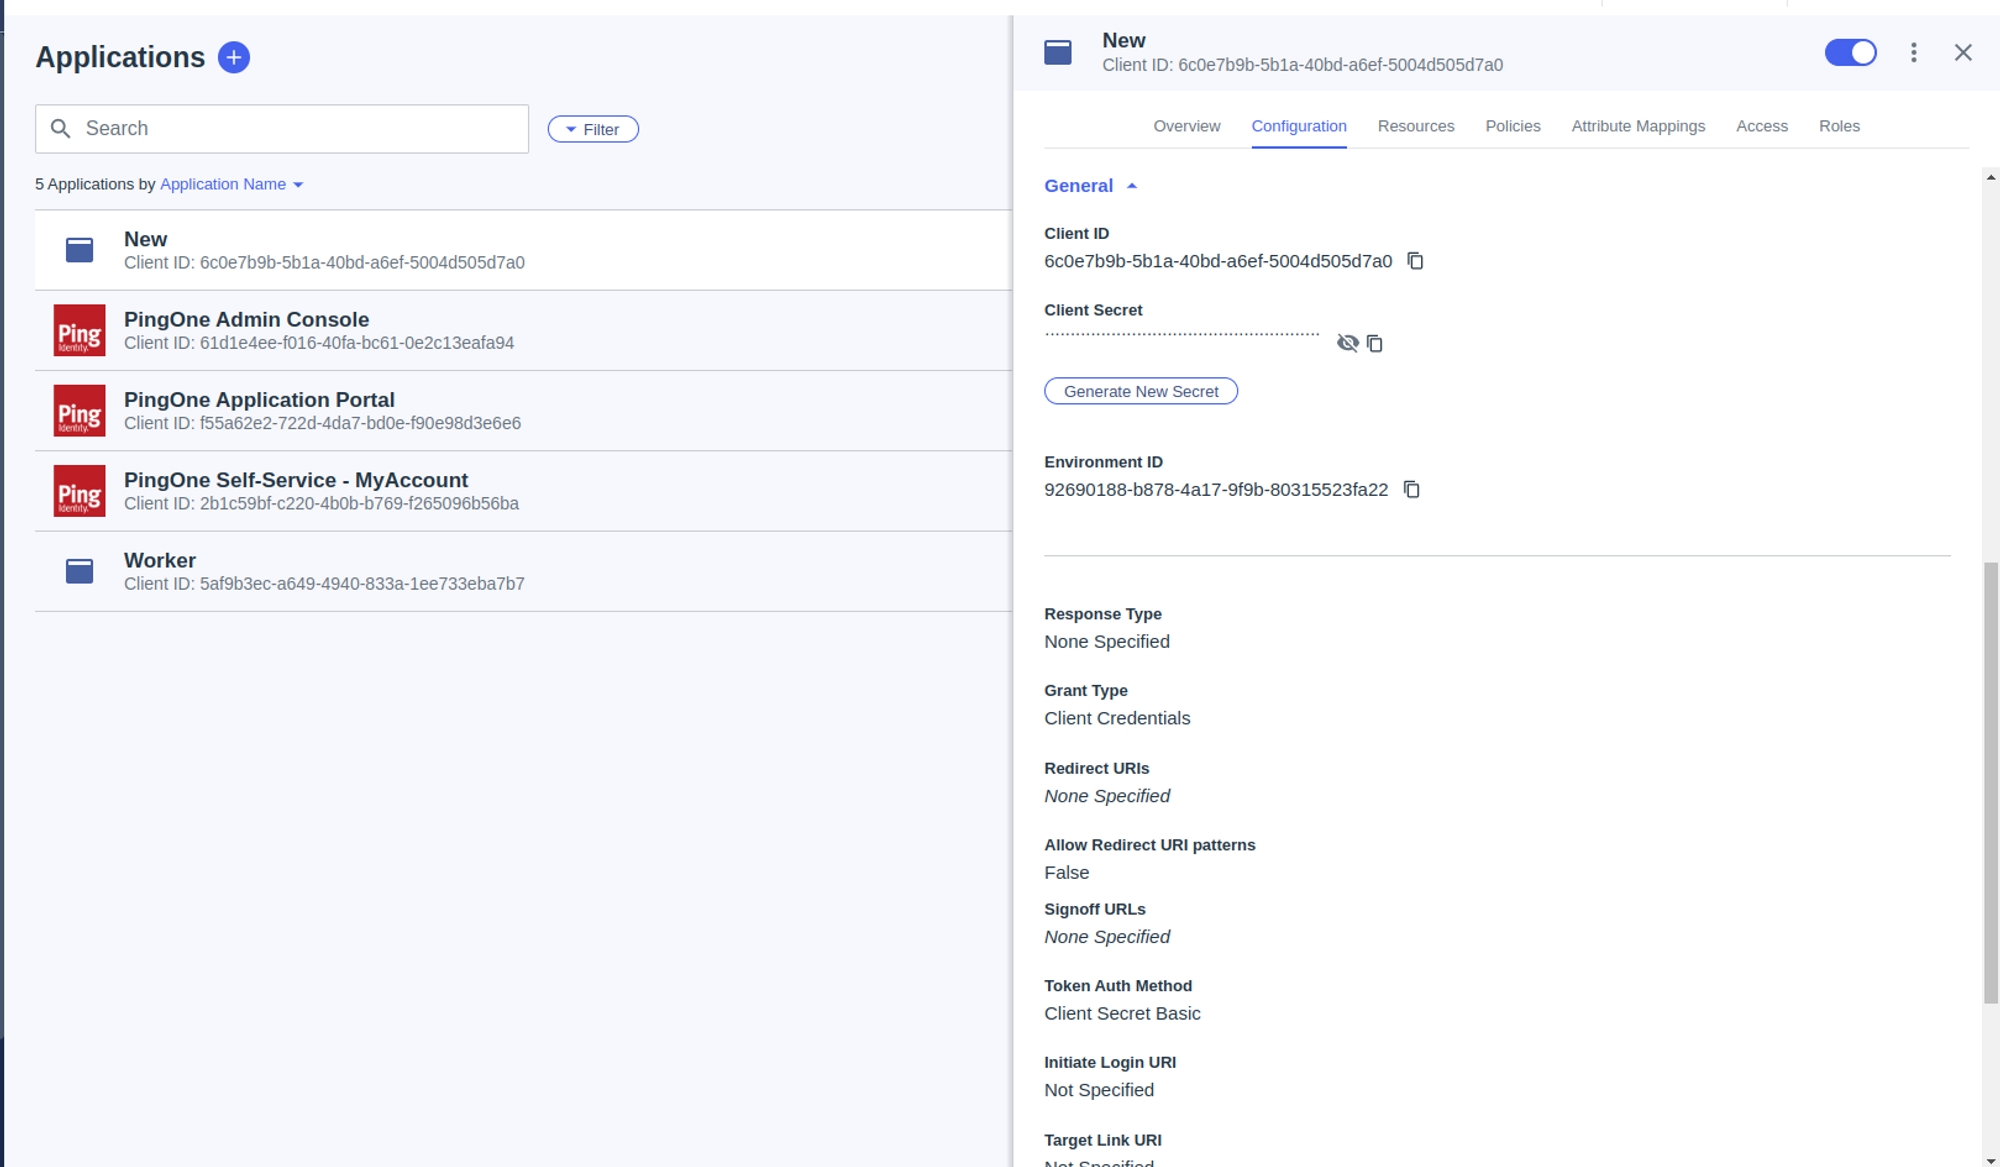

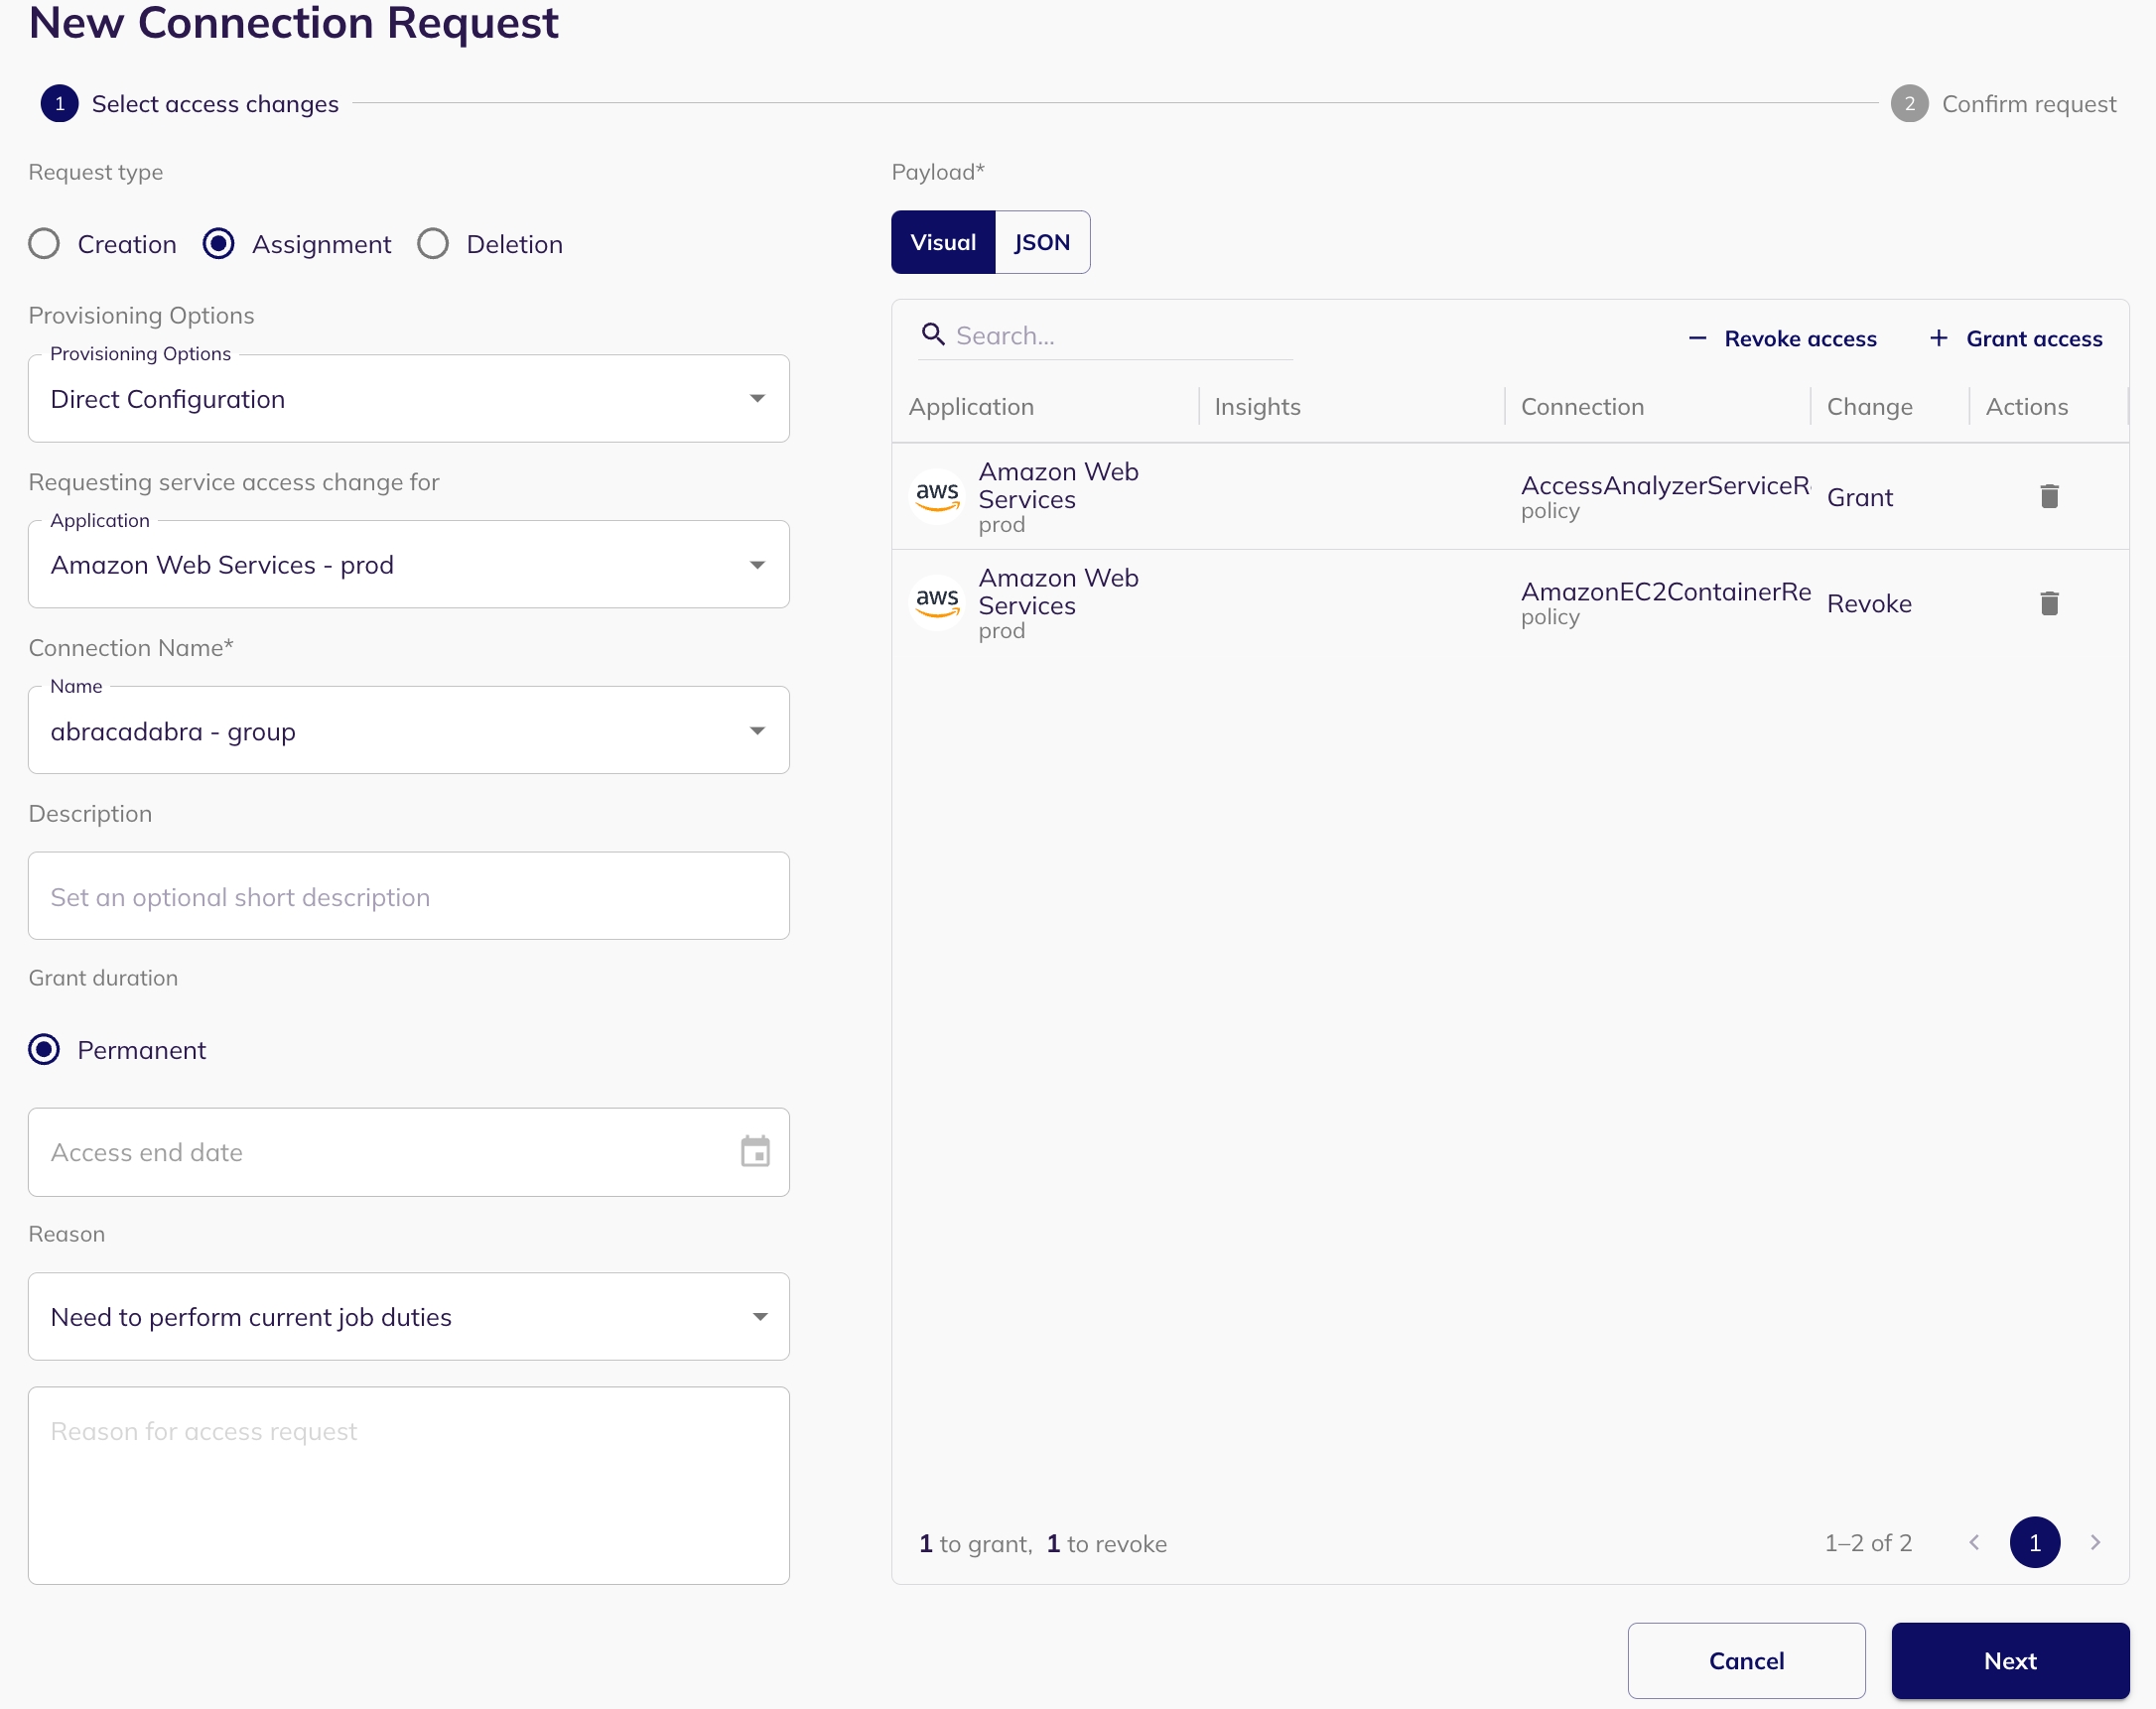
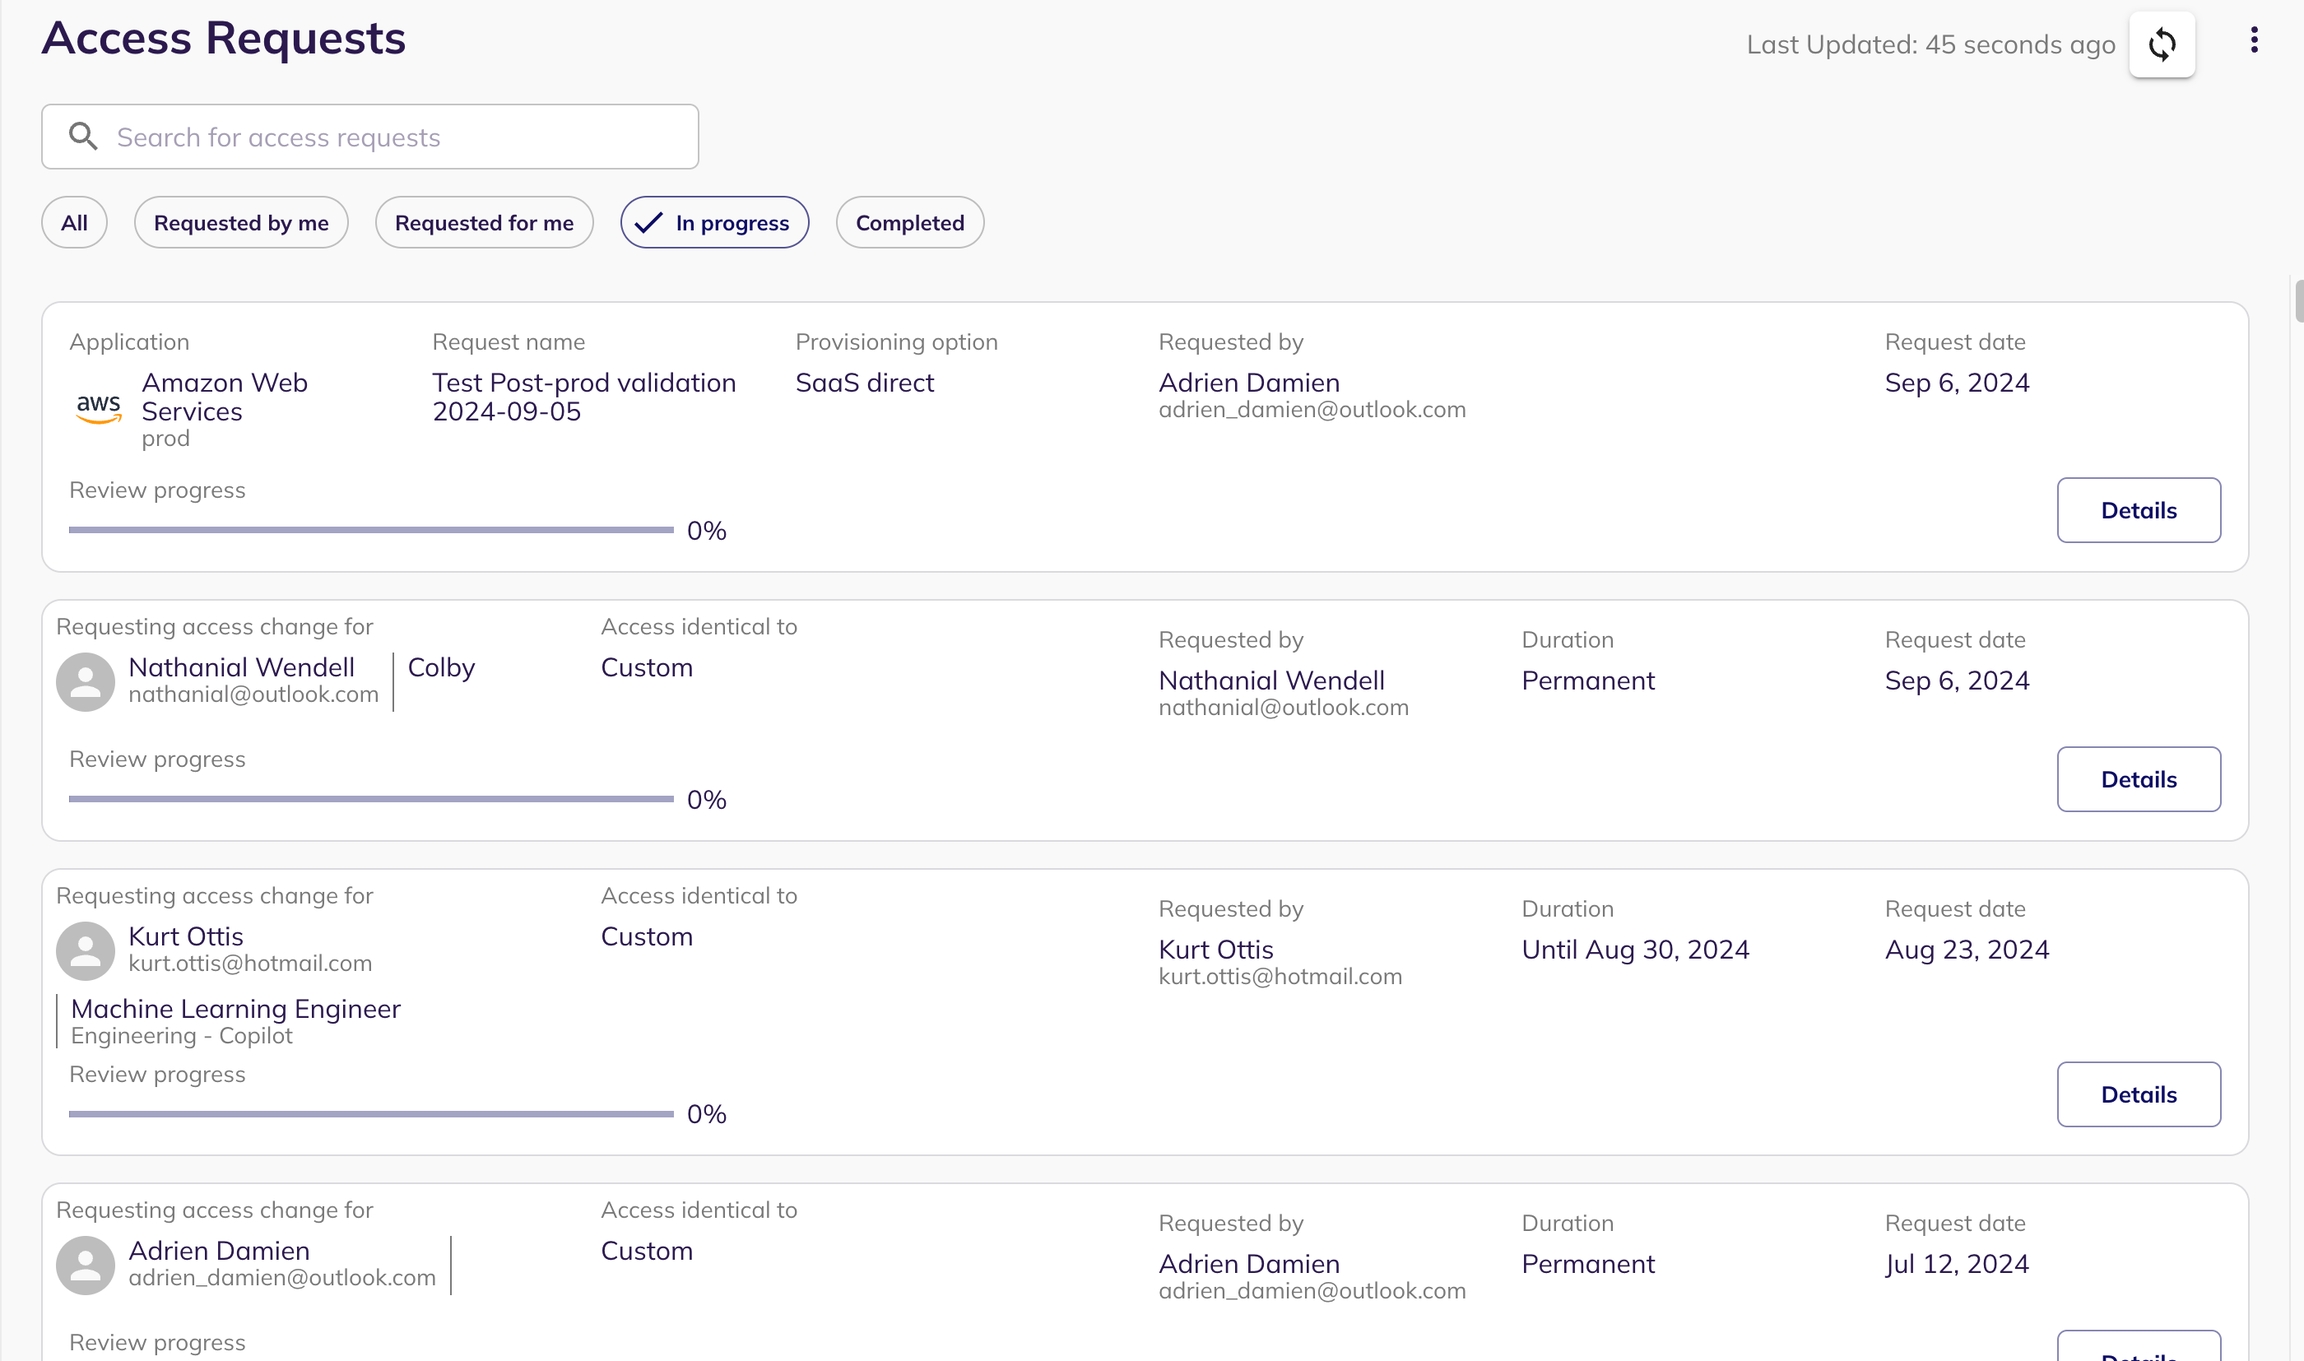
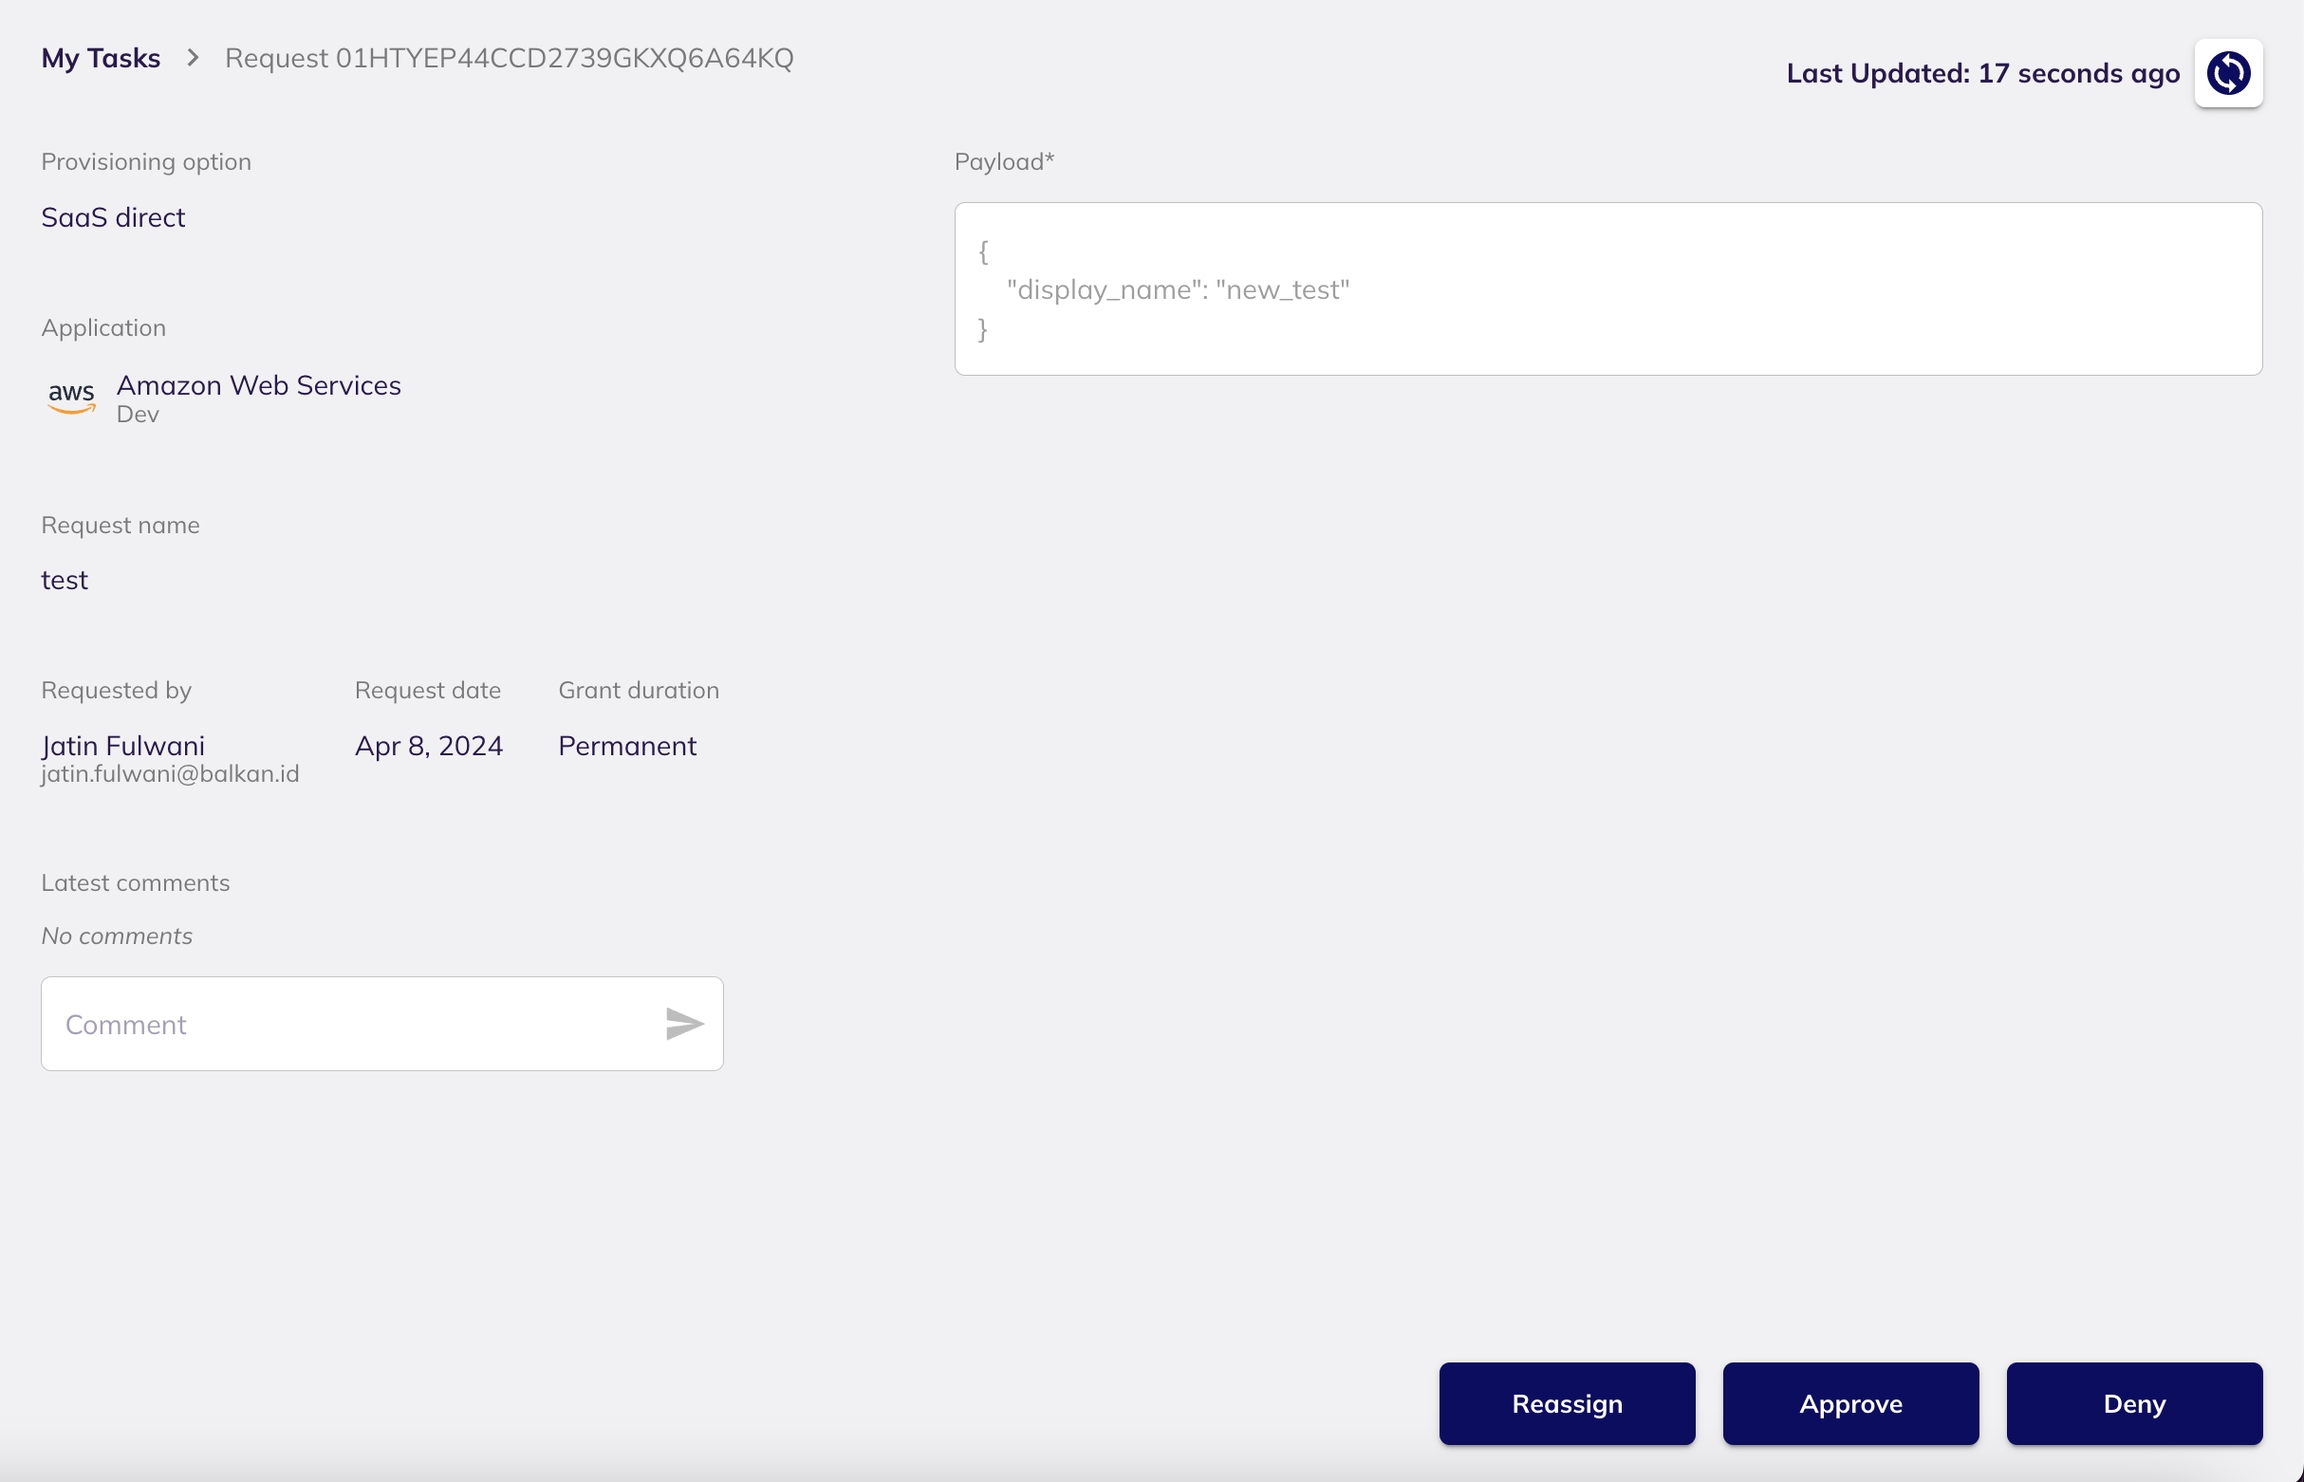
Project: The GCP project ID or name under which the dedicated service account is created. Although the service account resides in a project, its permissions will be granted at the organization level (explained below).
Click on Add Permissions to add new permissions to the role.
Search for the following permissions and add them
Click on CREATE to create the role.
Click on ADD KEY → Create new key.
Select JSON and click on the CREATE button, the wizard will create a JSON file to download with the necessary key for later use.
Go to IAM and Admin → IAM. You can view the service account and permissions granted in the IAM.
In the left-hand menu, go to Directory → Roles and administrators (or simply Admin roles).
Click on Create new role.
Configure Basic Role Details
Name: Read-Only Role (or any preferred name)
Description: Provides read-only access to users, groups, and customer organization details for BalkanID integration.
Click Continue.
Assign the Required Privileges
Under Admin API privileges, enable only the following:
Users
✅ Read (Allows viewing user profiles, emails, and metadata)
Groups
✅ Read (Allows viewing group memberships and details)
Customer
✅ Read customer (Allows viewing organization/customer profile, contact, and settings data)
Save the Role
Click Create Role to save the configuration.
Assign the Role to the Delegated User
Once the role is created:
Go back to Admin roles.
Select the new Read-Only Role.
Click Assign users and choose the delegated email (the same email used in the GCP setup).
Click Assign Role.
The same email should have Custom (Read Only Role)
This allows the service account to access user and group data by impersonating an authorized administrator through domain-wide delegation.
Find the domain-wide delegation section and click on MANAGE.
Enter the copied client ID and add the following OAuth scopes.
For more info please refer: https://developers.google.com/identity/protocols/OAuth2ServiceAccount#delegatingauthority
Direct integration - Provide your Service Account Key(in JSON), Email of delegate, Domain and Project ID obtained above to set up a direct connection with BalkanID.
SCIM integration - Provide SCIM server credentials to set up a SCIM connection with BalkanID.
Manual file upload - Upload Entity and Entity Relations through a .CSV file upload. Contact the team for assistance with this.
Automated upload using API - You can upload data using our with the help of an API key which will be provided to you. Please refer to the and upload docs for specific instructions on uploading your data through the API. Note: Use the KEY JSON downloaded in the 3rd step to fill in the key. Add a user’s email with access to domain-wide delegation in the delegated field. Fill in the domain name and the project’s ID as well.
Click on next to move onto Optional Configuration.
Fill Optional configuration, if required.
Once you filled in the information, click Save. Your integration is now configured and you will see the status of the integration displayed alongside other integrations on the Integrations page. When data is available, the integration Status will read Connected and the integration Message will read Data available.


A dialog box will appear as shown in the below image, asking you to confirm publishing the campaign. This dialog box will also warn you if any integrations used in the campaign are out-of-sync, indicating that the data you are basing the campaign on might not be up to date.
If there are no out-of-sync integrations, you will see a plain dialog box.
The target date a risk manager expects the campaign to be completed.
Dec 14 2021
Repetition
Design a periodic schedule for the campaign to recur based on your requirement and convenience. Clicking on custom in the dropdown for this field will open a dialog box where you can enter the frequency of recurrence.
Every 1 month on the first day Monday.
Escalation
Create an alert for the access reviews belonging to this campaign to be escalated if they haven't been completed for a certain duration before the due date.
1 week before due date.
Override Defaults
Choose to override the default integration settings during multi-level reviews. Understand configuring multi-level reviews at the integration level and overriding defaults over .
Yes/No
Exclude Reviewers with Insight(s)
Select specific insights that are applied to the identities of reviewers whose evaluations require escalation for an additional level of review from their line manager. To learn more please refer:
Segregation of Duties (SoD) - Insight
Include Nested Entities
Toggle to include nested entity access relationships in the campaign. This will show the full chain of access between entities. To learn more, refer:
Yes/No
Entity Type: Choose the type of entity you want to filter. You can filter by identity, resource or connection.
Source Type: This field refers to the terminology used in the applications that provide the data (e.g., in GitHub as the source system, a "organization-role" and a "team" are mapped as connection entities in our model. Here the terms "organization-role" and "team" are referred to as source types).
Entity Status: This field filters based on the activity of the entity within the application. For example, it allows you to filter reviews based on an identity being inactive within the application or if the identity was suspended.
Entity Insights: This filter shows entities tied to specific insights set up in your tenant. You can filter based on the insights you’ve created for analysis.
Has Access To - Name: This field is used to look for entities which have access to a particular entity with the name mentioned under this field. For instance, you can filter by the name of a resource/connection which another entity has access to.
Has Access To - Type: This field specifies the type of the related entity in a "Has Access To" relationship. For example, if you're filtering to find entities that have access to a particular resource, you would select 'resource' here. Similarly, if you want to find entities that are accessed through a specific connection, you would select 'connection'.
Has Access To - Source Type: This field allows you to filter based on the source-specific terminology of the related entity in a "Has Access To" relationship. For instance, if you're looking for identities that have access through a connection whose original source type was "team" (from GitHub), you'd use this field.
Has Access To - Status: This filter allows you to specify the activity status of the related entity in a "Has Access To" relationship. For example, you could filter for identities that have access to resources that are currently 'inactive'.
Has Access To - Insights: This filter allows you to narrow down results based on insights tied to the related entity in a "Has Access To" relationship. For instance, you could find connections that have access to resources flagged with a specific "SoD" insight.
User: Filter entities based on the user selected. This is useful if you want to see data mapped to a specific user.
Job Title: Filter based on the job title of users. For example, you can filter for all data associated with users who have the job title "Engineer."
Department: Use this filter to select entities tied to a department users belongs to. You can filter data based on the department.
Manager: Filter by a manager. This helps you select data tied to users managed by the person you select.
Employment Type: Filter entities based on the employment type (e.g., full-time, part-time) of users.
Exclude Tab:
Add a filter: Employment Type is Intern
(From the set of engineers you just included, this then removes any that have an 'Intern' employment type.)
Exclude Tab:
Add a filter: Department is Operations
(From the Jira-related identities you just included, this then removes any whose associated employee works in the Operations department.)
Field
Description
Example
Name
The title for the campaign. The name is displayed in campaign reporting.
Q4 2021 Audit
Description
A short description to provide context on why this campaign has been created.
Review of critical systems for Q4 2021
Start date
The intended start date of the campaign.
Nov 1 2021
Auto publish
This is used to automatically publish a campaign when the start date is reached. It is used when a campaign is setup to start at a future date.
Yes/No


End date
Overdue: The campaign has passed its designated due date. A campaign can still be "Overdue" even if all its access reviews are 100% complete if the end date of the campaign is in the past and it has not yet been manually marked "Completed" by a Risk Manager or Administrator. This status indicates that outstanding reviews need immediate attention or that the campaign requires finalization.
Completed: All access reviews within the campaign have been finalized (either approved or denied), AND the campaign has been manually marked as "Complete" by a Risk Manager or Administrator. It's important to note that all associated notifications and fulfillment actions (such as de-provisioning or ticket creation for denied access reviews) will occur only when the campaign is explicitly marked "Completed."
Aborted: The campaign has been stopped prematurely before all reviews could be completed, usually by an Administrator or Risk Manager.
Note: Only users with the "Risk Manager" or "Administrator" role can create and manage campaigns. For guidance on enabling provisioning and de-provisioning options, please refer to our "Fulfillment Options" article. (Only Administrators can set Fulfillment Options).
Creating campaigns: Learn the steps to initiate new access review campaigns.
Configuring integration-specific multi-level review settings: Tailor multi-level review processes for specific integrated applications.
Configuring multi-level review settings in campaigns: Set up sequential approval workflows for thorough reviews.
Creating recurring campaigns: Automate regular access reviews for continuous compliance.
: Define rules for automatically escalating reviews when timely action isn't taken.
: Understand how to leverage insights to prompt reviewers to action.
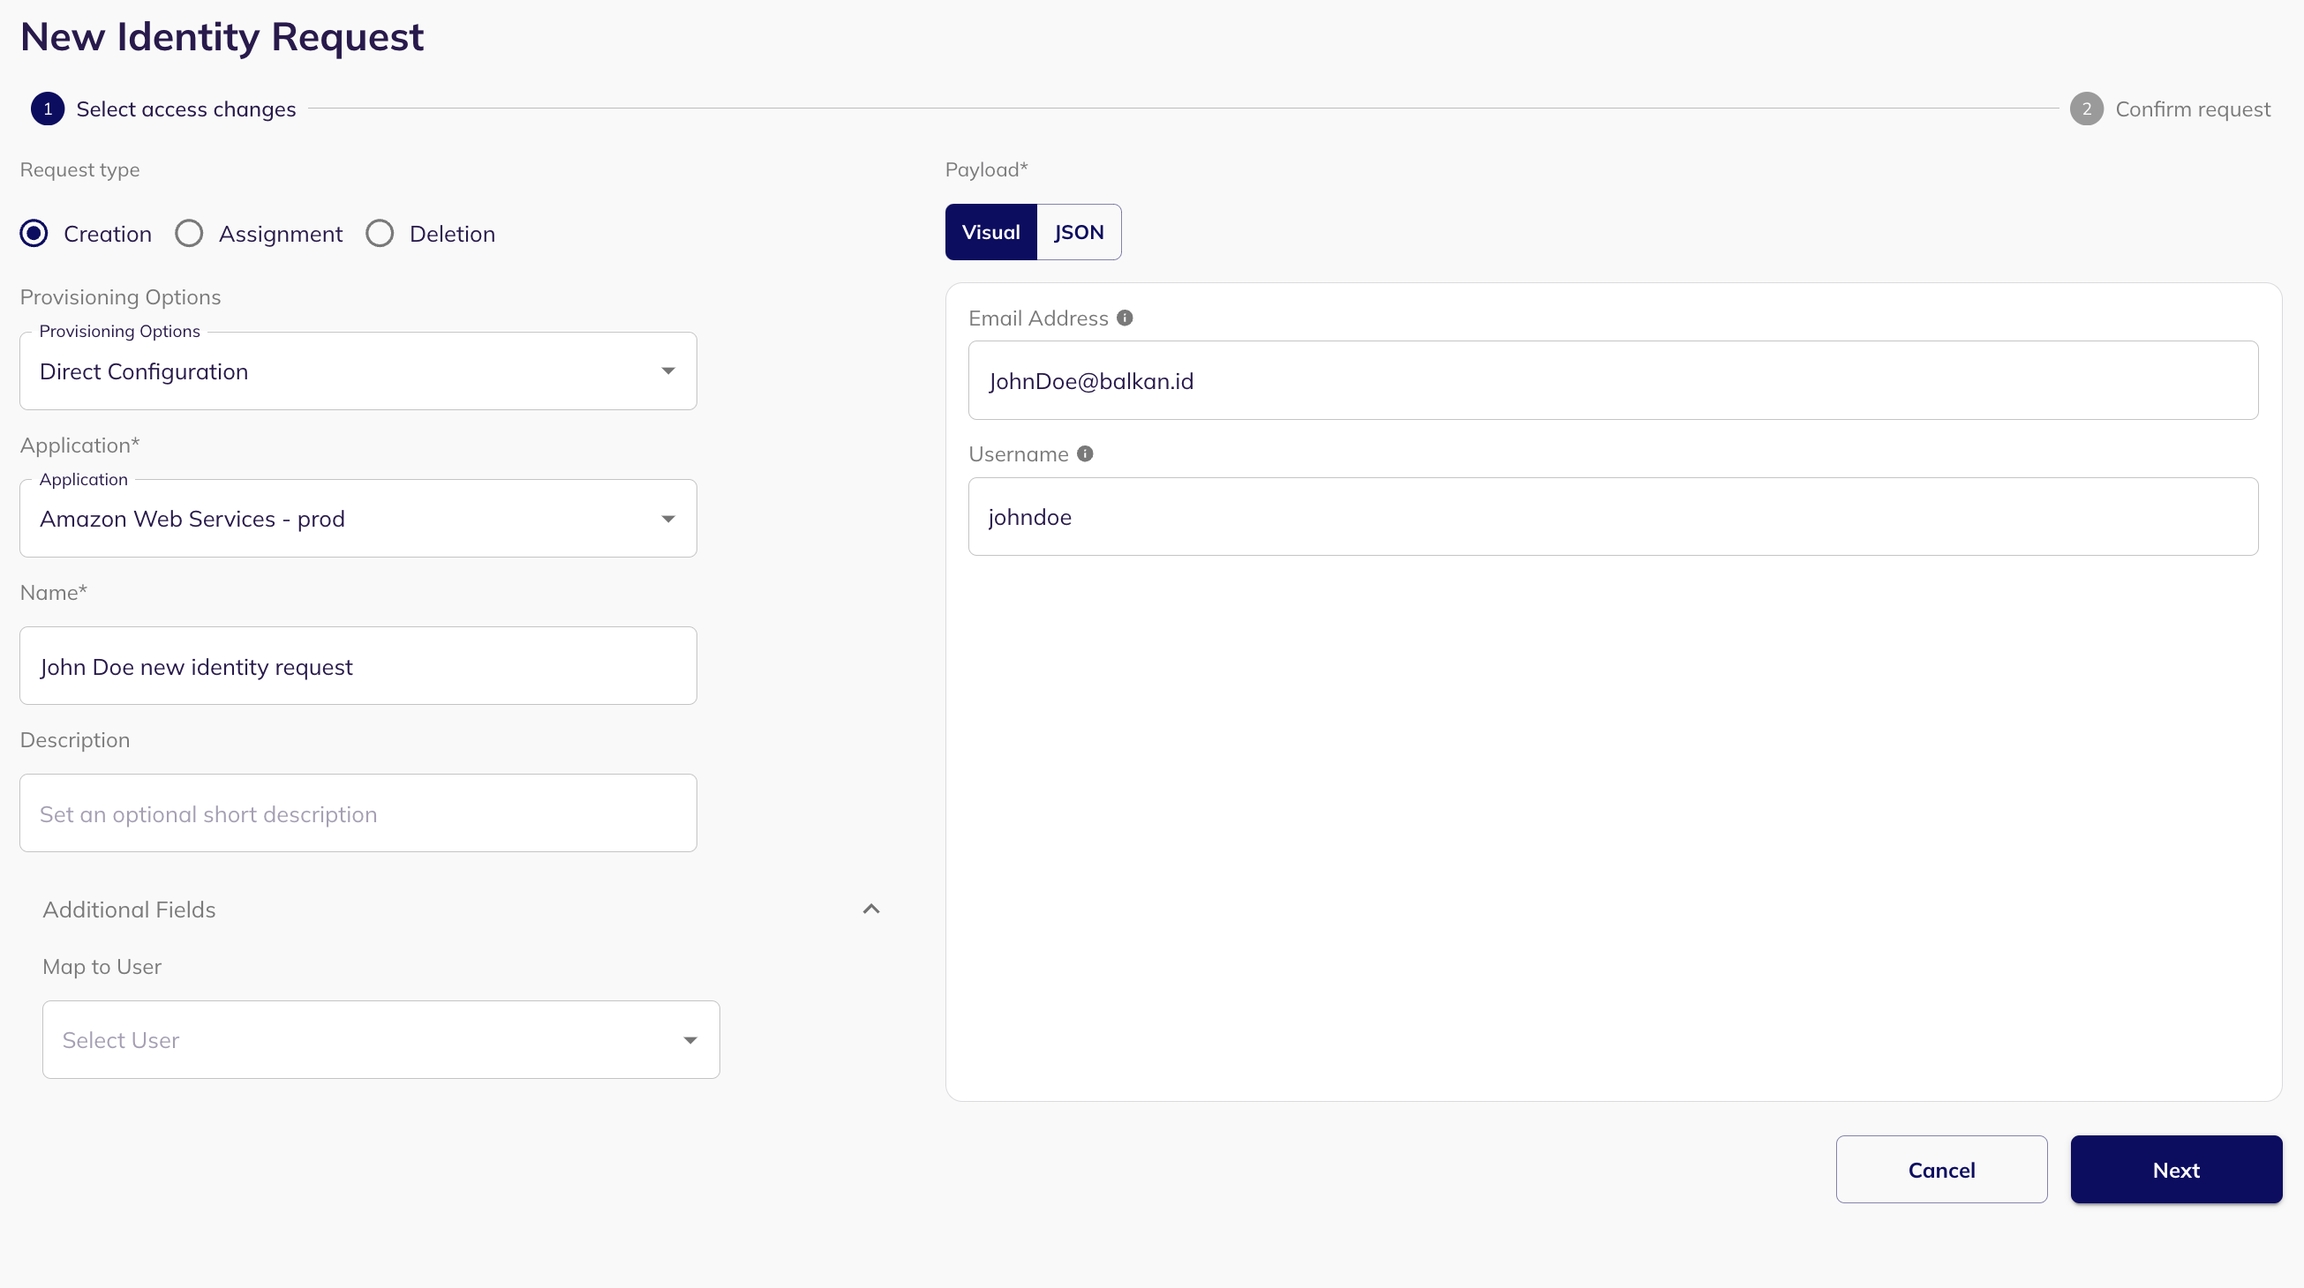
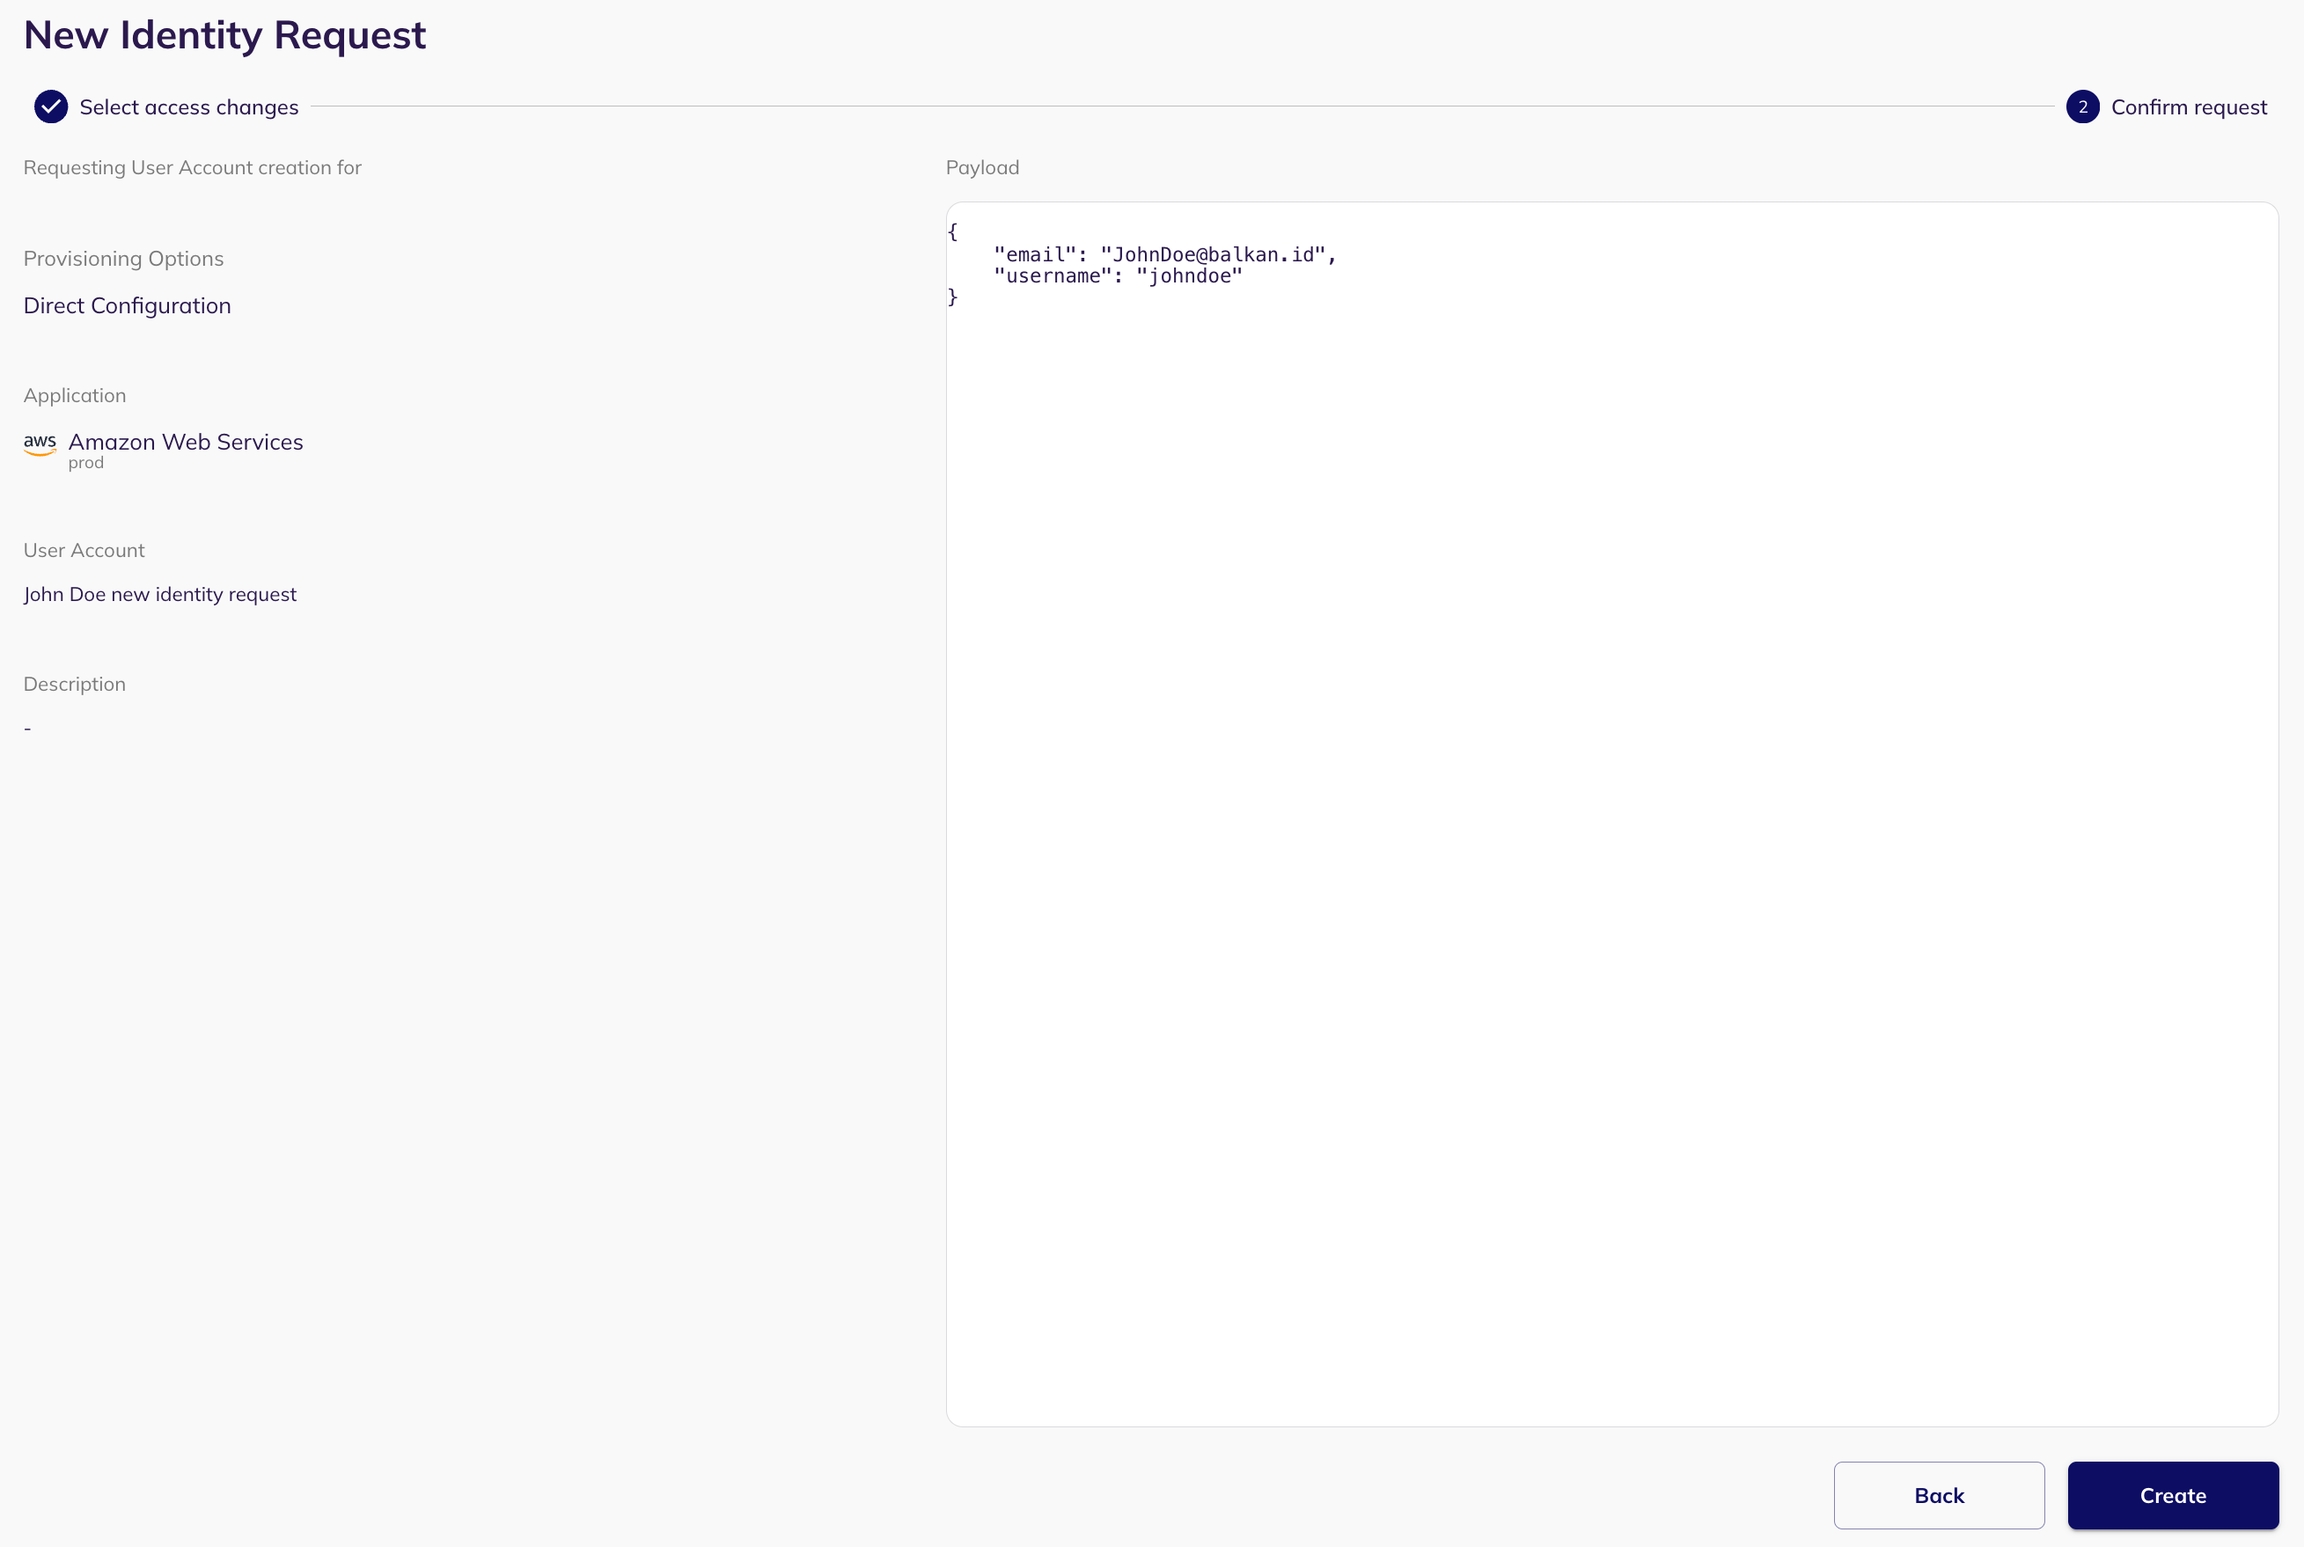
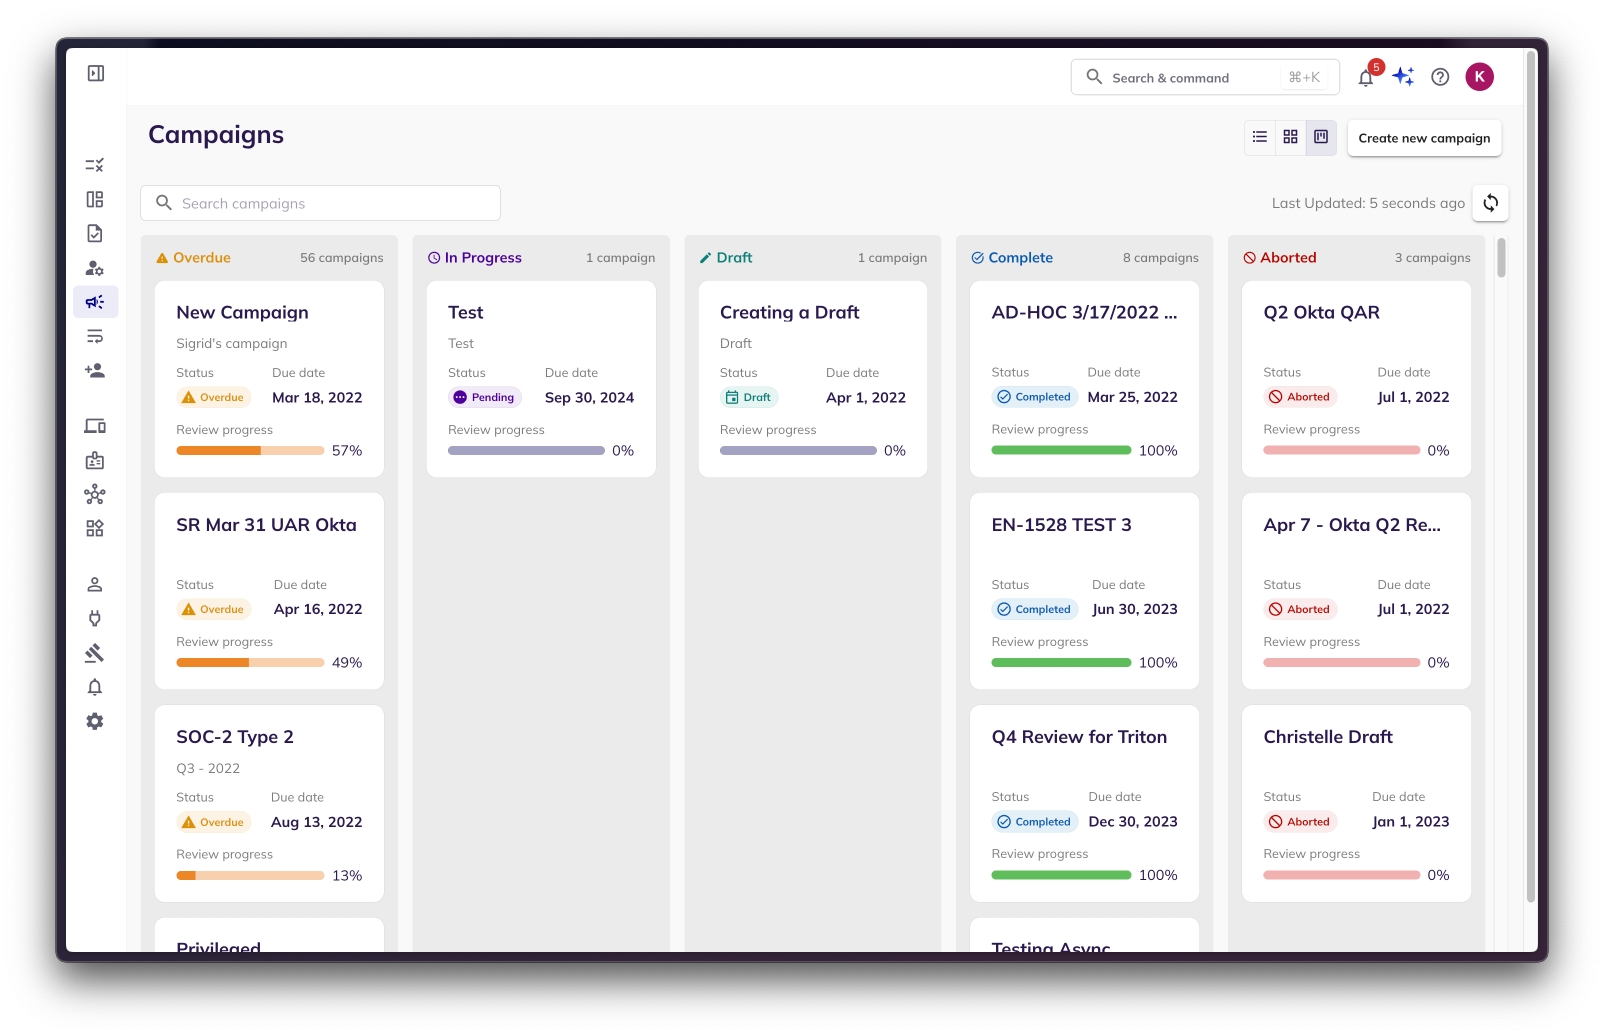
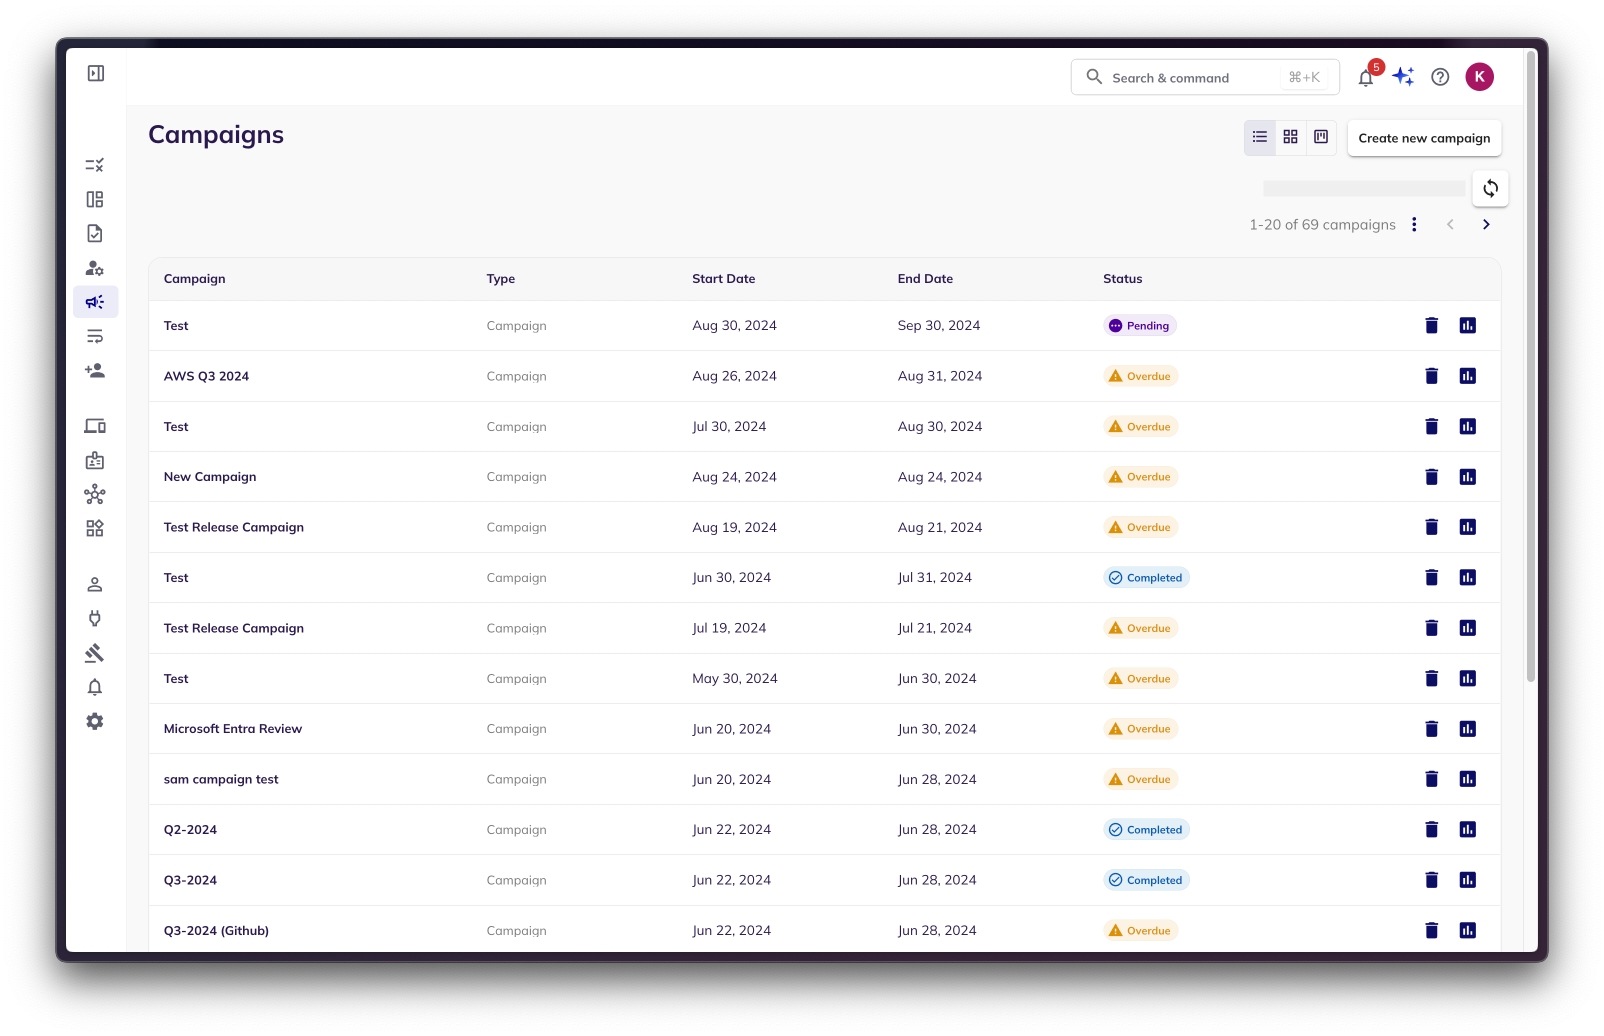
cloudasset.assets.searchAllIamPolicies
cloudasset.assets.searchAllResources
cloudasset.assets.analyzeIamPolicy
iam.roles.get
iam.roles.list
iam.serviceAccounts.get
iam.serviceAccounts.list
resourcemanager.folders.get
resourcemanager.organizations.get
resourcemanager.projects.gethttps://www.googleapis.com/auth/admin.directory.user.readonly,
https://www.googleapis.com/auth/admin.directory.user,
https://www.googleapis.com/auth/admin.directory.group,
https://www.googleapis.com/auth/admin.directory.customer.readonly,
https://www.googleapis.com/auth/cloud-identity.groups.readonly,
https://www.googleapis.com/auth/cloud-identity.groups,
https://www.googleapis.com/auth/cloud-platform,
https://www.googleapis.com/auth/cloudfunctions,
https://www.googleapis.com/auth/computeCloud Asset API
Identity and Access Management (IAM) API
Cloud Resource Manager API
Admin SDK API
Cloud Identity API


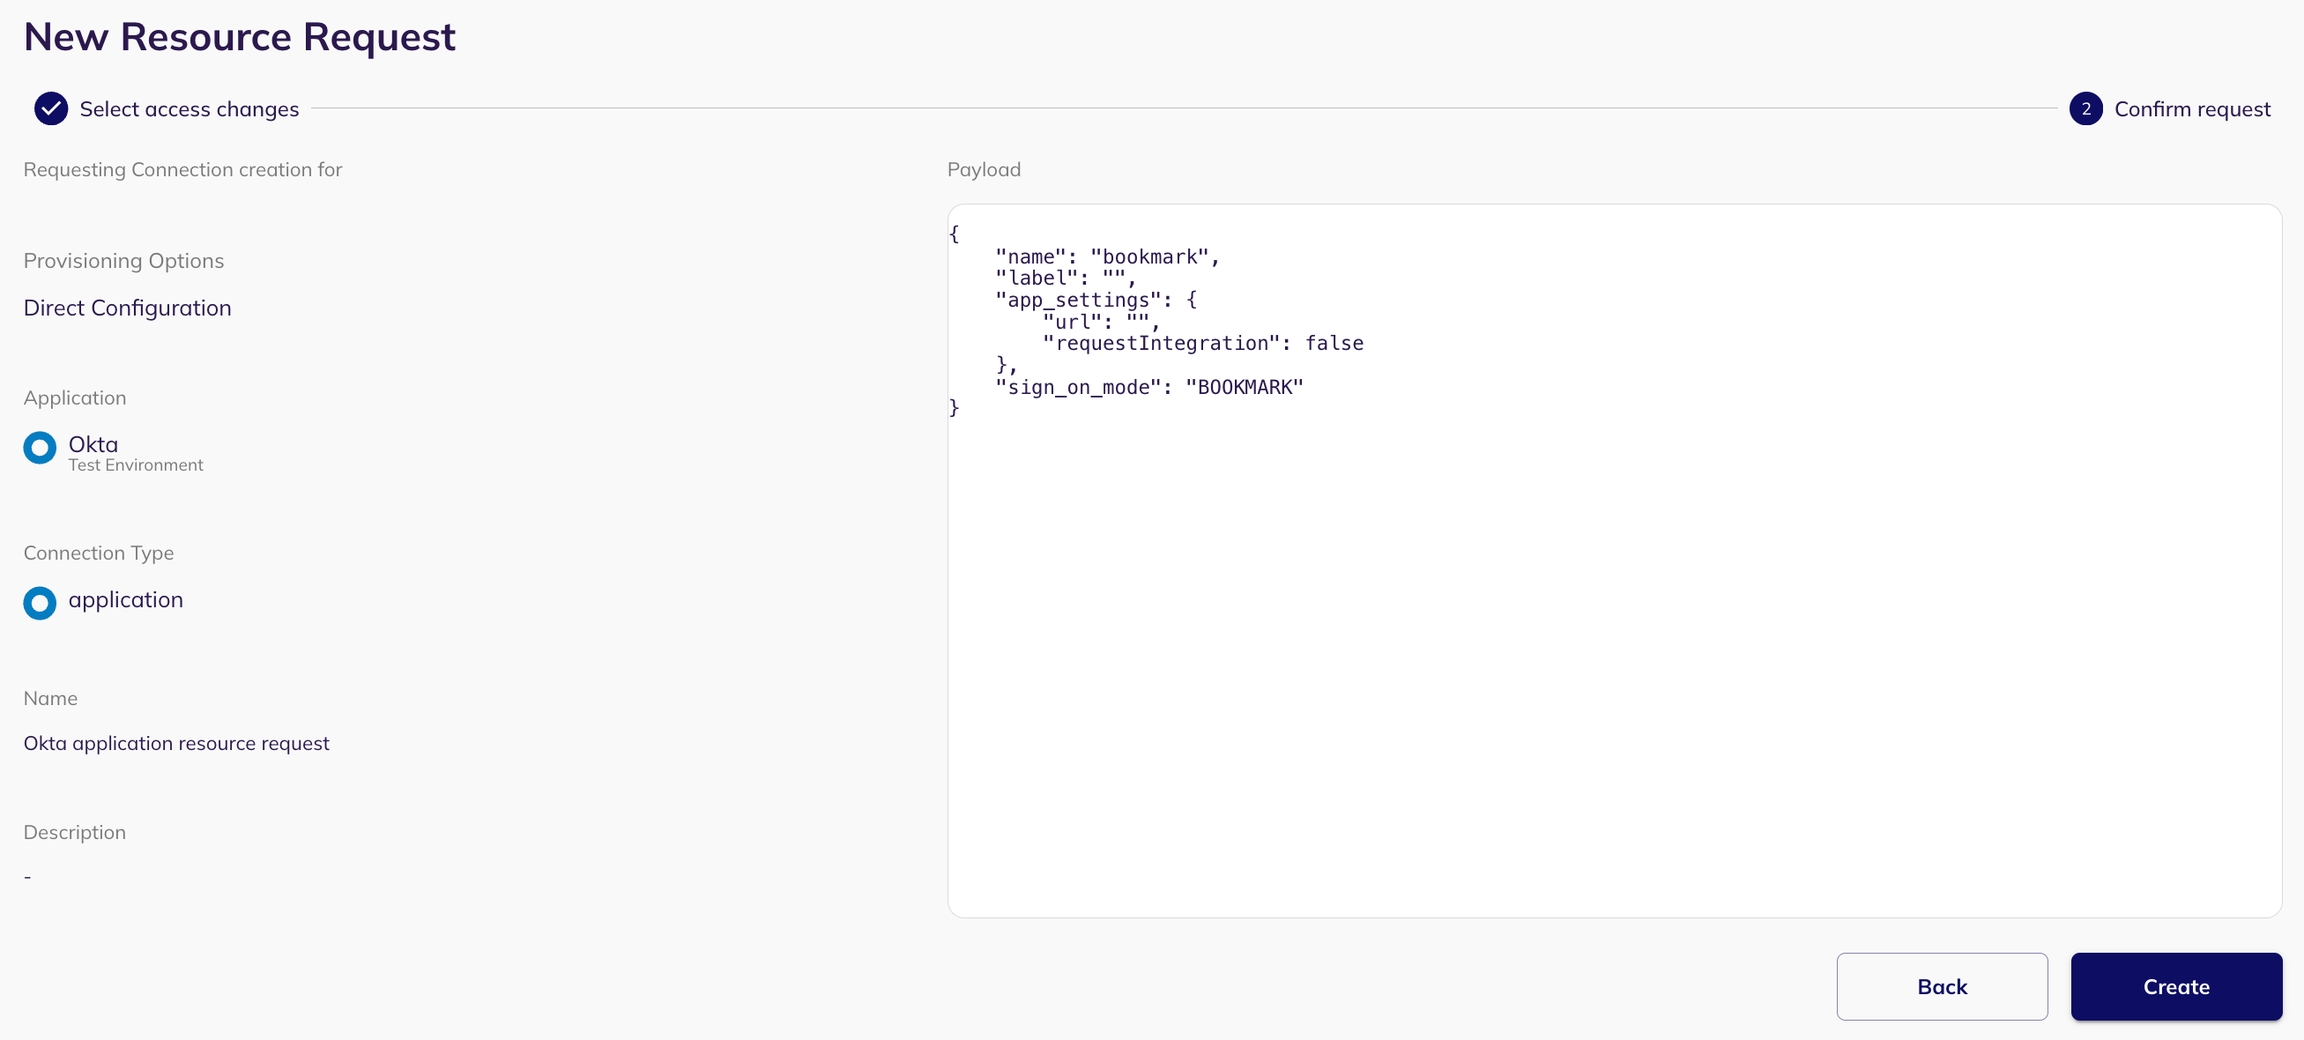
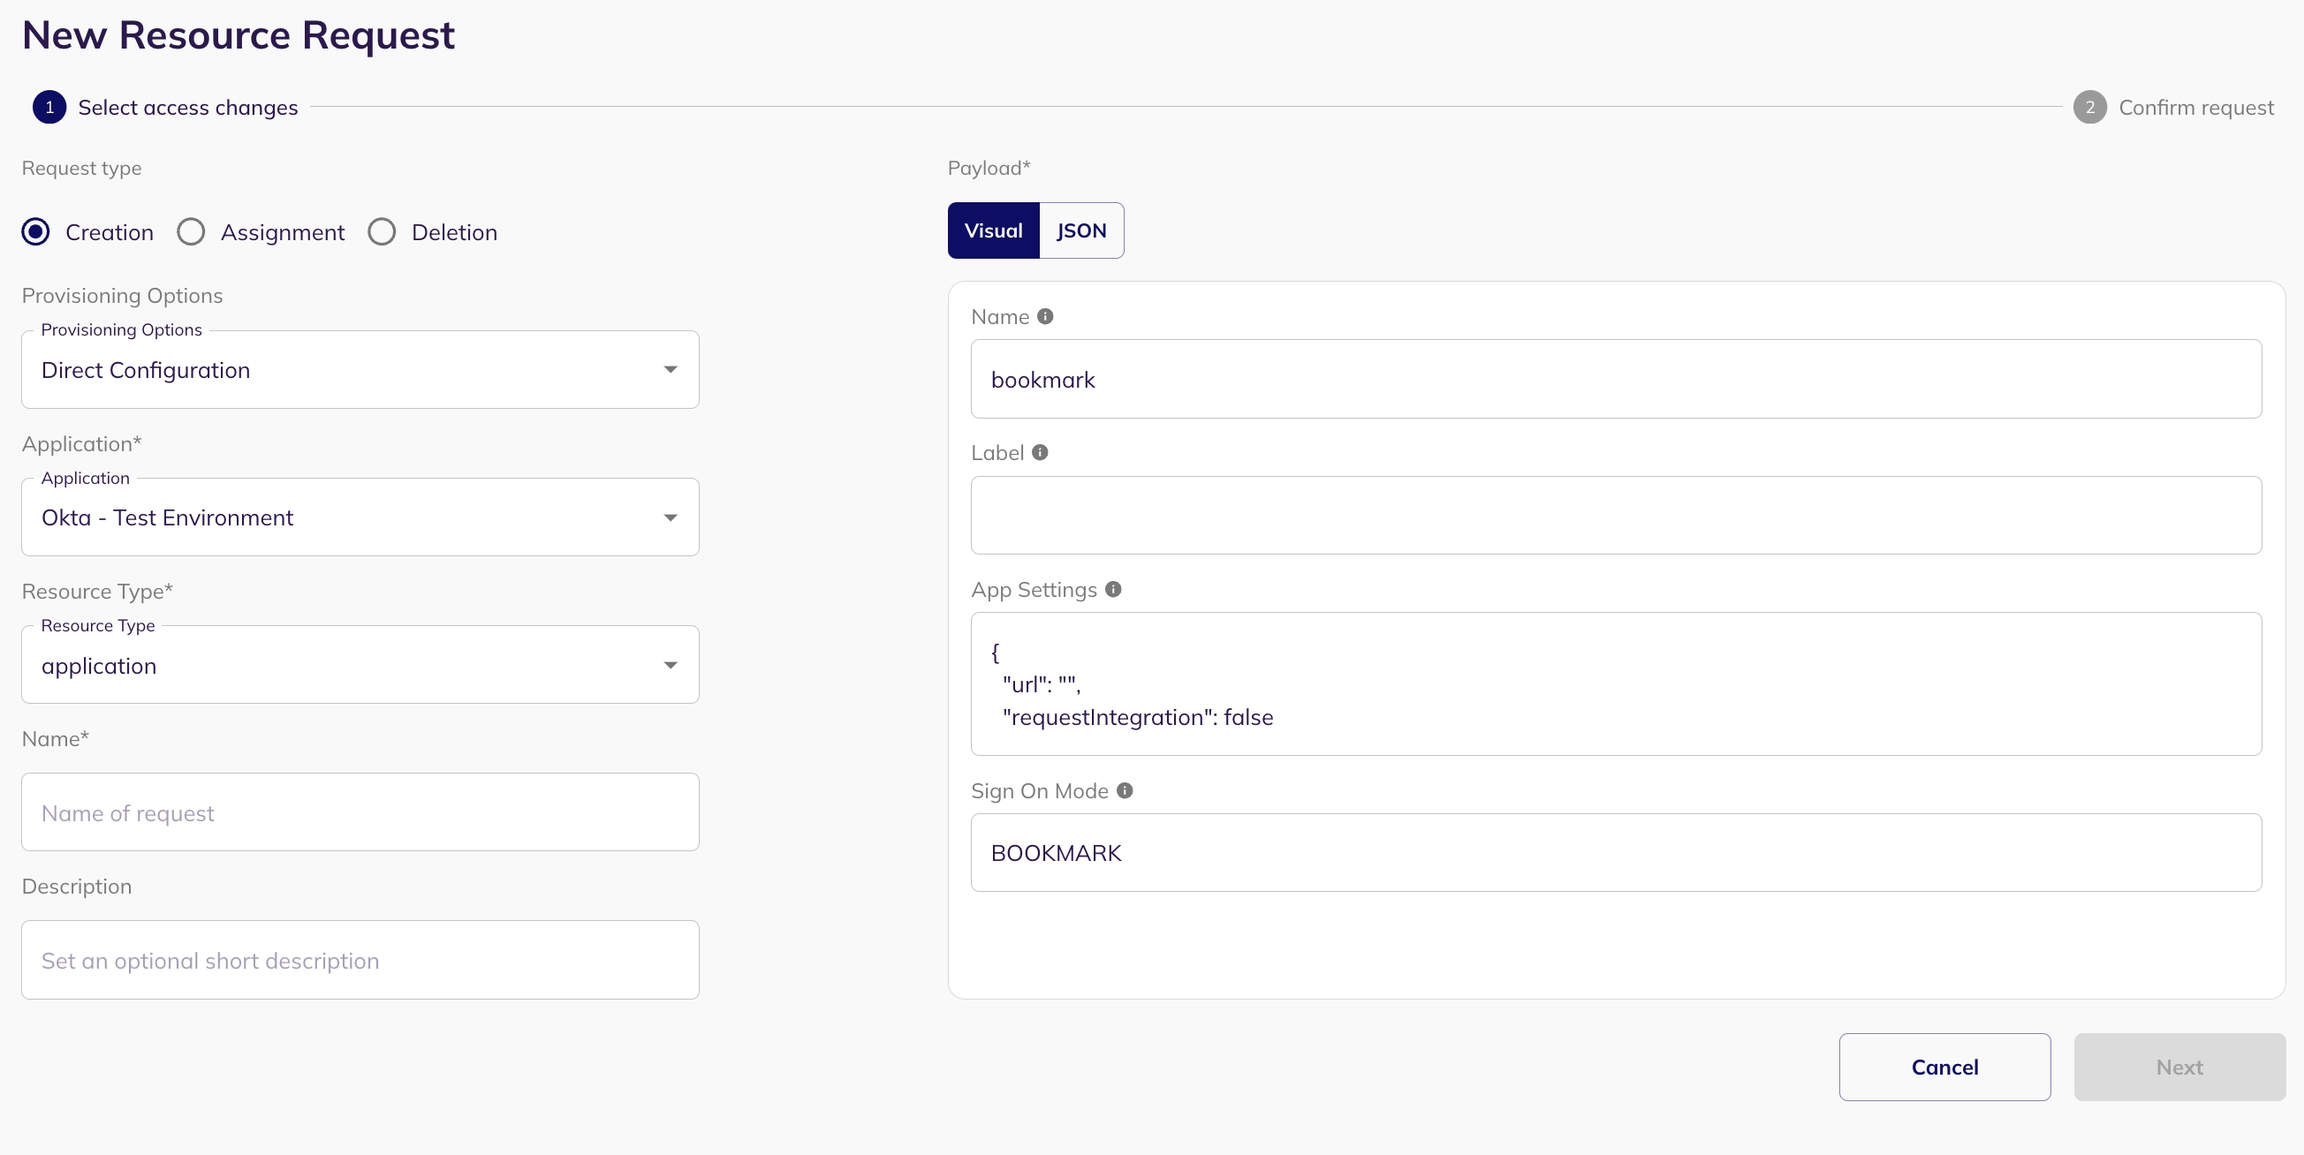
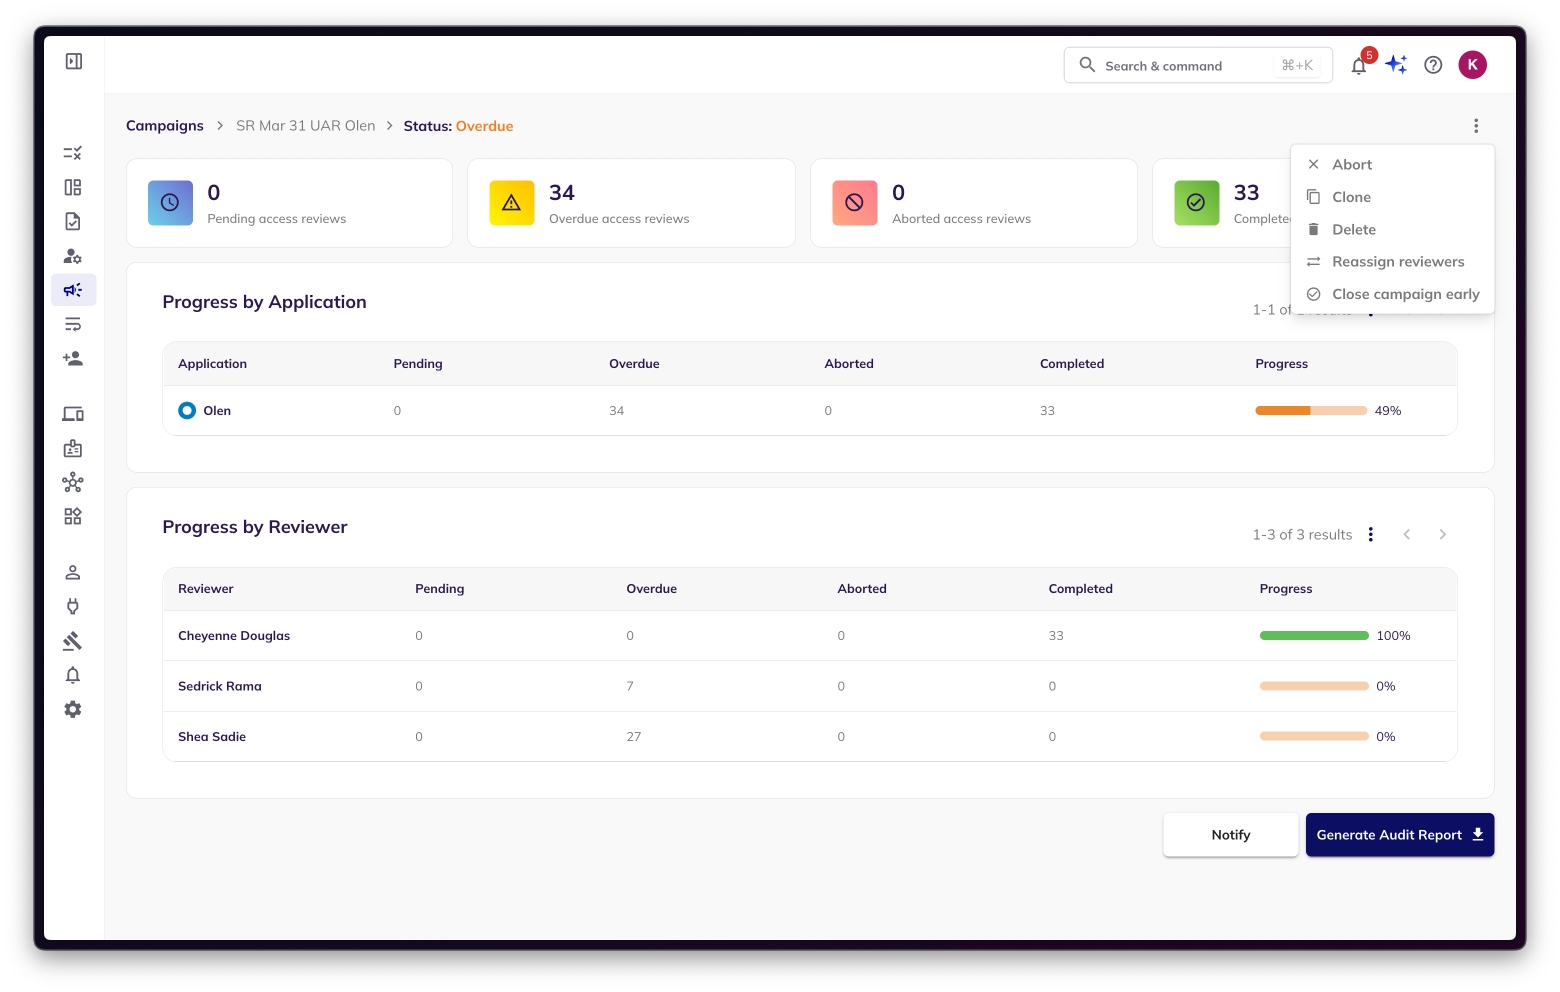
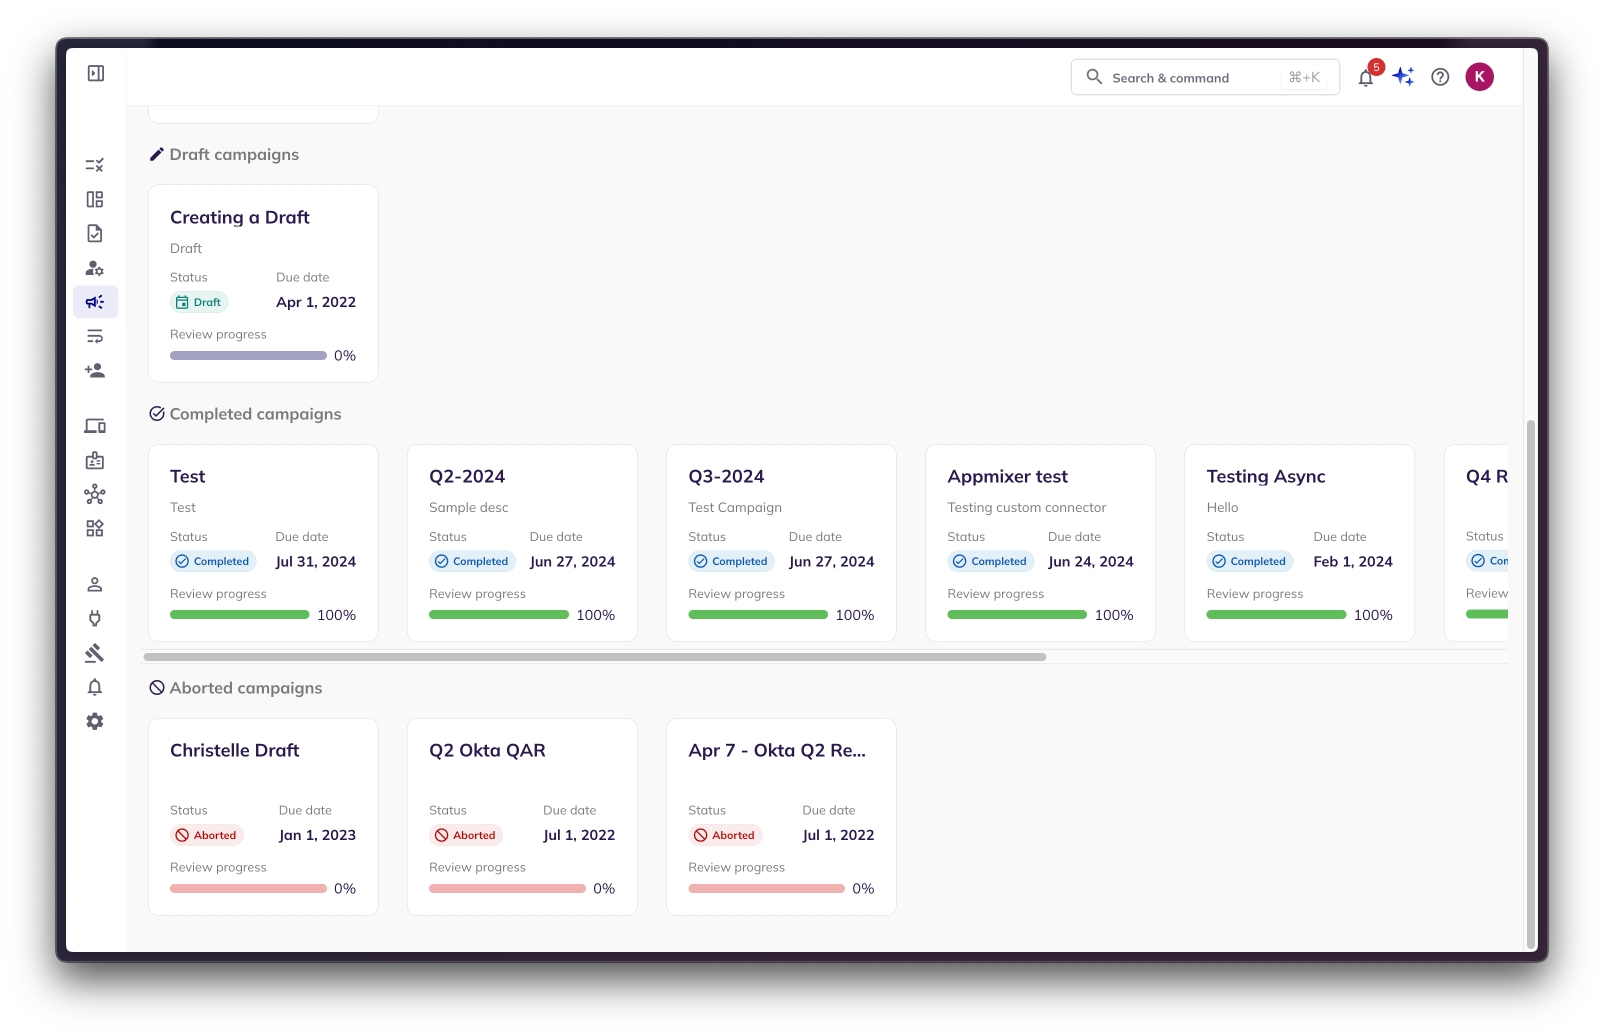
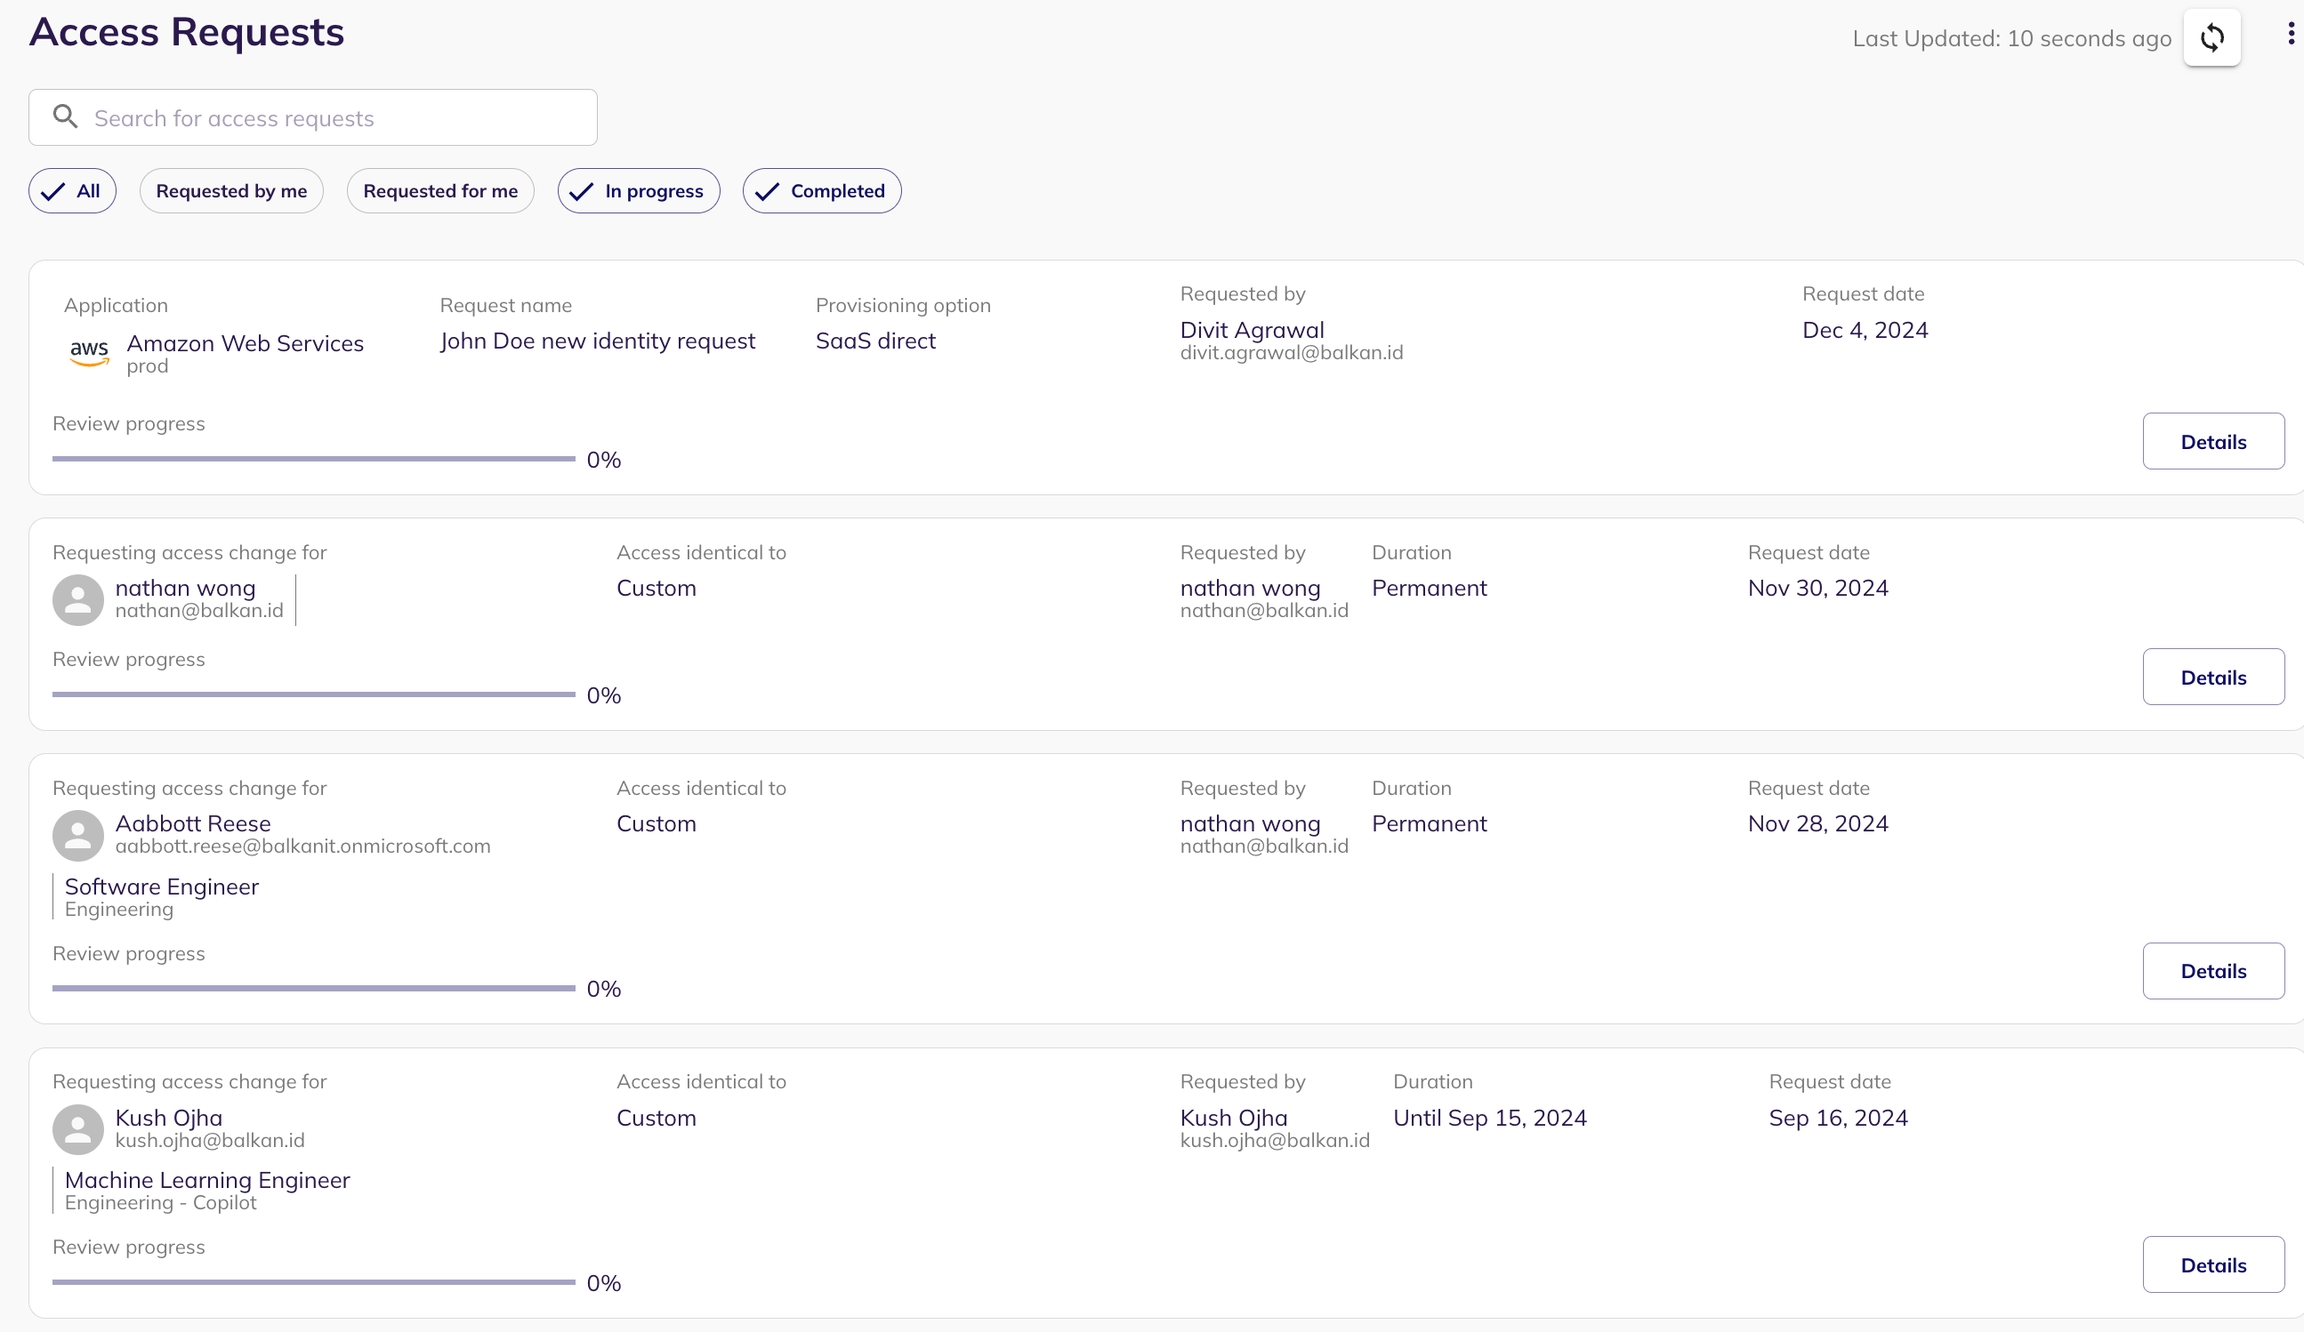
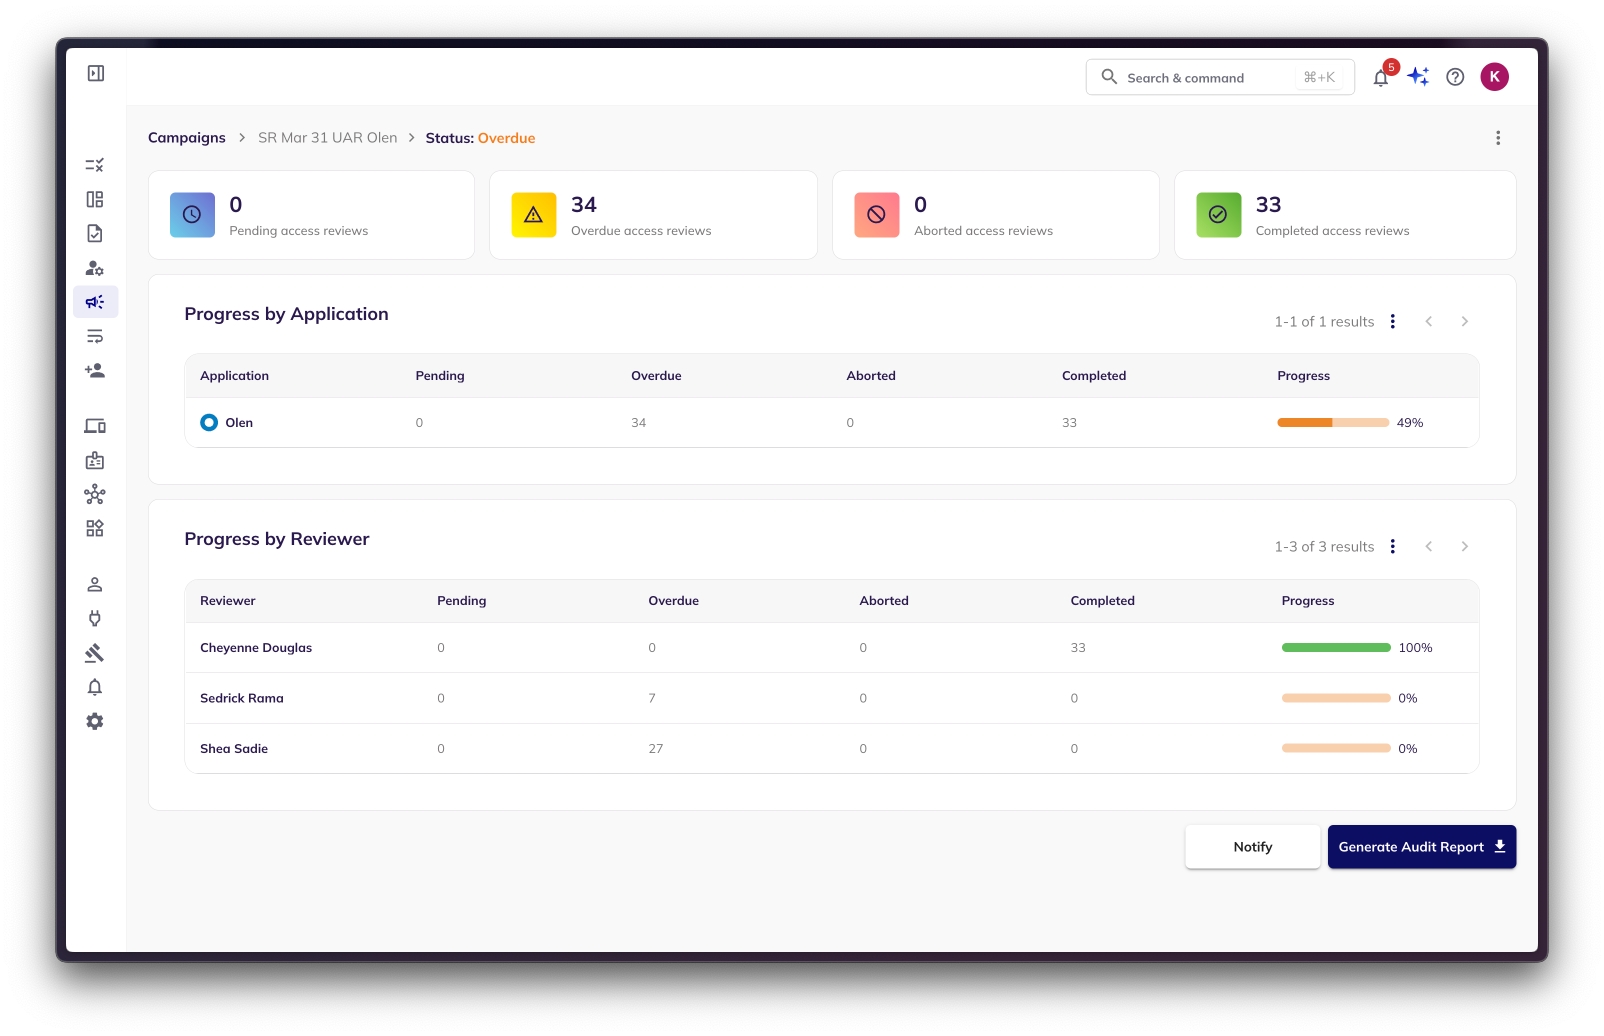
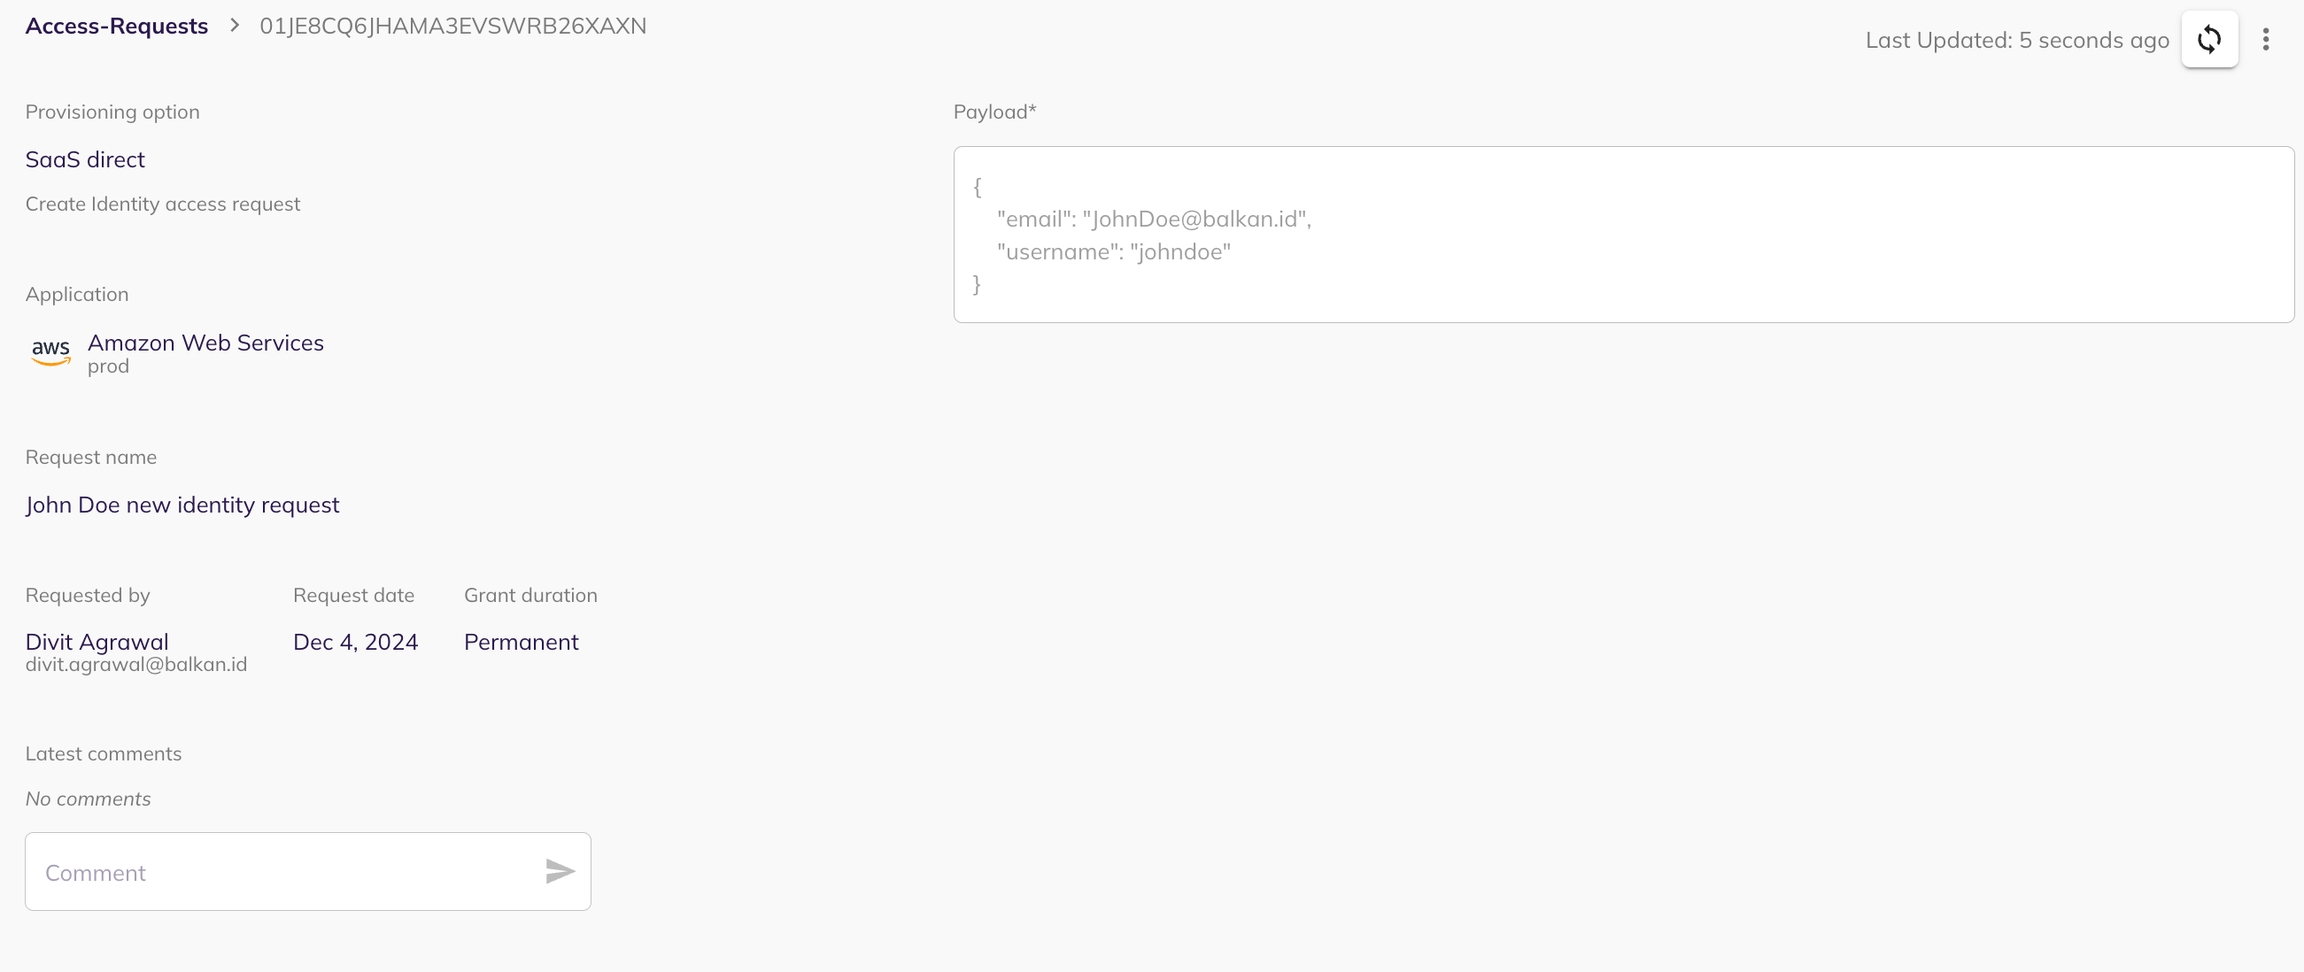
This section provides a detailed guide to integrating your applications with BalkanID. It's divided into two main parts: first, the general steps for integrating any application once you have its credentials, and second, specific instructions for obtaining credentials for each of the directly supported applications. If a particular integration that you are interested in is not in this list, BalkanID team can build those additional integrations for you. Typically new integrations take a couple of days to a week to be deployed in your environment.
Obtain the for your desired application by following the steps mentioned in the list of integrations below. Follow these steps to integrate it with BalkanID.
Login to the BalkanID application and switch to the tenant you would like to add your integration to.
Head to Integrations > Add Integration, select your desired application.
Need Assistance? Please reach out to [email protected] if you have any questions or need assistance configuring an integration. We are always available to help!
Each application listed below includes specific instructions on how to procure the necessary credentials (e.g., API keys, client secrets, access tokens) required to set up the direct connection within BalkanID. Once you have these credentials, follow the general integration steps outlined in the "Integrating a New Application" section above.
This list covers a wide range of categories, including project management & collaboration tools, cloud platforms & infrastructure services, version control & code management systems, CI/CD & DevOps tools, database & storage solutions, customer relationship management (CRM) systems, identity & access management (IAM) solutions, financial & business management tools, security & monitoring systems, and email & communication platforms.
If a particular integration you're interested in isn't on this list, the BalkanID team can build additional integrations for you. Typically, new integrations can be deployed in your environment within a matter of days.
Accelo
Adobe
Set up the Primary Application owner (mandatory) and the Description, if any. Set up Secondary Application Owner(s), if any.
If the only Extraction Type option you see is Direct Configuration, and you see a button labeled Get Access Token, jump ahead to step 7. Otherwise, continue on to step 6!
Select the Extraction Type and fill in the fields for successful extraction. From here, you can configure your application using one of the following methods:
Direct integration - Provide your application integration credentials to set up a direct connection between BalkanID and the application in question. You can refer to the application documents to get understand how to procure the tokens.
SCIM integration - Provide SCIM server credentials to set up a SCIM connection between BalkanID and the application.
Manual file upload - You may also upload application Entity and Entity Relations through a .CSV file upload. Contact the team for assistance with this.
Automated upload using API - You can upload data using our with the help of an API key which will be provided to you. Please refer to the application and upload docs for specific instructions on uploading your application data through the API.
Flow for integrations with the Get Access Token flow: Ignore this step if you already entered your app credentials in the previous step! Otherwise: go ahead and click the button labelled Get Access Token.
You'll find yourself on an informational page titled Balkan uses Truto to connect your account. Go ahead and click continue.
Follow the instructions on the subsequent screen! Depending on the application, it may ask you for an API Key and related information, or take you through an OAuth2 flow after clicking the Connect button.
Once connected successfully, you'll be brought back to the BalkanID page you were on previously, and the Access Token field would have been filled.
Click on next to move onto Optional Configuration.
Configure your fulfilment options as you see fit in this page. You can configure your multi-review settings here as well.
Once done, click on the "Save Changes" button. Your integration will process and extract your data in a few minutes. You can track the status of your integration from the snackbar we provide as shown in the below images.
You can view your application entitlement data once the status of application integration is "Connected" and you see the "Data Available" message in the table.
Adobe Marketo Engage
Adyen
Amplitude (SCIM)
Anthropic
Apollo
Asset Panda
Avigilon Alta
Avoma
BambooHR
Baremetrics
Basecamp
BigPanda
Bitwarden
Blackline
Boomi
Box
Brex
Britive
Buildkite
Calendly
Capsule
ClickUp
Cloudflare
CockroachDB Cloud
Coda
Confluent
Constant Contact
Contentful Content Management
Copper
CyberArk
CyberArk Identity Management
Dashlane
dbt Labs
DevRev
Dialpad
DockerHub
DocuSign
Domo
Drata
Drift
Duo
Enchant
Eventbrite
Figma
Fireberry
Fireflies.ai
Fountain
FreeAgent
Freshcaller
Freshchat
Front
FuseDesk
GitLab
Gladly
Gong
Google Ads
Google Analytics
Gorgias
Grafana
Greenhouse
HappyFox
Harvest
Hashicorp Terraform Coud
Height
Help Scout
Heroku
Highlevel
Hive
Hootsuite
Hubspot
Humaans
Illow
Insightly
Intercom
Ironclad
Jenkins
Jetbrains
Jira Service Management
Jostle
JustCall
Keap
Kommo
Kustomer
Lattice
Lemist
Lever
Linear
LiveAgent
LoanPro
Loxo
Lucid
Mailersend
Make
ManageEngine ServiceDesk Plus
Metabase
Microsoft 365
Microsoft Dynamics 365 Finance and Operations
Microsoft Dynamics 365 Sales
Microsoft Teams
miniOrange
Miro
Missive
Mixpanel
Mode
Monday.com
Moneybird
MongoDB Atlas Admin
Mural
Netlify
Notion
Nutshell
OneDrive
OpenAI
OpenVPN CloudConnexa
Oracle Fusion Cloud
Oracle Netsuite
Orca Security
Outlook Mail
Outreach
PagerDuty
PandaDoc
Peakon
PingOne
Pinpoint
Pipeliner
Platform.sh
Podio
Podium
PostHog
Postman
Power BI
ProdPad
Puzzel Case Management
Pylon
Qdrant Cloud
Qualtrics CoreXM
Quickbase for Project Management
Re:amaze
Redis
Render
Retool
Richpanel
Rippling
Robin
Rockset
Rollbar
Rootly
Sage Intacct
SailPoint Identity Security Cloud
SailPoint IdentityIQ SCIM
SailPoint NERM
Salesflare
SAP Concur
Scale AI
Seismic
SendGrid
Sentry
ServiceNow
ServiceNow SCIM
SharePoint
Shopify
Shortcut
Showpad
Sigma Computing
Sisense
Slab
Slack Enterprise
SmartRecruiters
SolarWinds Service Desk
SonarQube Cloud
SonarQube Server
SpotDraft
Sumo Logic
Supabase
Superchat
Survery Monkey
SurveySparrow
Tailscale
TalentLMS
TalentLyft
Talkdesk
Teamleader
TeamViewer
Teamwork CRM
Teamwork Desk
Teamwork Project Management
Teamwork Spaces
Tenable
ThoughtSpot
Trengo
Truto
Turso
Typeform
UserVoice
Vanta
Veeva Vault
Vidyard
Webex
Webflow
Wingman
Wiz
WordPress
Wrike
Xero
YouTrack
Youtrack Hub
Zapier SCIM
Zendesk Sell
Zeplin
Zoho Analytics
Zoho Bigin
Zoho Books
Zoho BugTracker
Zoho CRM
Zoho Desk
Zoho Meeting
Zoho Projects
Zoho Sprints
Zoho Vault
Zoom
ZoomInfo SCIM
Zscaler
Zscaler ZIA
Zscaler ZPA SCIM


Click the link below to download the CSV template for manual upload.
Before filling out the CSV, it's essential to understand the following key concepts.
In BalkanID, Entities are fundamental representations of identities, resources, connections, and insights within your system. They are designed to be flexible and can be extended to cover new data types (like logs) in the future.
We categorize the data extracted from your application integrations into the following core entity types:
Identity:
Represents a user or service account in your system.
Extracted directly from your application integrations.
Examples include individual users (e.g., "Alice Smith"), customer profiles, or different types of service accounts, each with unique access rights.
Entity relations describe how two entities are connected and interact with each other. They provide the context for how identities gain access to resources within your environment.
To illustrate, let's consider a GitHub integration example:
Scenario:
A user, "alicegh" (Identity) within a GitHub integration, belongs to the "Engineering" group (Connection). Because of her membership in "Engineering", Alice has access to two repositories: "customer-application" (Resource) and "admin-application" (Resource).
Entities Involved:
alicegh (Identity)
Engineering (Connection)
customer-application (Resource)
Entity Relations:
alicegh → Engineering
Meaning: Alice is a member of the Engineering group. This is a direct relationship.
Engineering → customer-application
Here’s the format that must be followed for Manual Upload CSV. Each column is described below, along with the required information.
Project
The Project represents the specific project or organizational unit where the entity relations belong. This could be an internal system (like a Jira project) or a cloud environment (like a GCP or Azure project). This field helps categorize the data based on projects or systems.
Example:
Refers to an Azure project or directory.
Required Fields: Ensure the following fields are filled for each entity:
Entity Name, Entity Type, Entity Source Type, Entity Source ID, Entity Has Access To Name, Entity Has Access To Source ID, Entity Has Access To Entity Type, Entity Has Access To Source Type.
Optional Fields: Fields such as Entity LastLoginTime, Entity Status, LastPasswordChangedTime
Login to your BalkanID tenant.
Go to the Configure > Integrations > Add Integrtion.
Choose the Custom App integration from the list.
Click on the Custom App.
Resource:
Represents the assets or services that users can access.
Extracted directly from your application integrations.
Can be anything from documents, databases, or reports to specific features within your applications.
Examples: a premium feature, a cloud storage bucket, an API service, or a specific repository.
Connection:
Represents the access provider that grants an Identity access to a Resource.
Derived from entities granted through your application integrations.
Often represents roles, groups, or memberships.
Example: If a user gains access to admin resources because they are part of an "Admin" role, then the "Admin" role serves as the Connection.
admin-application (Resource)Meaning: The Engineering group has access to the customer-application repository.
Engineering → admin-application
Meaning: The Engineering group has access to the admin-application repository.
alicegh → customer-application (Connection Provider: Engineering)
Meaning: Alice has access to customer-application because she is part of the Engineering group.
alicegh → admin-application (Connection Provider: Engineering)
Meaning: Alice has access to admin-application because she is part of the Engineering group.
The unique ID of the entity from the source system. Required.
63c16f61-d355-420b-87c6-615785ad8053
Entity - Has Access To Name*
The name of the entity being accessed. Required.
Admin
Entity - Has Access To Source ID*
The source ID of the entity or resource that the entity has access to. Required.
x1234567890abcdef
Entity - Has Access To Entity Type*
The type of the entity or resource the entity has access to (e.g., resource, connection, identity). Required.
connection
Entity - Has Access To Source Type*
The type of source system or entity that the Entity Has Access To belongs to (e.g., application, group, role, policy). Required.
group
Entity - Has Access To Permission Name
The permission granted (e.g., member, admin). Optional. Defaults to member, access if not filled.
member
Entity - Has Access To Permission Value
Whether the entity has access (boolean: true or false). Optional. Defaults to true.
true
Entity Status
The current status of the entity in the source system (e.g., inactive, active, suspended). Optional.
active
Entity First Name
The first name of the entity (required for users). Optional
Aabbott
Entity Last Name
The last name of the entity. Optional.
Reese
Entity LastLoginTime
The last time the entity logged into the system. Optional.
2023-12-14 04:42:12 +0000 UTC
Entity LastPasswordChangedTime
The time when the entity last changed the password. Optional.
2023-12-14 04:42:12 +0000 UTC
Entity MfaEnabled
Whether multi-factor authentication is enabled (boolean: true or false). Optional.
true
Entity Has Access To
This indicates the entity or resource the entity has access to. It could be another entity (like a group, role, channel) or a resource (like an application or app role). This relationship can be direct or mediated via a connection.
Example:
A user might have access to an application (BalkanID), or a group might have access to a policy.
CloudOps
john.developer
identity
user
AIDACKCEVSQ6C2EXAMPLE
john.developer
S3-Development-Bucket
arn:aws:s3:::dev-bucket-12345
s3:GetObject
True
active
John
Developer
2024-01-15 09:30:00 +0000 UTC
2024-01-10 14:22:00 +0000 UTC
true
resource
Consistency: Double-check all IDs (especially Source ID and Source IDs), as they are crucial for linking entities and their access relationships accurately.
Entity Username and Entity Email are optional fields. If these values are not provided, the mapping will not be done automatically. The user will need to handle the mapping of these fields separately using BalkanID Web App.
After clicking on the Custom App, you will be directed to the next screen. Simply fill in the required details and select the 'File Upload' option and Drag and Drop the File.
In case your CSV did not exactly match our format, you will be able to map your columns to our canonical format, and set any defaults as necessary.
Click on Confirm Mapping, and Next.
Click on Save Button. Your integration is now configured and you will see the status of the integration displayed alongside other integrations on the Integrations page. Integrations are synced daily. When data is available, the integration Status column will read Connected and the integration Message will read Data available.
Column Name
Description
Example
Project
The project or app where the entity relations belong. Can be a Jira project, Azure directory, GCP project, etc. Optional.
`BalkanID - Org
Entity Name*
The name of the entity, such as a user,group or application . Required.
Aabbott Reese
Entity Type*
The category of the entity: identity, connection, or resource. Required.
identity
Entity Source Type*
The term used for the entity in the source system (e.g., user, group, service account). Required.
user
Entity Source ID*
storage
CloudOps
DevOps-Team
connection
group
arn:aws:iam::123456789012:group/DevOps-Team
DevOps-Team
Admin-Console-Access
arn:aws:iam::123456789012:role/AdminConsoleRole
AssumeRole
True
active
false
connection
CloudOps
Database-Admins
connection
group
arn:aws:iam::123456789012:group/Database-Admins
Database-Admins
RDS-Full-Access-Policy
arn:aws:iam::123456789012:policy/RDS-Full-Access-Policy
PolicyAttachment
True
active
false
connection
CloudOps
Lambda-Execution-Role
connection
role
arn:aws:iam::123456789012:role/Lambda-Execution-Role
Lambda-Execution-Role
Lambda-Basic-Execution-Policy
arn:aws:iam::aws:policy/service-role/AWSLambdaBasicExecutionRole
PolicyAttachment
True
active
false
connection
CloudOps
EC2-CloudWatch-Role
connection
service_role
arn:aws:iam::123456789012:role/EC2-CloudWatch-Role
EC2-CloudWatch-Role
CloudWatch-Logs-Group
arn:aws:logs:us-east-1:123456789012:log-group:/aws/ec2/application
logs:CreateLogStream
True
active
2024-01-15 12:45:00 +0000 UTC
false
resource
CloudOps
Network-Operations-Team
connection
group
arn:aws:iam::123456789012:group/Network-Operations-Team
Network-Operations-Team
AWS-Management-Console
res_aws_console_001
console_access
True
active
false
resource
AzureOps
mary.analyst
identity
user
63c16f61-d355-420b-87c6-615785ad8053
mary.analyst
Power-BI-Dashboard
res_powerbi_dashboard_001
view_reports
True
active
Mary
Analyst
2024-01-14 08:15:00 +0000 UTC
2024-01-10 09:30:00 +0000 UTC
true
resource
AzureOps
Security-Team
connection
group
87654321-4321-4321-4321-210987654321
Security-Team
Security-Reader-Role
/subscriptions/sub-123/providers/Microsoft.Authorization/roleDefinitions/39bc4728-0917-49c1-b181-199c9e0c9e7e
RoleAssignment
True
active
false
connection
AzureOps
app-registration-service
connection
service_principal
12345678-1234-1234-1234-123456789012
app-registration-service
Key-Vault-Access
/subscriptions/sub-123/resourceGroups/rg-prod/providers/Microsoft.KeyVault/vaults/prod-vault
Key Vault Secrets User
True
active
2024-01-15 11:20:00 +0000 UTC
2024-01-05 16:30:00 +0000 UTC
false
resource
AzureOps
Compliance-Team
connection
group
grp_compliance_001
Compliance-Team
Audit-Management-System
res_audit_system_001
read_audit_logs
True
active
false
resource
AzureOps
Backup-Service-Role
connection
role
role_backup_001
Backup-Service-Role
Storage-Access-Policy
pol_storage_backup_001
PolicyAttachment
True
active
false
connection
CoreSystem
sarah.admin
identity
user
usr_sarah_001
sarah.admin
Admin-Dashboard
res_admin_dashboard_001
full_access
True
active
Sarah
Admin
2024-01-15 07:45:00 +0000 UTC
2024-01-08 10:15:00 +0000 UTC
true
resource
CoreSystem
System-Administrators
connection
group
grp_sysadmin_001
System-Administrators
Admin-Dashboard
res_admin_dashboard_001
full_access
True
active
false
resource
CoreSystem
HR-Access-Group
connection
group
grp_hr_001
HR-Access-Group
Employee-Data-Access-Role
role_employee_data_001
RoleAssignment
True
active
false
connection
CoreSystem
metrics-collector-service
connection
service_account
svc_metrics_001
metrics-collector-service
Monitoring-Data-Policy
pol_monitoring_001
collect_metrics
True
active
2024-01-15 13:15:00 +0000 UTC
false
connection
CoreSystem
Integration-Service-Role
connection
role
role_integration_001
Integration-Service-Role
External-API-Access
res_external_api_001
api_invoke
True
active
false
resource
CoreSystem
Network-Operations-Team
connection
group
grp_netops_001
Network-Operations-Team
Network-Configuration-Policy
pol_network_config_001
configure_network
True
active
false
connection
CoreSystem
Analytics-Team
connection
group
grp_analytics_001
Analytics-Team
Data-Warehouse-Access
res_data_warehouse_001
read_write
True
active
false
resource
CoreSystem
Backup-Operator-Role
connection
role
role_backup_operator_001
Backup-Operator-Role
Backup-Management-Console
res_backup_console_001
manage_backups
True
active
false
resource
CoreSystem
email-service-account
connection
service_account
svc_email_001
email-service-account
Email-Template-Policy
pol_email_template_001
send_email
True
active
2024-01-15 14:30:00 +0000 UTC
false
connection
CoreSystem
Document-Managers
connection
group
grp_docmgr_001
Document-Managers
Document-Management-System
res_doc_system_001
manage_documents
True
active
false
resource
CoreSystem
Report-Generation-Role
connection
role
role_report_gen_001
Report-Generation-Role
Report-Access-Policy
pol_report_access_001
generate_reports
True
active
false
connection
CoreSystem
Security-Audit-Team
connection
group
grp_security_audit_001
Security-Audit-Team
Security-Monitoring-Console
res_security_console_001
view_security_logs
True
active
false
resource
CoreSystem
Workflow-Automation-Service
connection
service_account
svc_workflow_001
Workflow-Automation-Service
Workflow-Execution-Policy
pol_workflow_exec_001
execute_workflows
True
active
2024-01-15 15:45:00 +0000 UTC
false
connection
CoreSystem
Identity-Management-Team
connection
group
grp_identity_001
Identity-Management-Team
User-Provisioning-System
res_user_provisioning_001
manage_users
True
active
false
resource


role
policy
policy
logging
application
application
role
security
application
policy
application
application
role
policy
api
policy
application
application
policy
application
policy
application
policy
application
The Access Review Management section outlines the process for overseeing and managing access reviews. It includes guidance on setting up and executing access review campaigns, performing reviews, and utilizing the campaign dashboard for effective management. The section also covers campaign audit reporting for tracking compliance, handling notifications and reminders, and configuring multi-level review settings for integration-specific and general campaigns. Additionally, it addresses managing recurring campaigns, handling campaign escalation, and nominating delegates.
Configuring access reviews and campaigns: Setting up your review campaigns, including defining multi-level review settings for both integration-specific and general campaigns, managing recurring campaigns, handling campaign escalation, and nominating delegates.
Tracking campaigns and performing access reviews: Monitoring the progress of campaigns and executing the review process.
: Generating reports to track compliance and review history.
: Managing alerts and prompts for reviewers.
Follow the instructions below to define and setup JITPBAC Constraints for your organization in BalkanID.
Navigate to the ‘Purposes & Constraints’ tab in the side navigation bar and open the 'Constraints' page. This page lists all the constraints that have been set up for your tenant.
To create a new constraint, click on the ‘Create Constraint’ button at the top left of the page. This action will open a new page where you can enter the details for the constraint.|
Fill in all the required (*) fields related to the constraint. Filling out the optional fields is not mandatory.
To add connections to the constraint, click on the ‘Add Connection’ button at the top right of the connections table. From the dialog that appears, select the connections you want to associate with the constraint.
To add users to the Constraint, click the 'Users' tab, then click the ‘Add User’ button at the top right of the users table. In the dialog that appears, select the users you want to associate with the constraint.
Once all details are entered and connections & users are selected, click on the ‘Save’ button to create the constraint.
The newly created constraint will then appear on the 'Constraints' page.


