> For the complete documentation index, see [llms.txt](https://docs.balkan.id/llms.txt). Markdown versions of documentation pages are available by appending `.md` to page URLs; this page is available as [Markdown](https://docs.balkan.id/getting-started/setting-up-your-tenant/application-integrations/direct-application-integrations/service-now-integration-setup.md).
# Service Now Integration Setup
### Getting Started
This guide walks you through provisioning a ServiceNow instance and configuring a secure OAuth 2.0 Client Credentials connection for BalkanID
### Requirements:
* ***Instance Name***
* ***Client ID***
* ***Client secret***
### Getting the Configuration
#### How to ***Instance Name***, ***Client ID***, and ***Client secret***
***
#### Phase 1: ServiceNow Configuration
Note - Validate that the following four plugins are installed. This can be done by navigating to `Admin -> Application Manager`, or by navigating to `sys_plugins.list` using the Filter Navigator (UI15/16). Please install any that are not installed.
* `OAuth 2.0` (com.snc.platform.security.oauth)
* `REST API Provider` (com.glide.rest)
* `Authentication scope` (com.glide.auth.scope)
* `REST API Auth Scope Plugin` (com.glide.rest.auth.scope)
*Note: From Washington DC environment all four were already installed*
#### Step 1: Enable the "Client Credentials" Flow
By default, ServiceNow blocks machine-to-machine OAuth for security. You must enable it globally first.
1. In the **Filter Navigator** (left sidebar), type `sys_properties.list` and hit Enter.
\
a. Search for: `glide.oauth.inbound.client.credential.grant_type.enabled.`
2. If the value is **false**, double-click it and change it to **true**.
3. *If it doesn't exist:* Click **New**, name it exactly that, set Type to `true/false`, and Value to `true`.
#### Step 2: Create the Service User
Every integration needs a "User Identity" to determine what data it is allowed to see.
1. Navigate to **User Administration > Users** and click **New**.
2. **Fill out the User form:**
* **User ID**: `balkanid_service`
* **Internal Integration User**: **Check this box** (Prevents password expiration and UI login).
3. **Submit** the record, then reopen it.
4. **Assign Permissions**: Scroll to the **Roles** related list at the bottom:
* Click **Edit**.
* Add `snc_platform_rest_api_access` (required for API access).
* Add `itil` (required to read role and group membership tables such as `sys_user_has_role`, `sys_group_has_role`, and `sys_user_grmember`).
* Add `admin` (required to read OAuth credential inventory from `oauth_entity` and `oauth_credential` for [ServiceNow credential discovery](/getting-started/entitlement-data-discovery/credentials-discovery/servicenow-credentials.md)).
* Add `sn_hr_core.admin` (standard HR Admin role to sync Employees and Employments from ServiceNow HRSD). To add this role, refer to the [**ServiceNow Enable HRSD** ](#servicenow-enable-hrsd)section at the end of this documentation.
* Click **Save**
#### Step 3: Create the OAuth Application
This creates the "Client ID" and "Client Secret" that BalkanID will use to identify itself.
#### OAuth Flow for old releases
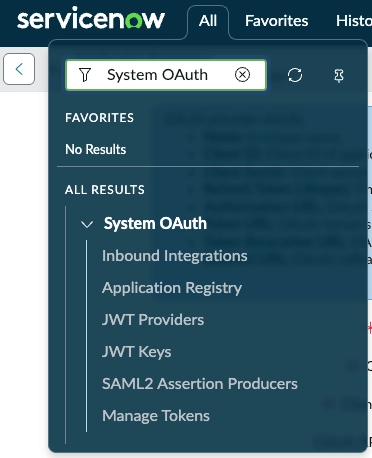
1. In the Filter Navigator, type **Application Registry** and navigate to **System OAuth > Application Registry**.
2. Click **New and Select “Create an OAuth API endpoint for external clients”**
3. **Fill out the form as follows:**
* Name: `BalkanID-app`
* **Client Type:** Choose any friendly label (your choice).
* **OAuth application user:** Select the OAuth application user from the dropdown. This should be the **Service User** you created earlier in Step 2 or the user with admin access.\
Note if you don’t see this as shown in below screenshot follow Step 4 to select the **OAuth application user.**
* **Client Secret:** Leave this fields **blank**. ServiceNow generates these automatically after you save.
4. **Save the Record**: Click the submit button.
5. **Retrieve Keys**:
Go back and find newly created OAuth Provide name “BalkanID-app” open it by clicking on name
* Copy the **Client ID**.
* Click the **Lock Icon** next to **Client Secret** to reveal and copy it.
#### OAuth Flow for new release (Zurich)
1. In the Filter Navigator, type Application Registry and navigate to System OAuth > Application Registry.
2. Click **New** and **New Inbound Integration Experience > New Integration >**\
\
**OAuth - Client credentials grant.**
3. **Fill out the form as follows:**
* **Name:** `BalkanID-app`
* **Provider name:** Choose any friendly label (your choice).
* **OAuth application user:** Select the OAuth application user from the dropdown. This should be the **Service User** you created earlier in Step 2 or the user with admin access.
* **Auth scope:** Choose the required scope from the list provided below.
* **Client ID / Client Secret:** Leave both fields **blank**. ServiceNow generates these automatically after you save.
1. **Save the Record**: Right-click the header and select **Save**.
2. **Retrieve Keys**:
* Copy the **Client ID**.
* Click the **Lock Icon** next to **Client Secret** to reveal and copy it.
#### **Step 4: Link the User to the OAuth App (The "Bridge")**
**This is the most critical step.** This tells ServiceNow: *"When BalkanID uses these keys, act as the `balkanid_service` user."*
1. Go back to your **Application Registry** record (`BalkanID-app`).
2. Locate the field **OAuth Application User**.
* *Note: If you don't see it, right-click the header > **Configure > Form Layout > move "OAuth Application User" to the right side > Save.***
3. Search for and select your **`balkanid_service`** user in this field.
4. Click **Update**.
#### OAuth credential read permissions
To discover **OAuth clients** and **OAuth tokens** in ServiceNow, the OAuth application user must be able to read `oauth_entity` and `oauth_credential` through the Table API. In most instances this requires the `admin` role on the service user created in [Step 2](#step-2-create-the-service-user).
Without read access to these tables, BalkanID still syncs users, groups, and roles, but OAuth credential inventory is skipped and the integration message may note that credential tables were unavailable.
{% hint style="info" %}
**Early Access:** [Credentials discovery](/getting-started/entitlement-data-discovery/credentials-discovery/servicenow-credentials.md) for ServiceNow requires **IGA for Non-Human Identities (NHI)** to be enabled for your tenant. For what BalkanID surfaces after sync, see [ServiceNow: Credentials](/getting-started/entitlement-data-discovery/credentials-discovery/servicenow-credentials.md).
{% endhint %}
BalkanID reads credential metadata only. Client secrets, token values, and password fields are never requested.
Required Table API access:
| Table | BalkanID credential type | Minimum service-user access |
| ------------------ | ------------------------ | --------------------------- |
| `oauth_entity` | OAuth client | `admin` (typical) |
| `oauth_credential` | OAuth token | `admin` (typical) |
#### AI Agent Studio agent read permissions
To discover **AI Agent Studio agents**, the instance must have the **Agentic AI** capabilities installed and the OAuth application user must be able to read agent inventory tables. Optional enrichment uses the AI Assets Inventory API when available.
If agent tables are unavailable (missing plugin, insufficient ACLs, or optional table read failure), BalkanID logs the skip and continues the identity and entitlement sync.
{% hint style="info" %}
**Early Access:** [Agents](/agents/introduction-to-agents.md) discovery must be enabled for your tenant, in addition to NHI. For what BalkanID surfaces after sync, see [ServiceNow: Agents](/agents/onboarding-agents/discovering-agents-from-integrations/servicenow-agents.md).
{% endhint %}
1. In the **Filter Navigator**, open **Plugins** and confirm **Agentic AI** (and related AI Agent Studio components) are installed on your instance.
2. Ensure the OAuth application user from [Step 2](#step-2-create-the-service-user) can read the agent tables below. Production ACLs vary by instance; `admin` on the service user is the typical starting point for pilot deployments such as AI Agent Studio inventory.
Required and optional reads:
| Table / API | Purpose | Required for agent sync |
| ------------------------------------------------------- | --------------------------------------- | -------------------------- |
| `sn_aia_agent` | Agent inventory | Yes |
| `sn_aia_agent_config` | Run-as user, model, execution mode | Yes |
| `sn_aia_tool_m2m` | Tool count metadata | No — skipped if unreadable |
| `sys_agent_access_role_configuration` | Agent → role access paths | No — skipped if unreadable |
| AI Assets Inventory API (`alm_ai_system_digital_asset`) | Governance enrichment (lifecycle, risk) | No — best-effort |
#### ServiceNow Enable HRSD
1. Login to your Servicenow instance ([https://{{instance}}.service-now.com](https://dev269449.service-now.com/))
2. In the **Filter Navigator** (left sidebar) search Plugins
3. Search for **Human Resources Scoped App: Core**
4. Install it and load the demo data if required
5. Then, Navigate to **User Administration > Users**\
Search for the Service User created in Phase 1 - Step 3
6. **Assign Permissions**: Scroll to the **Roles** related list at the bottom:
* Click **Edit**.
* Add `sn_hr_core.admin` (Required for Standard HR Admin Role to sync Employees, Employments from ServiceNow HRSD)
* Click **Save**.
#### ServiceNow Enable CustomerService
1. Login to your Servicenow instance ([https://{{instance}}.service-now.com](https://dev269449.service-now.com/))
2. In the **Filter Navigator** (left sidebar) search Plugins
3. Search for **Customer Service Management**\
**Plugin id**: `com.sn_customerservice`
4. Install it and load the demo data if required
5. Then, Navigate to **User Administration > Users**\
Search for the \*\*\*\*Service User created in Phase 1 - Step 3
6. **Assign Permissions**: Scroll to the **Roles** related list at the bottom:
* Click **Edit**.
* Add `sn_customerservice.customer_admin` and `sn_customerservice.customer`\
(Required for Standard Customer Admin Role)
* Click **Save**.
#### Configure integration within your BalkanID tenant
1. Login to the BalkanID application and switch to the tenant you would like to add your integration to.
2. Head to *Integrations* > **Add Integration**, select **ServiceNow.**
3. Set up the *Primary Application owner (mandatory)* and the *Description*, if any. Set up Secondary Application Owner(s), if any.
Select the Extraction Type. From here, you can configure your application using one of the following methods:
1. **Direct integration** — Provide your **Instance name**, **Client ID**, and **Client secret** obtained above to set up a direct connection with BalkanID.
2. **SCIM integration** - Provide SCIM server credentials to set up a SCIM connection with BalkanID.
3. **Manual file upload** - Upload Entity and Entity Relations through a .CSV file upload. Contact the team for assistance with this.
4. Click on next to move onto *Optional Configuration.*
5. Fill **Optional configuration,** if required.
6. Once you filled in the information, click **Save**. Your integration is now configured and you will see the status of the integration displayed alongside other integrations on the *Integrations* page. When data is available, the integration Status will read **Connected** and the integration Message will read **Data available**.
Use **Data Sync Preferences** to control which entity types are extracted (users, groups, roles, OAuth clients, OAuth tokens, insights, and AI agents).
### Integration Scopes
| **Read Only (Access Review) Scopes** | **Lifecycle Management Scopes** |
| -------------------------------------------------------------------------------------------------------------------------------------- | ------------------------------- |
| `snc_platform_rest_api_access` (role) | — |
| `itil` (role) — group and role membership tables | — |
| `admin` (role) — OAuth credential tables (`oauth_entity`, `oauth_credential`) | — |
| Agentic AI / AI Agent Studio table read access — see [AI Agent Studio agent read permissions](#ai-agent-studio-agent-read-permissions) | — |
---
# Agent Instructions
This documentation is published with GitBook. GitBook is the documentation platform designed so that both humans and AI agents can read, navigate, and reason over technical content effectively. Learn more at gitbook.com.
## Querying This Documentation
If you need additional information that is not directly available in this page, you can query the documentation dynamically by asking a question.
Perform an HTTP GET request on the current page URL with the `ask` query parameter, and the optional `goal` query parameter:
```
GET https://docs.balkan.id/getting-started/setting-up-your-tenant/application-integrations/direct-application-integrations/service-now-integration-setup.md?ask=&goal=
```
`ask` is the immediate question: it should be specific, self-contained, and written in natural language.
`goal` is optional and describes the broader end goal you are ultimately trying to accomplish on behalf of the user. GitBook uses it to tailor the answer towards what is most useful for that goal.
The response will contain a direct answer to the question and relevant excerpts and sources from the documentation.
Use this mechanism when the answer is not explicitly present in the current page, you need clarification or additional context, or you want to retrieve related documentation sections.